
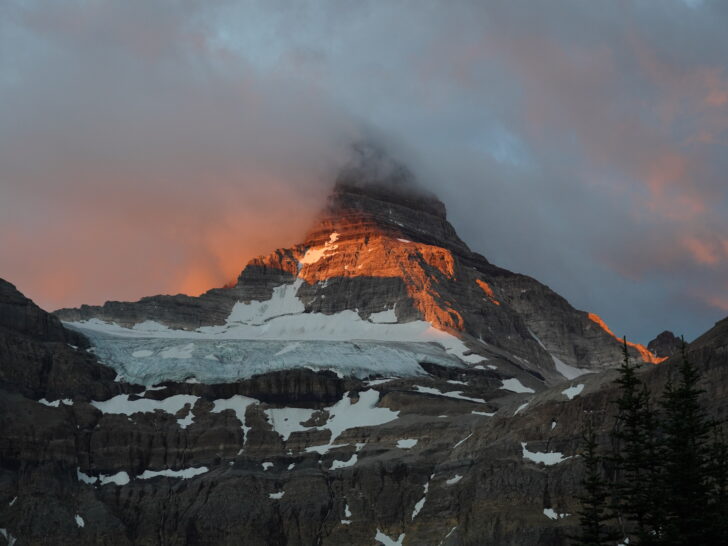
Mount Assiniboine is one of the more challenging backpacking trips in Canada. But with proper planning it is truly an adventure of a lifetime.
Getting to Mount Assiniboine is anything but straight forward. There are many different trails, accommodation styles, and even a unique mode of transportation. So in this backpacking guide, we will cover everything you need to know, so your trip is a breeze.
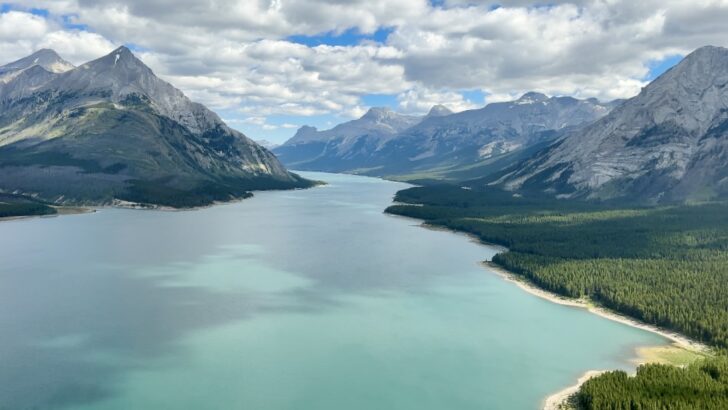
Mount Assiniboine is located deep into the heart of Mt Assiniboine Provincial Park, but you pass through other parks just to get there. It’s actually right on the border of British Columbia and Alberta Canada.
Whats certainly unique about Mount Assiniboine, is you can get here via foot, or by helicopter. But regardless, you are really in the backcountry with one of the most surreal scenes.
So let’s dive into all the details for backpacking to Mount Assiniboine.
Be Sure To Leave No Trace: When exploring these treasured outdoor spaces, you are responsible for understanding and following Leave No Trace Guidelines. Most importantly: pack out all garbage, travel only on trails and durable surfaces, and follow local rules for campsites and human waste disposal.
This post may contain affiliate links. Disclosure policy.
Trailheads & Different Routes
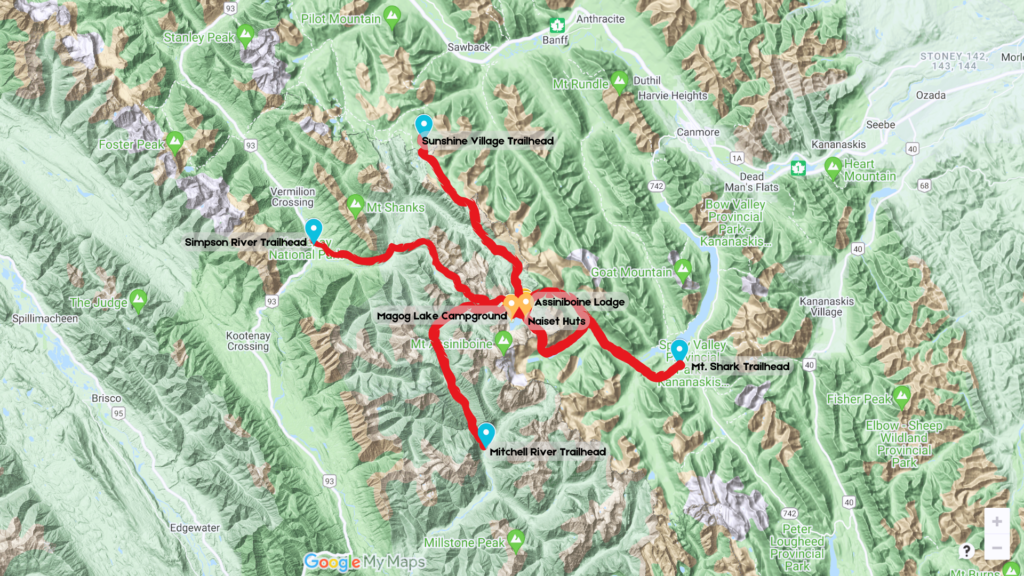
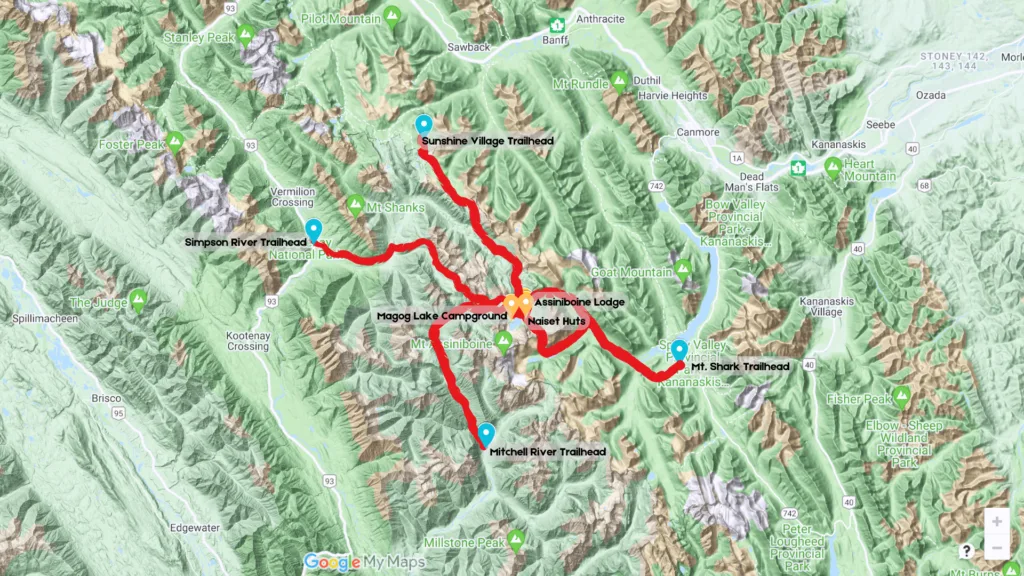
There are a 4 different trailheads that you can launch from:
- Mt. Shark
- Sunshine Village
- Simpson River
- Mitchell River
No matter which route you choose, each trail is long and challenging.
The two most popular routes leave from Mt. Shark & Sunshine Village. And there are even a few different routes from Mt. Shark.
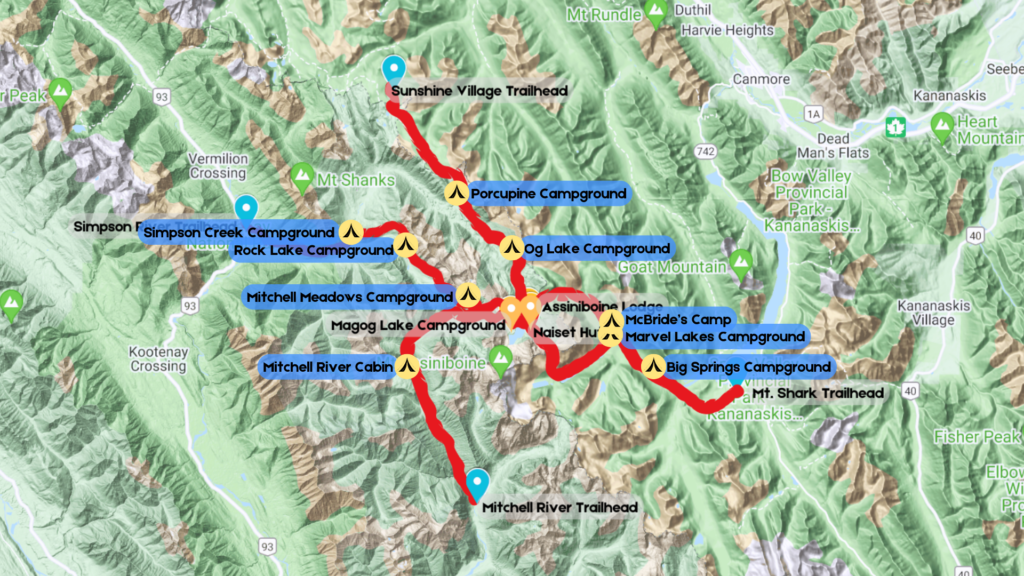
Here is a helpful map of all the trailheads (blue), midway campgrounds (dark red), and main accommodations near Mount Assiniboine (orange).
Hiking Trails To Mount Assiniboine
All hike distances are one way.
- Mt. Shark Trailhead to Mt. Assiniboine
- Wonder Pass – Distance: 27km (16.9mi) , Elevation: 488m (1601ft)
- Assiniboine Pass – Distance: 25.4km (15.8mi), Elevation: 322m (1,056 ft)
- Assiniboine Pass Horse Trail – Distance: 24.9km (15.5mi), Elevation: 878m(2,880ft)
- Sunshine Village To Mt. Assiniboine (Citadel Pass)
- Distance: 27.2km (16.9mi), Elevation: 1010m (3,313 ft)
- Simpson River To Mt. Assiniboine
- Distance: 30.7km (19.1mi), Elevation: 1045m (3,428 ft)
- Mitchell River To Mt. Assiniboine
- Distance: 30km (18.6mi), Elevation: 335m (1,100ft)
There are a few other routes, but these are the main trail options hikers might consider.
Mount Shark to Mount Assiniboine
There are multiple ways to hike to Mount Assiniboine from the Mt. Shark Trailhead.
Wonder Pass
Mount Shark Trailhead to Mount Assiniboine via Wonder Pass is the route Jake and I personally took. So it’s really the only route we can talk about from experience. The hike is 27km with 652m of elevation gain (16.9mi, 2139ft elevation).

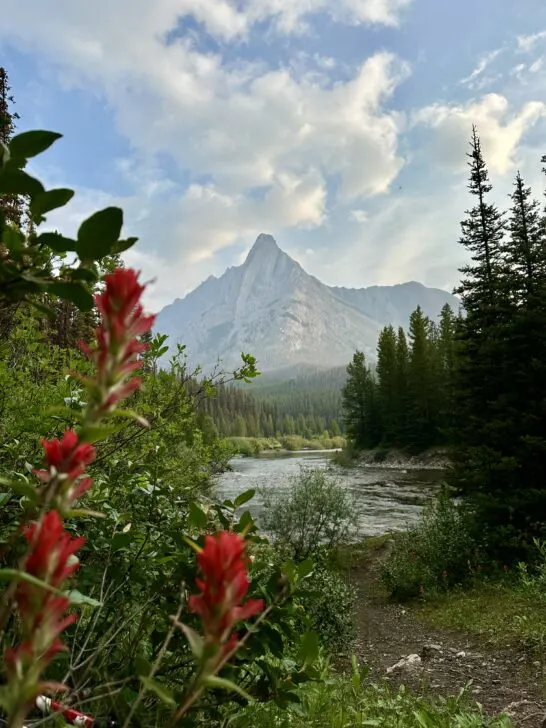
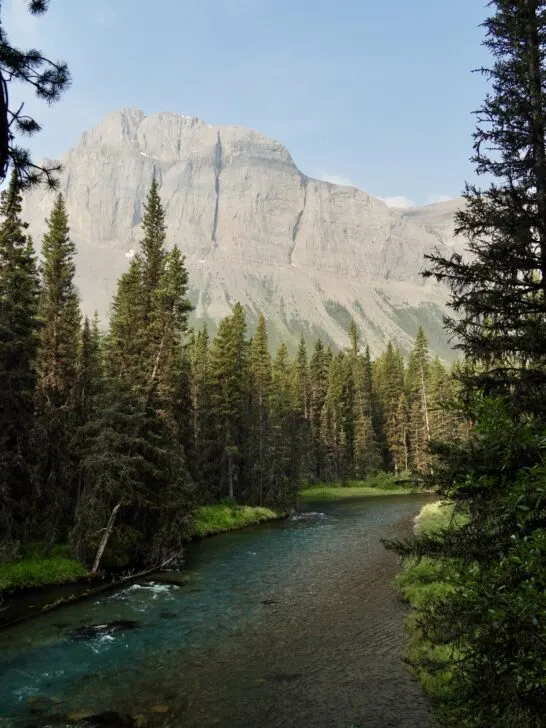
The trail starts along a flat, gravel dirt road, but of course, cars are not allowed to drive this section. It’s mostly in the trees, but there are still a few impressive views along the trail.
The trail gradually starts to climb as you hike along Marvel Lake. Once you near the end of the lake, this is where the true elevation of this hike begins as you acend up Wonder Pass.

While the climb is steep, it’s short in comparison of the length of the hike. So just dig deep here, because the views at the top of Wonder Pass are breathtaking.
You climb along beautiful meadows (bonus during wildflower season mid-July & August) encompassed by the surrounding mountains. Then, you reach the last decent to the base of Mount Assiniboine.
Assiniboine Pass (Upper & Lower)
I found that this trail goes by a couple different names. But these two trails are known to be the easiest ways to get to Mount Assiniboine. There isn’t a ton of elevation in this trail as it skirts around Wonder Peak.
The lower Assiniboine Pass Trail also doubles as a horse trail, so you may encounter horse dung.
The upper Assiniboine Pass Trail is a Grizzly Cooridor, and has a closure from August 1-September 30.
Also note that the helicopters follow this route, so this may be annoying if you are hiking on their flight days (more on this later).
Can You Use A Bike From Mt Shark Trailhead?
Bikes are allowed on the first 6.5km (4mi) of the Mt. Shark Trail. But there are signs clearly marked letting you know bikes are no longer allowed. Since the trail basically follows a road, this can be a faster way to complete the first part of the hike.
But, of course, you need to be comfortable riding a bike with a heavy pack or have another bikepacking setup for carrying your gear. And you will likely want to bring a lock so you can secure your bike to a tree.
Sunshine Village To Mount Assiniboine
This trail starts from the Sunshine Village Ski Resort. You can either choose to hike up the mountain, or you can pay for a gondola ride.
The 27-kilometer hike from Sunshine Village to Mount Assiniboine assumes you are taking the gondola.
Without the gondola, it adds another 6km (3.7mi) in distance and 600m (1969ft) or elevation. Thus making it the longest of all the popular routes.
Sunshine Gondola ticket prices start around $68+ CAD per person for the Sunshine Gondola. Alberta Residents get a 25% discount. Do note, the gondola only runs from 8:00am – 6:00pm. So you will need to plan the start of your hike within that time frame if you plan to use the gondola.
The hike climbs starts through a beautiful alpine meadow, then meets up with thick trees, and eventually climbs over Citadel Pass.
Simpson River To Mount Assiniboine
This is another route to get to Mount Assiniboine. But the trail is known to be a bit overgrown and not very well-maintained. It also passes through a burned forest.
There are a few different routes after the Rock Lake Campground and as you near the core area.
You might find it helpful to read recent reviews from the Simpson River Trailhead to Suprise Creek Campground to see how the trail conditions are maintained throughout the year.
This area is also known to have an increase in grizzly bear activity.
Mitchell River To Mount Assiniboine
This is the least traveled route to Mount Assiniboine. The trail is not well-maintained, and crosses through a mine. You will need to get permission to park here and walk through their property. The trail is said to cross the river, but you can also skirt the river through some bush wacking.
You should definitely have a GPS and good map to help navigate this route.
Be Bear Aware
The Mount Assiniboine area is in true Grizzly Bear Country! Every group should have at least one bear spray, but ideally one per person. (You can buy or rent bear spray from outfitters in Banff or Canmore.)
Be sure to learn, or brush up on bear safety before setting off on the trail. Here are a few key things to know about bear safety:
- Always carry bear spray and know how to use it
- Make loud noises and talk loudly while hiking
- Never leave food unattended
- Properly store your food and scented items using approved methods (bear box, bear hang, bear canister, etc)
- Never run from a bear (calmly give them space, while continuing to talk)
There are different tactics to use if attacked by black bears versus grizzly bears. If a black bear attacks, flight back with everything you have. But for a grizzly bear, you want to play dead and hopefully it moves on. BUT… If the bear continues to attack and not move on, then… you fight back with everything you have!!!
Seasonal Wildlife Closures & Restrictions
It’s important to note, that some of these trails have seasonal restrictions or closures to protect wildlife.
- Upper Assiniboine Pass: No Access August 1 – September 30
- Allenby Pass Trail: Restricted to groups of 4 or more people
Learn more about these closures & restrictions in the area.
Mid-Trail Campgrounds

Personally, we feel the hikes in to Mount Assiniboine should be broken up into two days. And luckily there are many stops along the way to help achieve that.
Here are a few great mid-way campgrounds to stop at on your way to Mt. Assiniboine:
- Mt. Shark to Mt. Assiniboine:
- Big Springs Campground (permit required)
- Marvel Lakes Campground (permit required)
- McBride’s Camp (permit required)
- Sunshine Village to Mt. Assiniboine:
- Porcupine Campground (permit required June 21st to Sept 30th)
- Og Lake Campground (permit required year-round)
- Simpson River Trailhead to Mt. Assiniboine:
- Simpson Creek Campground (aka Suprise Creek Campground)
- Rock Lake Campground
- Mitchell Meadows Campground
- Mitchell River to Mt. Assiniboine:
- Mitchell River Cabin
If you don’t land a camping permit for Magog Lake. You might consider staying at Og Lake or Mitchell Meadows and day hiking to Magog Lake.
Accomodation At Mount Assiniboine
Something exceptionally unique to Mount Assiniboine is the different styles of accommodation. You can choose from camping, huts, cabins, and lodge rooms. But price differs significantly.
Magog Lake Campground

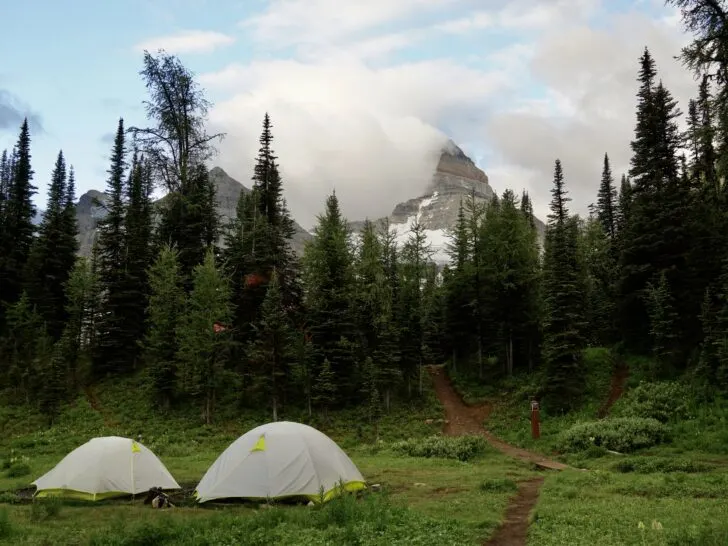
Tent camping at Magog Lake Campground is the budget-friendly option at Mount Assiniboine. But don’t worry, you aren’t exactly slumming it.
They have level tent pads, shelters for cooking, outhouses where they provide toilet paper, a water tap (although you still need to filter it), grey water filter, bear boxes, and bear hangs.
While each campsite is numbered, there’s a lack of signage around the campground to show which sites are where. While it might not seem like a huge deal, when you are exhausted, the last thing you want to do is spend forever finding a vacant site. I recommend taking a photo of the campground map to help navigate.
Personally, we liked campsites 35-40 because they are the only ones with clear views of Mount Assiniboine. However they are in an open field, so there is less privacy and little shade from trees.
Bear Safety Around Camp
To minimize negative bear encounters, all cooking needs to be done at the shelters located around the campground. And all food and scented items should be stored in the bear boxes/hangs, or otherwise carried on you during the day.
Water Spout
There is a water spout near each shelter, but it needs to be filtered or boiled for drinking.
Or you can get water from the stream at the farthest East end of the campground. It also needs to be boiled of filtered before drinking
Our favorite backpacking water filter is the Platypus Gravityworks. You can read our full review here.
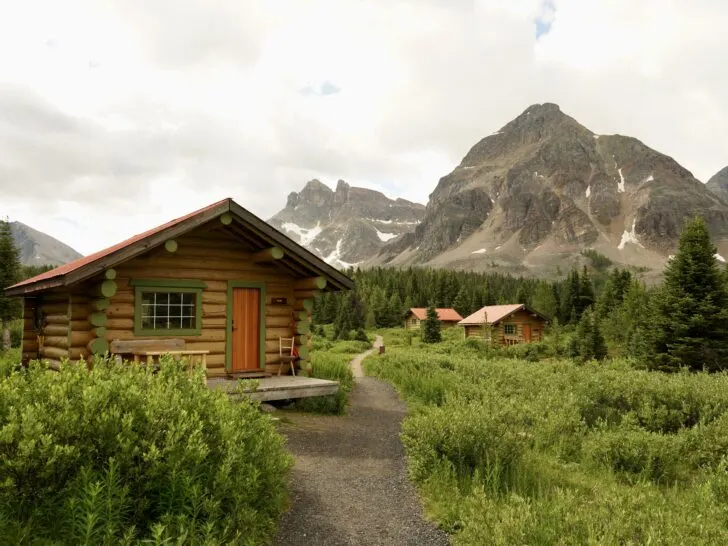
Assiniboine Lodge
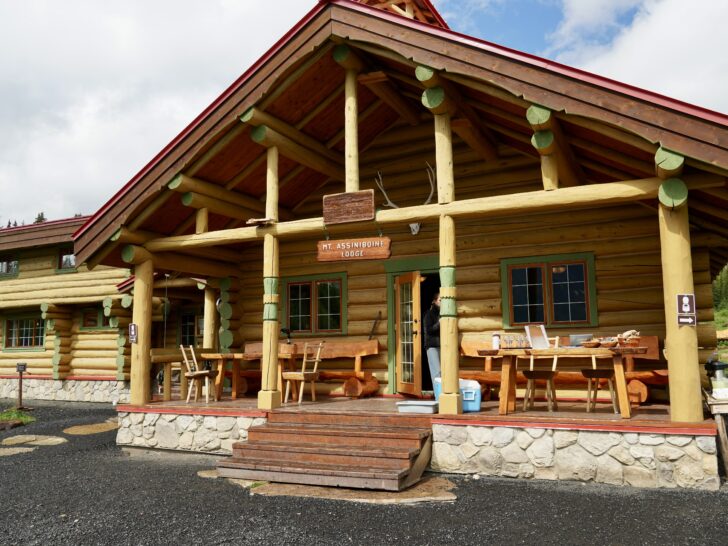
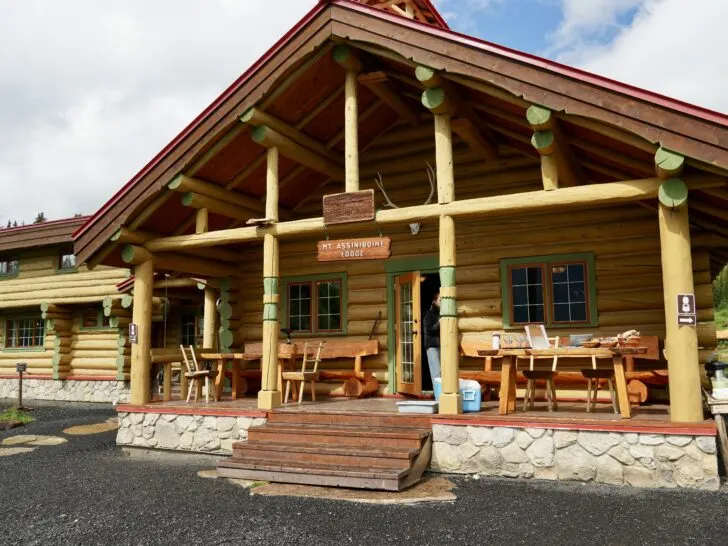
The more luxurious stay is at the Assiniboine Lodge. There are rooms in the lodge itself or in individual cabins. Prices range from $465+ CAD/person per night. Plus all meals and afternoon tea are included.

Guests have access to running water. And flush toilets at night. There are communal showers and a sauna.
Guests also have access to full and half-day guided hiking tours on non-helicopter days.
Bookings are made by filling out a booking request form starting August 1-31 (the prior year). There is a waitlist (email info@assiniboinelodge.com) or you can call them directly (403-678-2883) to find out if there are any cancellations.
- Lodge Room (5 rooms available): $465-$680 CAD/person per night + 6.2% tax
- Cabins (5 cabins available, sleeps 3-5 people): $465-$575 CAD/person per night + 6.2% tax
- Children (2-12yrs): $240 CAD/person per night + 6.2% tax
Naiset Huts

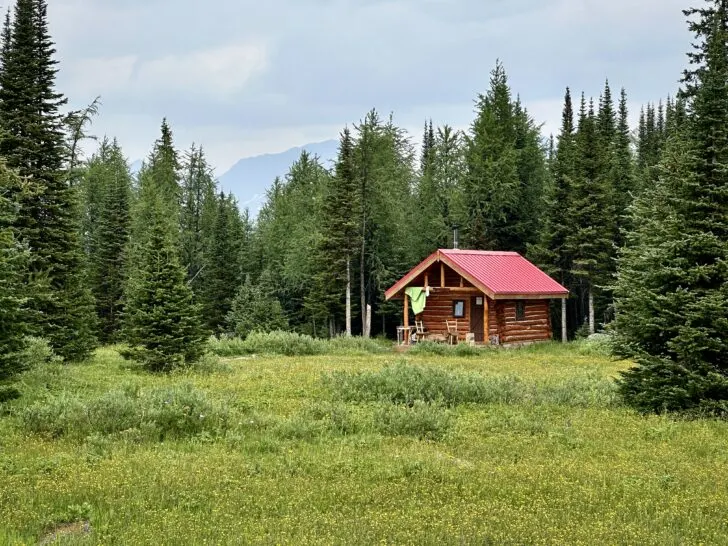
There are five backcountry huts which sleep anywhere from 5 to 8 people. The huts are the middle tier option, more rustic than the lodge/cabins, but still a step above tent camping. Prices range from $150-$240+ CAD/night. You must book the entire hut.
Bookings are available starting January 14 from 8:30am – 2:30pm Mtn Time. You can only book by phone only (403-678-2883).
- Arnica (Sleeps 5), $150/night
- Jonesy (sleeps 6), $180/night
- Forget-Me-Not (sleeps 6), $180/night
- Fleabane (sleeps 8), $240/night
- Aster (sleeps 8), $240/night
Hind Hut
The Hind Hut is ONLY for EXPERIENCE CLIMBERS. This hut can fit up to 10 people. This hut is a little easier to book, and doesn’t book out super in advance. Mainly because people only want to use this hut if the climbing conditions are in good condition.
You can find more information about both of these huts on the Assiniboine Lodge Page.
Backpacking Permits For Magog Lake
Overnight permits are required at Magog Lake and for most campgrounds along the popular routes. And you may need additional parking permits (more info below).
Backcountry Camping Permits for locations in British Columbia (such as Magog Lake and Og Lake) are available on the BC parks website up to 4 months in advance, often booking quickly for peak summer months.
We find the ‘calendar view’ to be the easiest way to see what’s available. Permits cost $10 CAD per night per adult, plus a transaction fee of $6 per tent pad per night, (maxing out at $18).
Permits for location in Alberta (such as Big Springs, Marvel Lakes, and Mcbrides Camp) are available on the Parks Canada Website. Permits cost $13.50 CAD per night per adult, plus a transaction fee of $11.50 for each booking.
If you don’t see your desired dates available, check back diligently for cancellations. That’s how we scored our permits just a couple days before the trip.
Or you can check out paid subscriptions like Campnab or Schnerp that can help you score sold out permits. We haven’t personally used them, but heard very good success stories from others.
The most sought after camping permits are for Magog Lake Campground, right at the base of Mt Assiniboine. It’s a great base camp for exploring some of the best trails in the area. So most trips are structured around getting here. We highly suggest booking at least 2 nights here, so you have time to explore the other trails around camp.
Most backpacking itineraries should plan for two days to hike in and out of Mt Assininoine Park. There are mid-way campgrounds along the trails to break it up into more manageable distances. (We will include some ideal itineries below.)
Parking Passes
You may need an additional parking pass if you plan to park at the trailhead, depending on the route you choose.
National Parks Pass
If you plan to park at the Sunshine Village parking lot, then you will need a Banff National Park Pass.
Or if you plan to hike from Simpson River or Mitchell River, you will need a Kootney National Park Pass.
Prices start around $11 CAD per person per day. Or you might consider the annual discovery pass, which costs $75.25 CAD per person. Or $151.25 CAD for a family pass (up to 7 people).
Learn more about the Discovery Pass
Kananaskis Conservation Pass
If you plan to park at Mt. Shark Trailhead or helipad, you will need to purchase a Kananaskis Conservation Pass. It costs $15 CAD per day or $90 CAD annually. You need to purchase a pass for every day you plan to be in the park.
Learn more about the Kanananaski Conservation Pass
Tea-Time
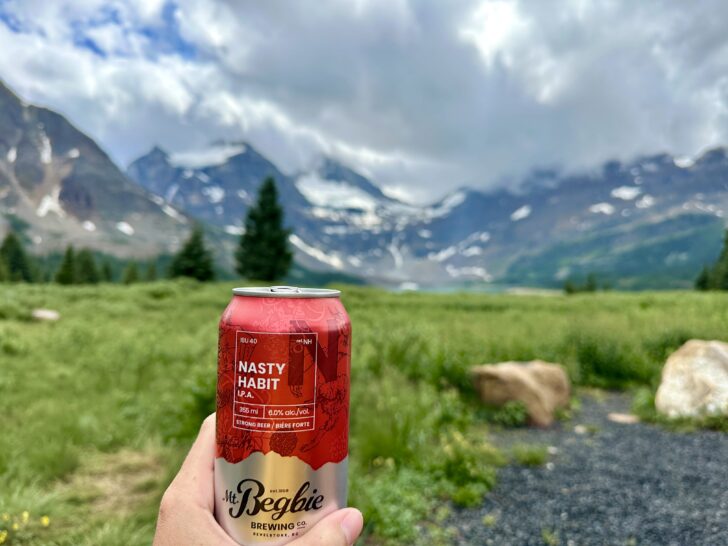

One of the coolest things about Mount Assiniboine, is the lodge puts on tea time for non-lodge guests from 4-5pm. So stop by to grab a pasty, tea, wine, or our favorite item on the menu, an ice cold beer!
While they do accept credit cards, they prefer cash! And don’t forget to bring extra for a tip!
Also the mosquitoes at Tea Time were the worst we experienced on the entire trip.
Helicopter Transfers

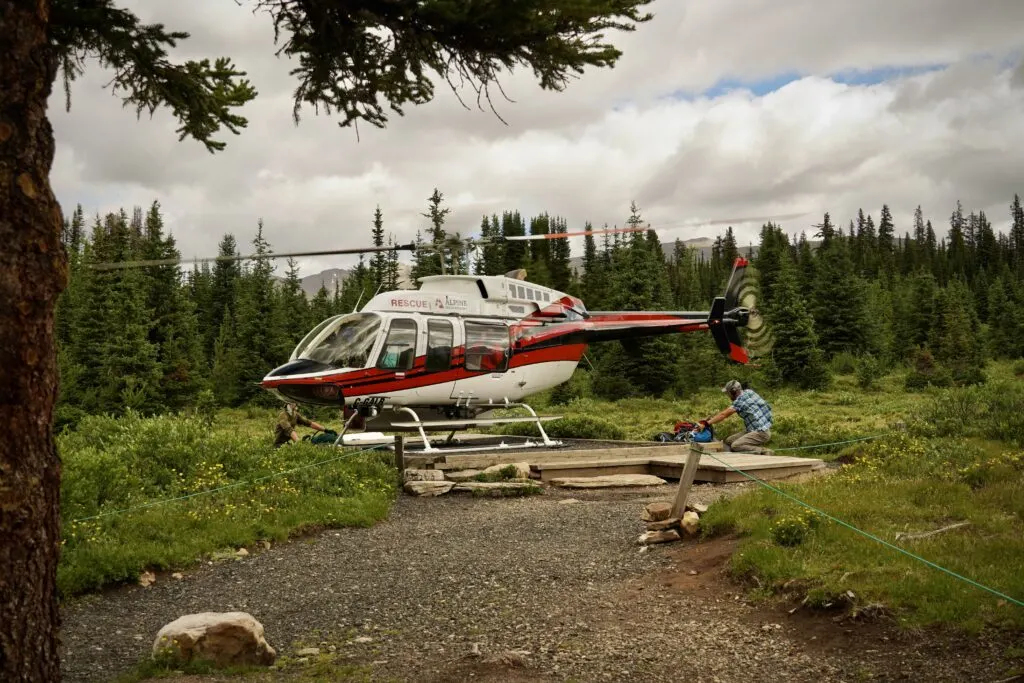
Flights are offered to and from Canmore and Mt. Shark.
Flights are offered on Wednesday, Friday and Sunday, or on long weekends they fly on Monday instead of Sunday.
Prices from Canmore: $245 CAD/person one way + 5% tax
Prices from Mt. Shark: $215 CAD/person one way + 5% tax
Each person is allowed to bring 40 lbs. Any pound over is an additional $10.
To book the helicopter, you must have a camping/hut/or lodge reservation, therefore, you can’t use the helicopter for one day visits.
One thing to note is that the Mt. Shark Helipad is not quite at the Mt Shark trailhead. The hike is 1.4 km (.86mi) from the helipad to the parking lot.
Flying Just Your Gear
If you still wish to hike, but want to lighten your load, you can just fly your gear to and from the Mt. Shark or Canmore helipad locations.
It costs $5 CAD per pound (up to 40lbs). $10 CAD per additional pound over 40lbs.

Honestly, we’re a little conflicted about the helicopters here.
Obviously, a parade of helicopters is quite disruptive to the peaceful nature. Especially for people hiking the trail on flight days.
But on the flip side, it makes the park more accesible to people who otherwise aren’t physically fit enough to hike in. Or in our case it was one of the reasons we could realistically pull off our 2 night itinerary on such short notice.
Ideal Backpacking Itineraries
We made the mistake of hiking Mt Shark to Magog Lake all in one day, and we honestly regret that. It was really hard on our bodies, and kind of made us less excited to hike around the area.
So we suggest at least breaking the hike up, into two days on the way in, to help break up the distances and leave you more energy for exploring the core area.
Sunshine Village to Mt. Assiniboine Itinerary
- Day 1 – Sunshine Village (ride gondola up)
- Camp at Og Lake (permit required)
- Day 2 – Hike to Mt Assiniboine
- Camp at Magog Lake (permit required)
- Day 3 – Hike Nub Peak, Nublet, and Niblet
- Camp at Magog Lake (permit required)
- Day 4 – Hike to Porcupine Campground
- Camp at Porcupine Campground
- Day 5 – Head back to car
Mt. Shark to Mt. Assiniboine Itinerary
- Day 1 – Start from Mt Shark Trailhead
- Camp at Marvel Lakes Campground (permit required)
- Day 2 – Hike to Mt Assiniboine via Wonder Pass
- Camp at Magog Lake (permit required)
- Day 3 – Hike Nub Peak, Nublet, and Niblet
- Camp at Magog Lake (permit required)
- Day 4 – Hike to Big Springs Campground via Assiniboine Pass
- Camp at Big Springs Campground
- Day 5 – Head back to car
Sunshine Village to Mt. Shark Thru-Hike Itinerary
Trip can also be reversed.
- Day 1 – Sunshine Village (Shuttle Car to Mt. Shark Trailhead)
- Camp at Og Lake (permit required)
- Day 2 – Hike to Mt Assiniboine
- Camp at Magog Lake (permit required)
- Day 3 – Hike Nub Peak, Nublet, and Niblet
- Camp at Magog Lake (permit required)
- Day 4 – Hike to Wonder Pass to Marvel Lake
- Camp at Marvel Lakes Campground
- Day 5 – Head to Mt. Shark Trailhead (Shuttle car back to Sunshine Village)
Shuttle From Mt. Shark to Sunshine Village (Vice Versa)
There is no scheduled shuttle from Mt. Shark to Sunshine Village (or vice versa). But you could consider using a taxi to shuttle your car.
One shuttle company in the area is Three Sisters Taxi. You will need to call ahead to coordinate and get a quote.
Additional Tips

Join The Facebook Group
There is a public Facebook Group where fellow backpackers can ask questions, trade campsites, learn about trail conditions, find hiking partners, etc.
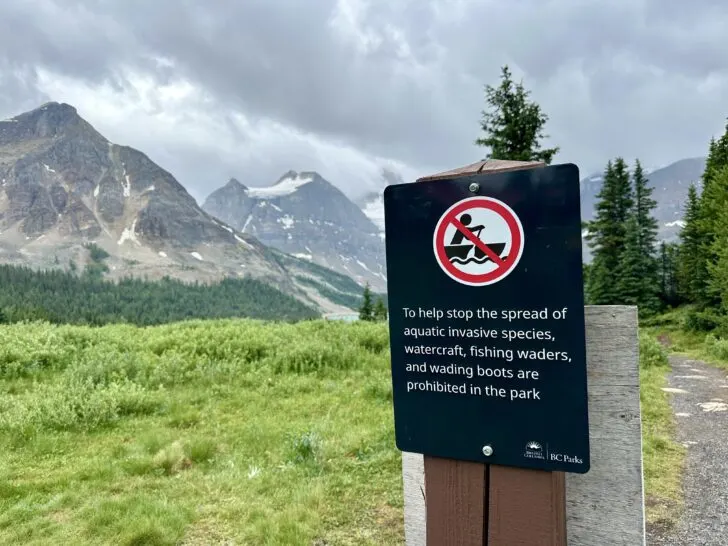
Watercrafts Are Not Allowed
Unfortunately, you can’t use watercraft in the surrounding lakes because of whirling disease. Which is a microscopic parasite, which infects fish through their skin.
Bugs
During the summer months, it can be exceptionally buggy on the trails and near the lake. Plan to bring bug spray, and a head bug net. Some backpackers reported a thermacell working well at camp.
Check out our favorite insect repellents.
Plan For All Types Of Weather
The weather changes often in the mountains. So plan for all types of weather. It can even snow in the summer! While it might be sunny and beautiful during the day, a storm can roll through and drop the temperature many degrees.
Packing Considerations For This Trip

We have an entire post dedicated to what to bring on a backpacking trip. Check that out for a simple guide to packing for a backpacking trip, plus a helpful checklist.
But I want to note some packing considerations for this trip in particular.
Trekking poles have basically become something we wouldn’t consider leaving behind on any backpacking trip. They were especially helpful for navigating uneven terrain and helping take some of the strain off you lower body. (We love our Trail Buddy Poles, they are cheap but still very durable).
Microspikes can be very helpful in spring or when snow is prevalent.
Bear spray is a MUST! Be sure you know how to use it.
A bear canister is needed because bear boxes are provided.
Tent pads are provided, but you will still want a ground sheet to protect from rain.
Like mentioned above, weather changes drastically in the mountains. You may want to pack for both a summer and a winter trip. Such as a beanie, gloves, neck buff, warm jacket, etc.
Save This Post For Later