

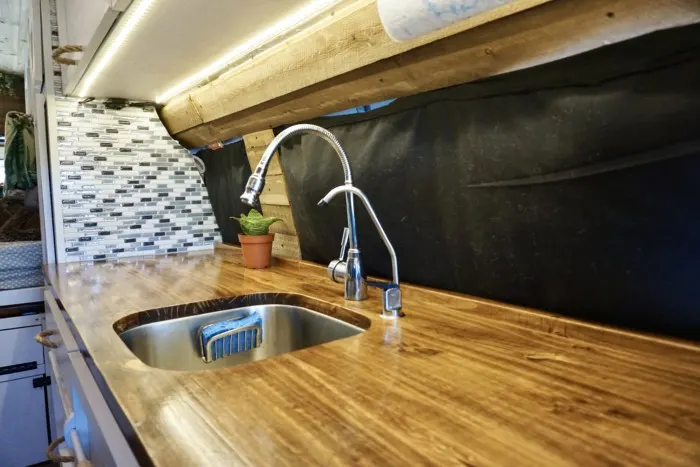
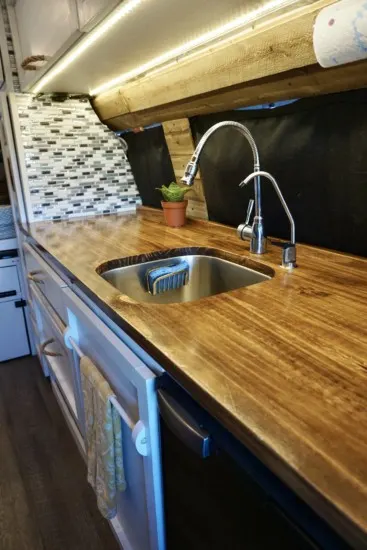
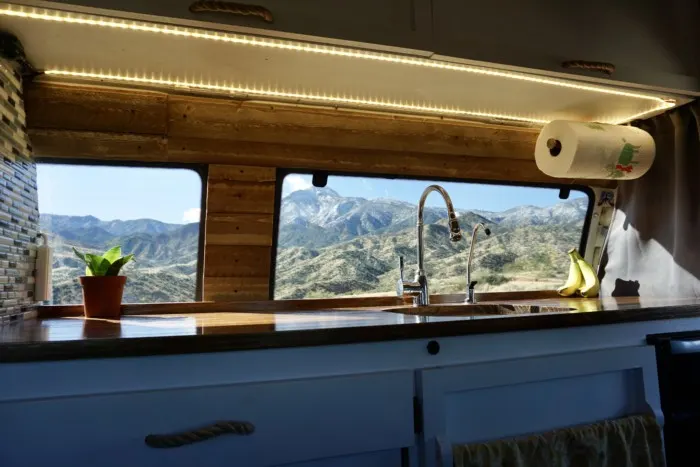
Our campervan kitchen is headlined by our DIY wooden countertop. The kitchen countertop is an important focal point of any kitchen. It commands so much visual power in determining the look of a kitchen.
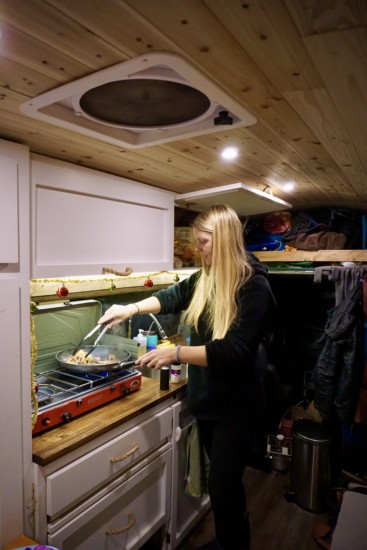
And functionally, it serves as a platform for cooking all kinds of delicious meals. And in a campervan it also usually serves as the bathroom counter, a workspace, and more.
Beautiful stone or wooden countertops can be like works of art, but they often carry a price tag to match. And they can be much too heavy for a van conversion.
To build a countertop that is beautiful and lightweight, but also resilient and affordable is quite a challenge.
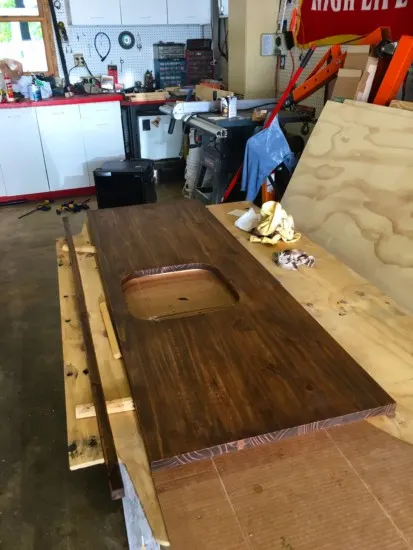
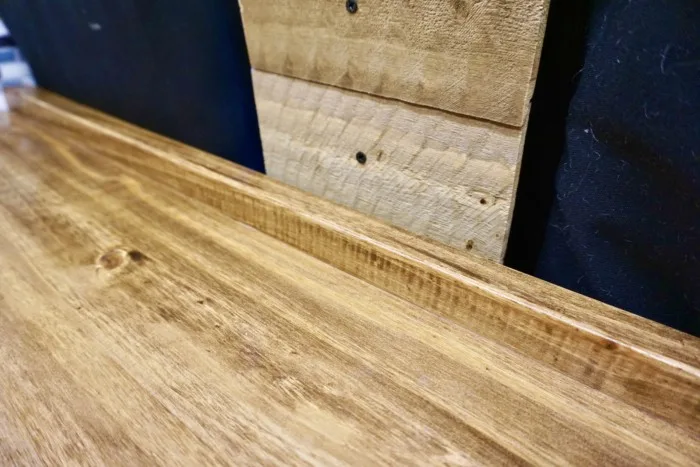
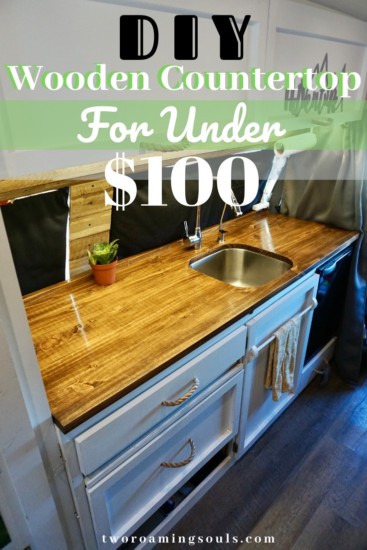
So to address this problem, we designed our own DIY wooden countertop. Our affordable design is a beautiful focal point of our campervan kitchen. The finished piece showcases the intricate wood grain, and holds up well against repeated use.
This post may contain affiliate links. Disclosure policy.
Time:
10-20 Hours (spread out over 3-5 days)
Materials:
- Edge-glued Board (such as this pine board)
- Sandpaper (120,220,400)
- Wood Stain
- Wood Pre-Stain Conditioner
- High Gloss Polyurethane
Tools:
- Table Saw or Circular Saw
- Jigsaw
- Rags
- Bristled Paintbrush
- Power Drill
USING POWER TOOLS CAN BE DANGEROUS!
Make sure you know how to safely operate any tools I mention so that you still have enough fingers for a high-five once the project is done.
Choosing the Wood
The first and most important step is choosing a piece of wood for your DIY wooden countertop. Home improvement stores have a variety of products called “edge-glued board” or “edge-glued panel”. Basically, it’s several pieces of wood glued together into a large board for furniture or other projects.
The majority of the cost for this project will depend on the type of wood that you buy, and how big it is.
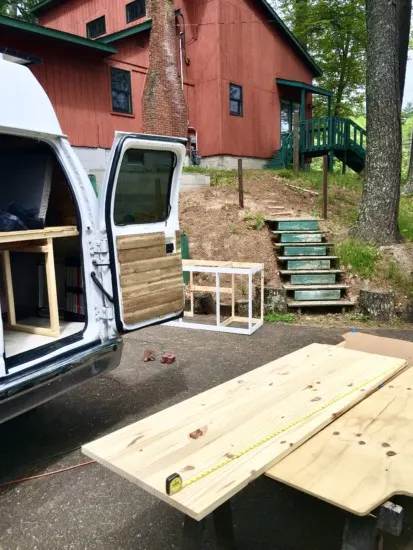
Begin with the size countertop you want (length, width, and thickness). Figure out how much space your van layout allows for your countertop. Also consider how much space is needed for the things you want to add (sink, stove, etc.), and then size the countertop accordingly.
I recommend choosing a product with a nominal thickness around 1”.
Just keep in mind that there’s a discrepancy between nominal dimensions and actual dimensions. Wood is normally sold in categories by nominal dimensions. For example, everyone has heard of a 2″ by 4″, but many people don’t know that almost all 2″ by 4″s are actually only 1½ by 3½ inches.
Now when it comes to selecting the actual piece of wood, it’s important to be picky. Wood from home improvement stores can be really hit or miss. So it’s good to carefully inspect a piece of wood before you buy it.
Look for glaring imperfections like warping, dents, gouges, inconsistent dimensions, or excessive knots. It can be helpful to hold one edge up to your eye and look down the length of the wood. This helps you to see any warping, twisting or bending in the wood. And nearly all wood will deform a little bit over time, so starting with the best piece possible is key.
We used this edge-glued pine board from Menards. Pine is by far the most affordable wood species. But the disadvantage is that it’s very soft, so it’s easily scratched or dented. But in the last step, we coat and protect the wood with polyurethane which helps to provide more strength and durability to the DIY wooden countertop.
If you have a larger budget, you could purchase a similar product made with harder wood species, like birch, oak, maple, etc. The trade-off is obviously a higher price tag, and more weight if that is an important factor in your van build.
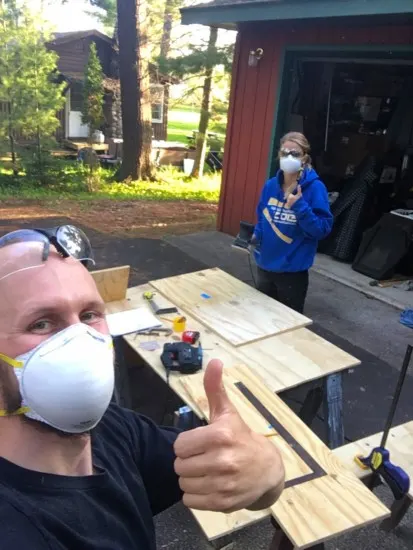
Cut The Wood To Size
The next step is to cut your piece of wood to the size you need. A table saw is by far the best tool for the job. You can pass the wood across a table saw to easily make one clean cut. Make sure you measure twice and cut once.

Some things to keep in mind…
The cut you make will probably not be as perfect as the factory edges. So plan to use the factory edge as the front of your countertop. And any imperfections or blade marks with your cut will be hidden on the backside.
You can use the extra wood that you cut off to make a backsplash like we did.
A common convention for kitchen countertops is to have the countertop overhang on the front. If you want this style, be sure to cut your countertop deeper than your kitchen cabinet frame (about an inch or so).


Cut Out Any Holes Needed
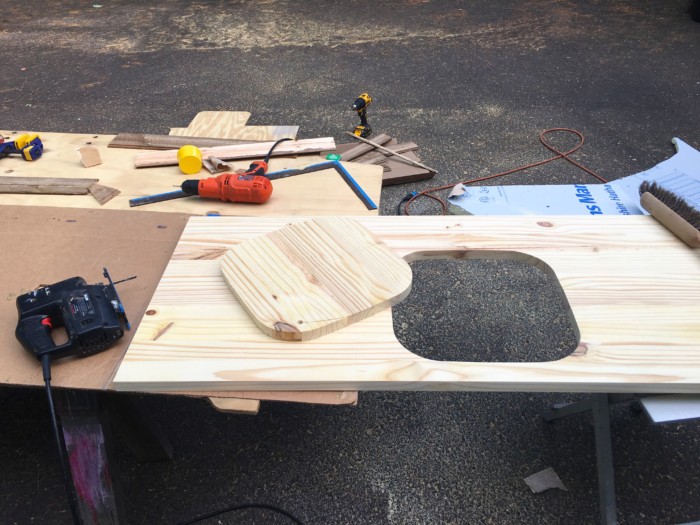

If you are going to install a sink or stove in the DIY wooden countertop, you should cut the holes for those. Use the sink/stove itself to outline in pencil where you want it to go. Or you can make a template with paper or cardboard, and use that to trace out the hole.
It is possible to cut holes after the countertop has been finished, but I don’t recommend it, because you will waste time sanding, staining, and finishing wood that will ultimately be cut out.
Then use a power drill to drill a starter hole for the jigsaw blade. Choose a drill bit that makes a hole big enough for your jigsaw blade to fit through. Then use your jigsaw to cut out the hole you marked in pencil. Thick wood is a challenge for jigsaws, so go slowly and patiently. Going slow will also help you follow the line more closely.

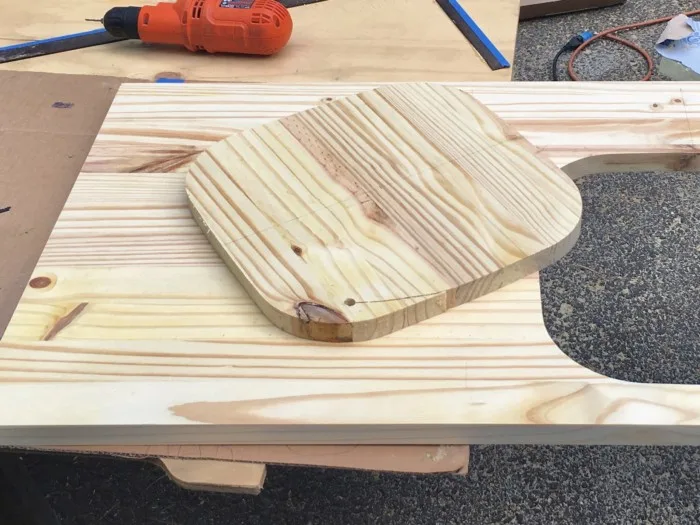
Keep in mind that if you choose an under-mounted sink like ours, you should be extra careful when cutting the hole because the edges of the wood will be visible from the top. This puts a lot more pressure on you to make a clean and precise cut. A conventional “drop-in” sink will cover up any imperfections when it’s installed.
The only holes we cut after the countertop was completely finished were the small holes for our faucet and drinking water.
Sand The DIY Wooden Countertop

This is when we make the rough piece of wood as smooth as a baby’s bottom. This step is a little tiresome, especially if you have a really big countertop because every inch needs to be sanded over several times. The technique is to start with a really rough sandpaper grit like 80 or 120, and then work your way up to 220 grit.
Make sure you wear a dust mask because you don’t want to get any wood dust, glue, or chemicals into your lungs.
You can use an orbital sander to help with the process, but I would only use it for the finer grit sandpaper. They tend to be too aggressive for delicate jobs.

Important!
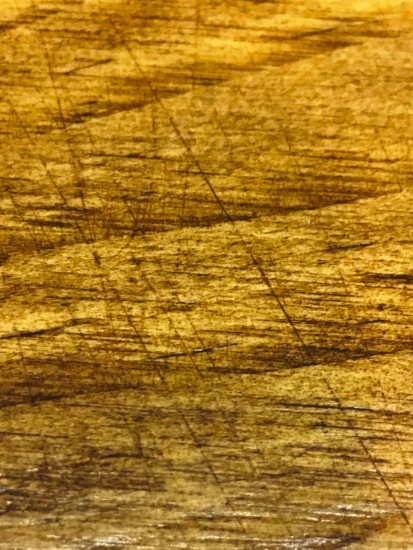
Only sand in the same direction as the wood grain. (Your strokes should go parallel with the lines in the wood). If you sand across the grain, you will leave ugly scratches that will reveal themselves after staining. We made this mistake, and it was a bummer that the finished product had scratches running perpendicular to the grain. And it only took a little bit of cross-grain sanding to mess it up. So learn from our mistake and ONLY sand with the grain.

80 Grit
I would only use 80 grit sandpaper if you have some really rough areas left from cutting out your sinkhole. Just use 80 grit to shape awkward spots so they are roughly smooth.
120 Grit
120 grit sandpaper is coarse enough to smooth out moderately rough areas, but fine enough not to remove too much material. Sand the entire piece with 120 grit until it’s as smooth as you can get it.
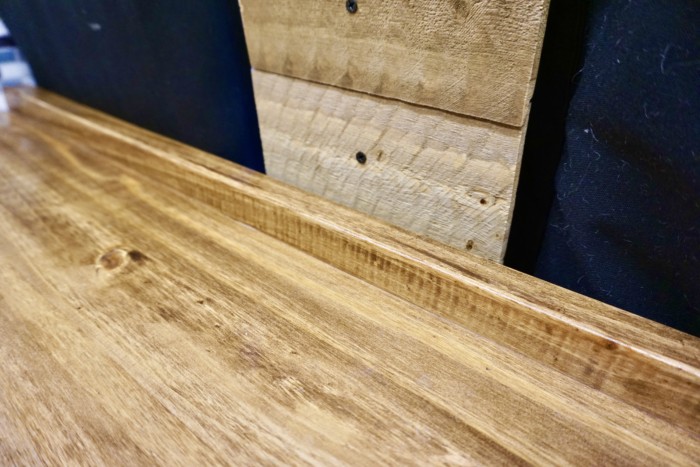
Then if you like, you can use the 120 grit to round edges. This is somewhat a matter of preference and you could leave all your edges perfectly square. However, most people prefer the edges to be rounded just a bit. We rounded the front edges and our backsplash to give them a softer, less aggressive look.
Achieving a uniform look does require special attention when sanding by hand. The key is to apply even sanding time, pressure, and technique to each area.
My technique is to make long (but comfortable) strokes back and forth while working your way from the top of the edge to the side. Count out a number of strokes, and then move to the next section completing the same exact number of strokes. This is the best way to achieve and even round your edges. Inspect your work, and touch up any areas that don’t appear uniform.
Then wipe down the whole countertop with a clean rag to remove dust and any leftover sandpaper grit.
220 Grit
Use 220 grit for the final step of sanding. It will leave the wood feeling incredibly smooth to the touch. Sand the entire piece with 220 until it’s as smooth as you can get it. Still, make sure you sand with the grain.
Then wipe down the whole countertop again with a clean rag to remove dust and any leftover sandpaper grit.
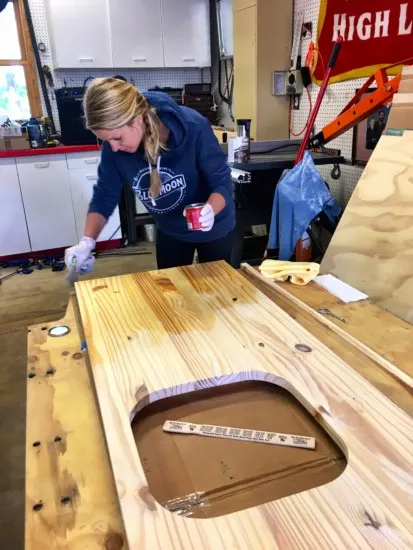
Stain the DIY Wooden Countertop
Staining wood is strictly cosmetic, so it’s not totally necessary. And sometimes people enjoy the nice bright white and yellow tones of pine. Or if you splurged for a more expensive wood species than pine, your wood may already have some nice color to it. And it’s totally fine to leave your DIY wooden countertop looking true to the colors of the wood itself.
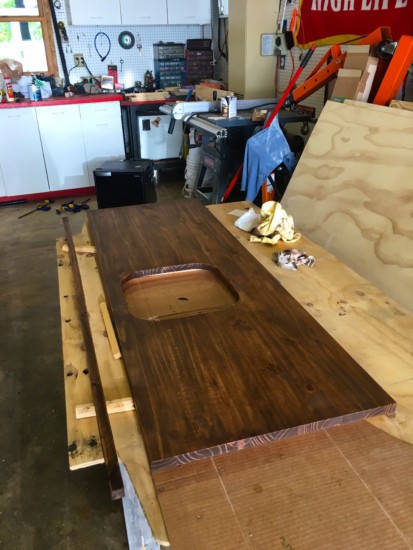
But we wanted to add a dark brown stain to give the counter more contrast against our white cabinets. We chose this dark walnut stain to achieve a rich dark color. The stain makes the wood grain really pop, and gives an amazing character to the knots.
But before staining softer woods, like pine, it’s important to apply a pre-stain wood conditioner. This helps the stain absorb more evenly. Without it, the results are very splotchy. Just dab the corner of a rag into the wood conditioner and apply a light even layer over the entire piece of wood. (You can skip the bottom because it won’t be seen, but make sure you wrap around the edges, especially the front edge if it will hang over).

It’s a good idea to raise your DIY wooden countertop on wooden blocks so you can better access the edges, and so it dries faster.
Then apply stain to the wood by following all the instructions on the can. Dip part of a rag into the stain and then spread the stain into the wood. You can skip areas that won’t be seen like the middle of the underside. Go as lightly as possible, because you can always apply more to darken the color. But it’s really hard to make the stain lighter.
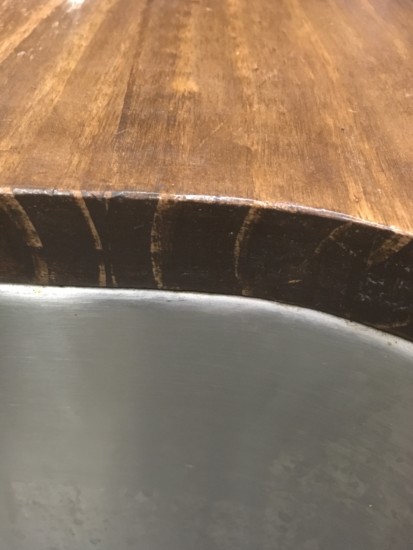
We found that just a single coat of the “dark walnut stain” was enough to give our pine countertop the desired color. And just be aware that the end grain of the wood absorbs a lot more stain than the surfaces. You can see how the edges around our sink are much darker than the rest.

The longer you leave the stain, the deeper the color will penetrate. After the stain has set for a while, use a clean rag to try to rub as much stain off the wood as possible. Keep rubbing the wood until all the stain is either absorbed or rubbed off. Use a clean rag to verify that no more stain is coming off.
Then let the stain set for 12-24 hours.
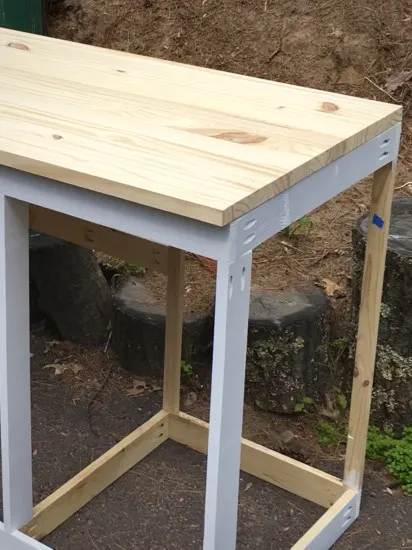
Attach Backsplash To The DIY Wooden Countertop
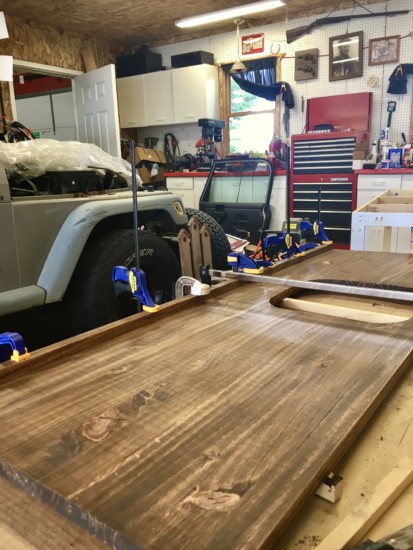
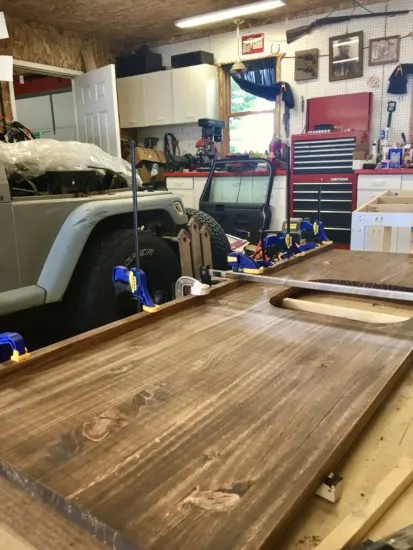
If you have chosen to use the extra wood for a backsplash, you should sand and stain it alongside the rest of the countertop. Then use wood glue and clamps to attach the backsplash to the back edge of the DIY wooden countertop.
Apply Polyurethane Finish
This final finish is important for providing a protective coating to your wood. It will make your DIY wooden countertop water resistant, scratch resistant, and dent resistant. The two main types of polyurethane for wood finishing are water-based and oil-based.
I recommend using oil-based polyurethane because it’s generally cheaper, and requires fewer coats. But it should be noted that oil-based poly will add an amber hue to your wood. You can see how our countertop transitioned from a dark brown to a more yellow-ish brown.
Otherwise the differences between water-based and oil-based are pretty nit-picky. Both are good options. And within both types you can choose the sheen of your finish from a very shiny “gloss” to “semi-gloss” to a non-shiny “satin” finish. I recommend “gloss” because it is the most durable.
But whichever you choose, make sure you apply the appropriate number of coats (water-based = 3-7, oil-based 2-4). I recommend going towards the higher end of those ranges, especially if you are using a softer wood like pine. And follow the instructions on the can for dry times in between coats, taking into account the humidity.


Polyurethane should be applied with a bristle paintbrush. However, the brush stroke technique is much more controlled than slapping on a coat of paint. The goal is to limit the number of overlapping strokes, so you should try to avoid stopping and starting as much as possible.
Dip the brush deep into the poly to fully load up with the bristles and then make a long deliberate stroke with the grain of the wood. Then repeat, picking up where your last stroke ended.
Ideally, you only pass over each section one time within each coat. Think of a perfectly mowed lawn, where the mower makes a snaking pattern to methodically cut every inch of the lawn. If you miss a little spot, don’t try to dab poly into it, you will have a chance to get it on the next coat.
Be extra careful when applying poly to the edges of your DIY wooden countertop. It’s best to make sure your brush isn’t too saturated when doing the edges to avoid awkward drips and overlaps.

Polyurethane has chemical odors, so be sure to have good ventilation where you work. However, try to limit dust or other airborne debris because it can land on wet polyurethane and dry into the layers.
In between coats of polyurethane, it’s recommended to sand lightly with 220 grit sandpaper, but 400 grit is even better. Once the coat has dried, sand with the grain of the wood to remove any dust nibs and prepare the surface for better adhesion with the next coat.
Then allow the countertop to dry for 48-72 hours while the polyurethane cures
Takeaway | DIY Wooden Countertop

The final product is a stunningly beautiful DIY wooden countertop that looks like it costs hundreds of dollars. It’s decently durable for the price and doesn’t require that many tools or skills to complete. And it will be even more special when you build it yourself.
We have been using our countertop every day for over 7 months and it’s been amazing.
The only negatives are some minor ridges that have formed in a couple of spots where the boards meet. But some amount of settling and deforming is to be expected. And there are a few minor dents and scratches from use. But again, for the price, we weren’t expecting our countertop to be absolutely bulletproof.

Overall, we love the countertop. It makes our kitchen look and feel like a real home. It’s a great platform for all kinds of home cooking! We love how visually attractive it is, and we constantly get compliments on it.
So that’s what prompted me to share the instructions on how to make your own DIY wooden countertop. Enjoy!

Other Tips and Strategies
Don’t Have a Table Saw?
I know most people don’t have a table saw, but it’s by far the easiest and best tool for the job. So if you can’t find a friend or family member who has one, you can check with the place where you buy the wood if they will make the cuts for you.
Otherwise, the next best tool is a circular saw. To achieve a perfectly straight cut with a circular saw you can make a DIY guide rail. Clamp another piece of wood or a ruler in place to serve as a guide rail. A quick google search turns up dozens of videos on how to do this.
And finally, as a last resort, it is possible to cut the countertop to size with a jigsaw. You can use a similar “guide rail” approach as above, and just take it really slow.
Removable Counter
When you cut out the hole for your sink, consider keeping the cutout so you can have extra counter space when the sink’s not in use. This system is pretty easy with an under-mounted sink. Simply cut the hole for the sink slightly larger so the flange of the sink provides a ledge for the removable counter piece to rest on.
Faux Tile Backsplash
Or in our case, it’s more of a sidesplash. We found faux tile stickers that are really easy to install and give the kitchen an even more sophisticated look. We didn’t have to mess around with heavy tiles and messy grout.
I installed them in less than an hour. Because they are just stickers, there’s no worry about tiles shaking loose from vibrations. And the best part is that the stickers aren’t flat, each “tile” actually has a nice rounded shape, to give a believable “3D” look.
2-Year Update | DIY Wooden Countertop
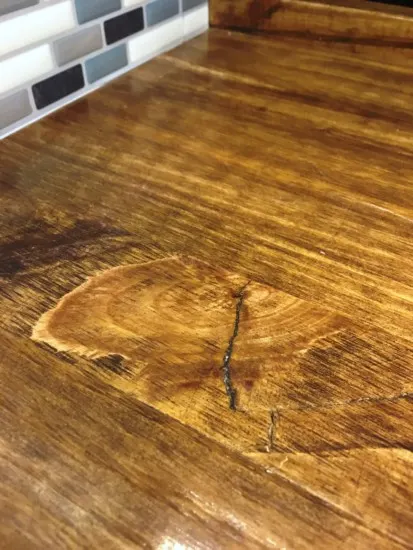
Over the last two years of full-time use the countertop has held up pretty well. The hot and cold weather causes the wood to expand and shrink. Over time this has formed some minor cracks at the seams between boards and around the knots.
The other problem is that the countertop chips and dents easily because pine is such a soft wood. (But this is to be expected when going with a cheaper soft wood like pine.) This has resulted in some areas where the poly and stain are removed revealing the bare pine underneath.
The main concern here is that water or other liquids will penetrate into the wood over time and cause rot. To fix this problem, you can touch up the stain in those spots and apply another coat or two of polyurethane.
I no longer have the wood stain itself, but Varathane sells a stain touch-up pen, so I purchased the one that says it should match Dark Walnut. Lies! Their stain pen (basically a crayon) was way more grey looking than brown. So just use your eyes to choose the color that most closely matches the final color of your countertop.
However, I did still find a little use for the Varathane Stain touch-up pen. I used it for filling in the larger cracks in the countertop.
Then finally I just applied another coat of oil-based polyurethane to the whole countertop. The new coat filled in the area that needed touching up and provided a renewed shine to the countertop as a whole! I would recommend using painter’s tape to block off anything you don’t want to stain by accident (like our faucet, tile backsplash, etc).
We slept outside of the campervan for a night to let the polyurethane dry and the smell to subside.
Save This ‘Stunning DIY Wooden Countertop For Under $100’ For Later


29 DIY Wood Countertops Ideas - DIYsCraftsy
Tuesday 23rd of January 2024
[…] tworoamingsouls […]
How Much Did Our DIY Camper Van Conversion Cost - tworoamingsouls
Monday 10th of April 2023
[…] Learn how to DIY your own wooden countertop for under $100. […]
How To Install Rustic Wooden Plank Walls In Your Campervan - tworoamingsouls
Thursday 6th of April 2023
[…] […]
How To Install Vinyl Flooring In A Campervan - tworoamingsouls
Wednesday 5th of April 2023
[…] Vanlife: Stunning DIY Wooden Countertop For Under $100 […]
Campervan Sink Plumbing With Water Filtration System - tworoamingsouls
Tuesday 4th of April 2023
[…] Stunning DIY Campervan Wooden Countertop For Under $100 […]