
This guide shares our first-hand experience of what to bring on a Lake Powell Houseboat Trip, and how to prepare for a smooth departure from the marina.
Emily and I have organized many Lake Powell Houseboat Trips (it’s our favorite vacation that we always keep coming back to). But there are very few services on this massive lake, so we highly recommend stocking up on everything you need for your whole trip.
Being self-sufficient for several days of houseboating requires some careful planning. So here is our fine-tuned list of items to bring, and how to prepare for the big day.
This is Part 2 of a three-part Lake Powell Houseboat Guide Series.
- Part 1: Initial Planning, Assembling A Crew, and Booking Your Houseboat Reservation.
- Part 3: Navigating Lake Powell, Best Places To Go
This guide is written from our many personal experiences renting from Lake Powell Resorts & Marinas. Aside from Antelope Point Marina, they are the only company that rents houseboats on Lake Powell.
Plan Your Food, Drinks, & Gear Ahead Of Time
Once you have booked your houseboat reservation, it is time to begin preparing for departure.
Once again… check in with your group to make sure everyone has made their travel arrangements, time off, etc.

The best way to enjoy a Lake Powell Houseboat Trip is to bring everything you need for your entire trip. This starts with a little bit of planning before your departure date.
While you technically can go back to a marina to resupply, you want to avoid doing this because you will waste precious time and gasoline. It severely limits your itinerary if you need to make any trips to resupply during your trip.
If you bring too much you will waste valuable space on the boat, and if you bring too little you run the risk of running out of essentials. So planning and coordinating exactly what to bring on Lake Powell has to be carefully thought out.
And which houseboat you rent can have a big impact on how you need to plan for the trip. Some have unlimited water filtration for drinking, while other boats have a finite drinking water supply.
Group Items Vs Personal Items
We find it helpful to divide the packing list into group supplies and individual items.
I like to coordinate the essential items as a group; drinking water, ice, dinners, & communal drinks.
Then people only need to worry about bringing their own breakfast/lunch foods, drink preferences, and clothes.
Drinking Water
Let’s start with the most essential item, WATER! Lake Powell is located in the desert. So it’s dry year-round, and experiences hot weather from about May through October.
So it’s vital to make sure you have enough drinking water for everyone in your crew. (The toilets, showers, and sinks all use lake water, so those will never run out).
But drinking water may be limited depending on the boat. The newer/nicer boats are often equipped with unlimited filtered water systems. If you end with one of those boats then you can completely ignore this section.
Plan on 1 gallon of drinking water per person, per day. The houseboats without unlimited filtered water come with a tank of potable drinking water, but depending on the size of your crew it may not be enough.
For example, the 53’ Adventurer model (discontinued) comes with a 40-gallon freshwater tank. For 12 people over 5 days, you would need roughly 60 gallons total. So you need to bring an additional 20 gallons to meet that quota.
I would recommend bringing those 2.5-gallon refrigerator jugs, or the large reusable camping jugs.
Encourage people to bring reusable water bottles (preferably insulated) so they can stay hydrated and cut down on waste. Avoid bringing cases of plastic water bottles because they create way more trash and people tend to misplace half-drank bottles everywhere. (The marinas do accept recycling, more on that in Part 3).
How Much Ice To Bring On Lake Powell
Knowing how much ice to bring is really difficult because it varies significantly based on the temperature, which boat you rent, and your needs. So it’s hard to give one-size-fits-all advice here.
If your group is drinking a lot of beer, cocktails, iced tea, or other cold drinks, then you will need more ice.
The newer/nicer boats tend to have better refrigerators that stay colder and can actually make ice during your trip. Additionally, some boats have a chest-style freezer, greatly improving your ability to preserve or make ice during your trip.
But the older model houseboats have RV-style fridges that can’t handle the heat very well. So the older model houseboats require a little bit more careful ice management/planning to make it last 4 or more days. We usually rent the older boats because they are cheaper, so some of my ice anxiety stems from that.
But a good rule of thumb is to bring one block of ice for each day of your trip. Plus 2-3 bags of cubed ice for each day. So a 5-day/4-night trip would call for 5 blocks of ice and 10-15 bags of cubed ice. If your boat has a chest freezer, you can definitely get away with less ice than that.
The two primary places for keeping stuff cold are the refrigerator/freezer in the kitchen and the giant chest cooler (both provided). But if you can, I recommend bringing some extra coolers if you can.
And as I mentioned, if your houseboat has a powered chest freezer, it basically solves many of the ice issues that plague houseboats without them.
But to complicate matters more, the refrigerator/freezer on the older model houseboats struggle to hold temp once the outside temperature gets above 90 degrees.
Additionally, the hotter the weather, the faster ice will melt in your coolers. This is another reason I advocate for going in the spring or fall, rather than the scorching summer heat.
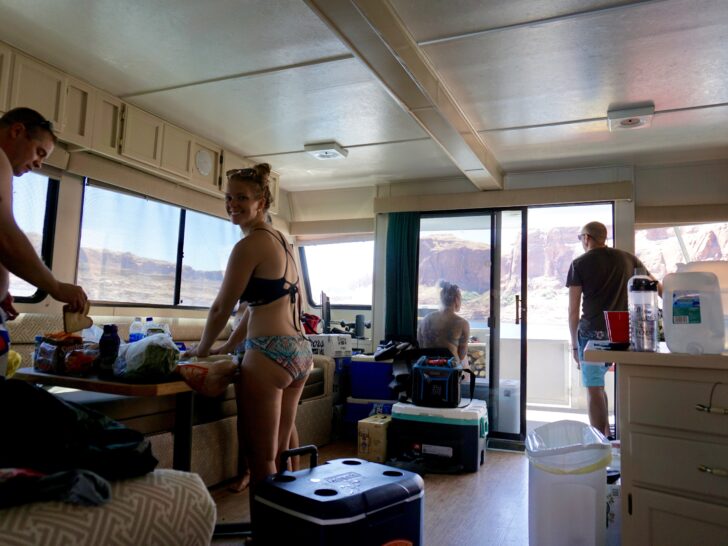
Right when you get on your boat, you should get the refrigerator/freezers running ASAP. You can ask the marina staff for help getting them started. Then place a block of ice in each freezer. If the weather isn’t too hot (above 90F), these blocks should keep well until you are ready to use them.
Next, load all your groceries into the refrigerator. By only keeping groceries in the refrigerator, you can limit the number of times you need to open it. Next, load the giant chest cooler with 3-5 blocks of ice, 3-5 bags of cubed ice, and as many cold drinks as will fit.
Then it’s a good idea to fill up any other coolers you brought with ice as well. Make sure to keep your coolers out of direct sunlight as the sun moves throughout each day.
It’s just not really feasible to bring all of your drinks pre-chilled. So a lot of your ice will be lost to chilling room-temp drinks. To mitigate this problem you can use the refrigerator or freezer on the boat to cool down beer before putting into your coolers.
But you want to make sure that you’re not compromising the groceries in the refrigerator. Load about 30 beers into a refrigerator/freezer for a couple of hours before transferring them into a cooler. This will help preserve your ice much longer.
If your refrigerator is barely keeping temp during the daytime, then it’s best to only attempt to chill beer at night.
By day 2-3 of your trip, the ice in the chest cooler will probably be mostly cold water. Now take the reserve block ice you had stored in the freezer and transfer it to the chest cooler. It’s not a good idea to drain the cold water from your coolers unless you have to.
If you really become desperate for ice towards the end of your trip you can freeze lake water in jugs or bottles. Just keep in mind that the freezers probably won’t make ice as fast as your freezer at home.
Beer, Hard Seltzers, Cocktails
The amount of beer, seltzers, and cocktails you need really depends on the drinking habits of your crew. We usually have large quantities of light beer and hard seltzers, and treat those as a group commodity.
Then, I have everyone supplement that with whatever else they like; craft beer, cocktails, wine, etc.
For the group drinks I usually plan for about 5 drinks per person per day.
So for a 5-day trip with 12 people, that’s 300 beers/seltzers. Don’t tell my doctor.
You should obviously adjust these numbers as needed for your group.
Food To Bring On Lake Powell
Having a large group of people share one kitchen can be challenging. There’s limited refrigerator space, and the kitchens are equipped with just the bare essentials.
If you have a larger group it’s simply not possible to have everyone doing their own thing for every meal. Too many cooks in the kitchen, ya know?
So here are a few strategies to make it work with a large group.
First, coordinate dinners as a group for each night of the trip.
And second, don’t buy too many groceries that require refrigeration.
We choose to do dinner as a group, and breakfast/lunch as individuals (or small groups).
People tend to eat breakfast and lunch a bit staggered, so not everyone is in the kitchen at once. Things like bagels, fruit, sandwiches, nuts, jerky, oatmeal, etc. are good options that simplify kitchen life.

For dinner, we divide into small groups with each group responsible for just one night of dinner and cleanup.
Some of our favorite group dinners are chili, pulled pork sandwiches, pasta, and burgers and hot dogs.
I recommend preparing as much of your food beforehand as possible. This will minimize the amount of dishes and work you have to do while on the trip. And it will allow you to spend less time cooking and more time enjoying your vacation.
We have even made meals before the trip and froze them in bags. And all houseboats have a grill, which can be an easy way to cook for a big group.


These two systems have worked well to allow a dozen people to share one kitchen with minimal conflicts.
The only issue is some dietary restrictions. But those can usually be worked around with a little creativity.
Firewood For Campfires
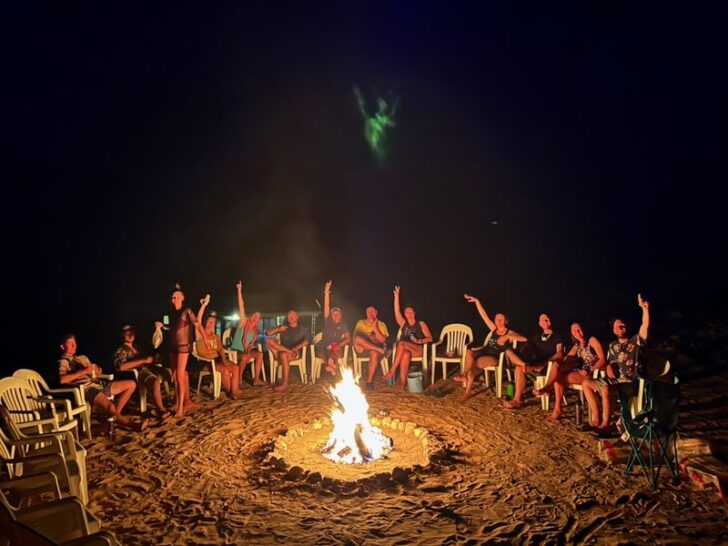
Technically, you don’t need to have fires at all. But personally, we love to finish each day with a big campfire.
But if you want campfires, you need to determine how many bundles to bring. Which might vary based on nighttime temperatures, size of you group, and how many nights you wish to have a fire.
If you’re there in the summer, you may not even want fires at all. The nighttime temperature is often around 70 degrees, so even in shorts and a t-shirt you will be hot next to a fire.
But during the spring, fall, and winter, a campfire can be the perfect way to wind down. Remember that if you have a big group of 10 or more people, you need a pretty big fire so everyone can fit around it.
For a group of 12 people, we found that 3 bundles per night is perfect for spring and fall weather. If you wish to have a more roaring bonfire, you may want to bump those numbers up a bit.
Kitchen Supplies
Here are some typical kitchen items and other ‘nice to have’ items. I usually just buy all these things and expense it to the trip fund that gets split by everyone attending.
Kitchen / Cleaning
- Drinking Water
- Extra Coolers
- Coffee
- Gatorade, etc.
- Trash Bags
- Paper Towels
- Toilet Paper (Provided, but always good to have extra)
- Clorox Wipes
- Paper Plates
- Paper Bowls
- Plastic Cutlery
Miscellaneous Things To Bring
Not everything in this section is mandatory, but I include plenty of ‘nice to haves’. Generally, I coordinate with the group because many of these items can be shared.
- Lawn/Beach Games
- Camera / GoPro
- Paddleboards/Kayaks
- Fishing Rods and Tackle (don’t forget to get permit)
- Portable Speaker
- Waterskis / Wakeboard
- Tow-rope
- Life Jackets (they only provide the basic orange ones)
- 2-way Radios (optional)
- Folding table
- Binoculars (For locating buoys and good beach spots)
- Aux cord (for connecting to houseboat stereo)
Personal Items To Bring On Lake Powell
This is the list that I share with attendees of our houseboat trips. People can customize it to their personal preference.
Check the 10-day forecast before your trip and adjust accordingly. Don’t forget to check nighttime low temps.
Personally, I don’t plan on having a new outfit for every single day of the trip. But that’s up to you.
Clothes
- Bathing Suits/Shorts (2-5 pairs)
- Shirts (3-5)
- One jacket, fleece, or warm top layer for nights
- 1-2 pairs of pants (for evening/nighttime)
Footwear
- Sandals
- Shoes that can get wet and/or sandy (for exploring)
- Socks (depending on your footwear choices)
- Water Shoes (optional, good for hanging around the beach/boats)
(Footwear choices depends on your preferance, and also on what kinds of activities you’re doing. If you are doing some hiking, you will appreciate having a secure type of sandal or watershoe (Chaco, Keen, Teva, Croc). Or you may prefer just to wear shoes or boots, even though they will probably get wet and sandy. Also, most beaches around Lake Powell have thorny bushes, so footwear is always recommended)
Other Things
- Sun Hat
- Sunglasses (& croakies if you like)
- Headlamp
- Phone charger
- Toiletries
- Sunscreen (Two standard bottles per person, sun exposure is high, unless you just hide in the houseboat all day. Expect to apply lotion at least 3 times per day.)
- Bug Spray (Kind of depends on the time of year, Summer is a must, Spring/Fall optional)
- Chap Stick (With SPF)
- Reusable water bottle
- Daypack (for hiking/boating)
- Drybag
- Pool Floaty
Extra Sleeping Items (Optional depending on circumstances)
- Air mattress or Sleeping pad
- Pillow
- Tent
Getting To The Marina On Time For Departure
The day you leave, you should get the earliest start possible to make the most of your first day. Both Bullfrog and Wahweap Marina will probably let you start boarding around 11am.
But there is paperwork to fill out, and moving all your stuff from cars to the dock takes a while, so you want everyone to arrive around 9-10am. After all the loading, paperwork, and boat walkthroughs, we usually don’t take off until about noon.
IMPORTANT: Wahweap Marina is right on the Utah/Arizona border, which creates potential time-zone issues. Both states are in the Mountain Time Zone, but AZ doesn’t observe daylight Savings.
One huge benefit of leaving from Wahweap Marina is that you are 20 minutes from the town of Page, AZ. So you can buy all your supplies the morning you leave. And thus you don’t have to refrigerate all your food and drinks a day early.
The Wal-Mart is a good one-stop-shop for almost everything you need for the trip. The only thing the Wal-Mart doesn’t sell is firewood, so we go to Safeway for that.
The year we departed from Bullfrog, we had to pack all of our groceries when we left Colorado, so day 1 of the boat trip was already day 2 for our coolers. And ice at the marinas is way more expensive than at Wal-mart. So in several ways, leaving from Wahweap is a lot easier/cheaper in terms of supplies.
This is important!!! When you arrive at the marina the morning of your trip, follow signs for boat rentals.
If you just put Bullfrog Marina (or Wahweap Marina) into your GPS, you will end up at the wrong dock. For Wahweap Marina put “Wahweap Boat Rentals” into your GPS, or “Bullfrog Houseboat Slips” for Bullfrog departures.
It’s important because once you get there, you may not have cell service to help your friends/family get to the correct dock.
Where To Stay The Night Before
The night before, I recommend either camping or renting rooms at the Marina or somewhere close.
There are great camping options for both Marinas that are very close. Or if you have an RV or campervan there are options at or nearby both marinas. Also, the Wal-Mart in Page allows one-night stays in their parking lots if you have an RV or campervan.
Or if you are interested in renting a room, you can go to the Lake Powell Resorts & Marinas Website, or rent from nearby hotel or Airbnb (only in Page, AZ).
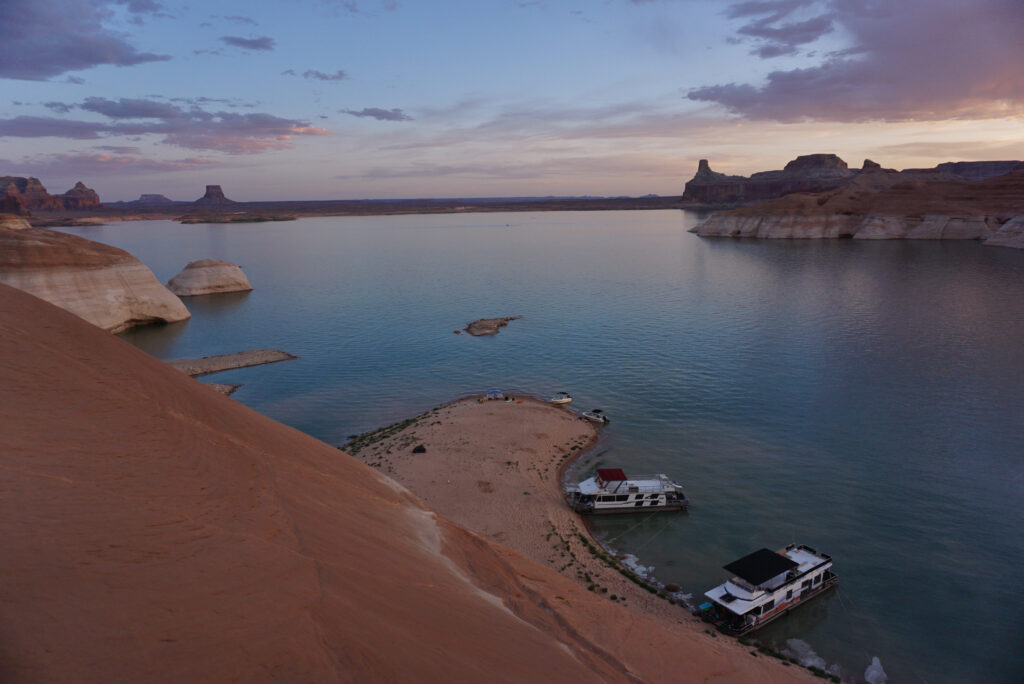
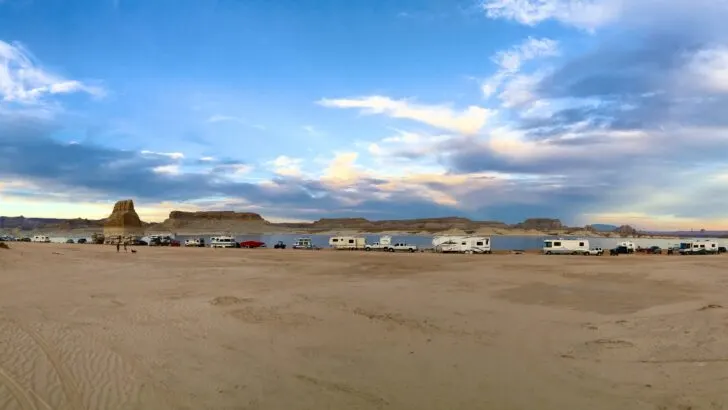
For Wahweap Marina you can camp at Lone Rock Beach Campground. It’s a large beach at the southern tip of Lake Powell with beautiful views of Wahweap Bay and of course Lone Rock.

It’s $14/night per vehicle and you also have to pay $25 for the Glen Canyon National Recreation Area entrance fee. (If you have a National Parks Pass, you do not have to pay the $25 fee.)
There are toilets located periodically along the beach. The best part is that there are no designated campsites, and the beach is enormous, so you don’t have to worry about not getting a spot.
Most people want to be close to the water, so those spots will likely be taken first, but there’s always tons of space farther up the beach. You have to drive on sand to get down to the camping areas, but there is a network of unofficial “roads” that are quite packed down. If you try to stick close to these more traveled areas, you shouldn’t have any problems, even with two-wheel-drive.
Just be aware that the beach can get windy, which creates problems for camping in tents. It’s 15 minutes from Wahweap Marina.
For Bullfrog Marina you can camp at Stanton Creek Campground. This is a rather rocky area on the shore of Bullfrog Bay, of Lake Powell.
It’s $12/night per vehicle and you also have to pay $25 for the Glen Canyon National Recreation Area entrance fee. If you have a National Parks Pass, you do not have to pay the $25 fee.
There are no designated campsites, although the terrain lends itself to creating some obvious “sites”. There’s a network of unpaved roads throughout and it can get rather rough in spots. There are toilets but no running water. It’s 20 minutes from Bullfrog Marina.
Both of these campsites are conveniently close to their respective marinas. And they both allow people to arrive after dark without too much trouble. Cell service will be hit or miss, so I would recommend making a tentative plan, but also have a backup plan to just meet at Marina Boat Rental Dock in the morning.
Checking In and Getting Ready for Departure
Once you get there, you should go into the office located on the dock. They will pull up your reservation and prepare your paperwork.
It’s also the time when you pay for your add-ons (powerboats, etc) and optional insurance. They almost always let you fill out your paperwork early while you wait to board. This way, you can get a headstart on your departure. The paperwork usually takes about 10-30 minutes.
They have a designated area in the parking lot for unloading cars, so you can drive your car pretty close to the dock. When you’re finished they ask you to move your cars back to the overnight section of the parking lot.
They have wheelbarrow-type carts for lugging your gear from your cars, and also “porters” who drive ATV’s with several trailer carts to carry your stuff for you. The porters always appreciate some tips, so it’s good to have some cash on hand.
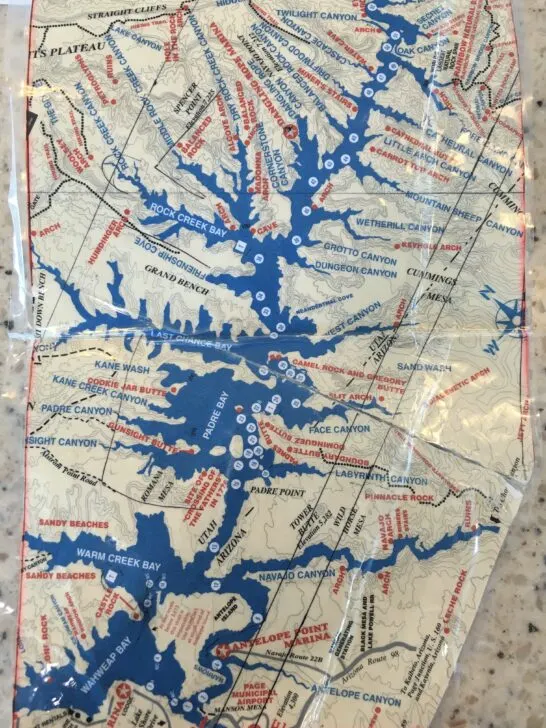
BUY LAKE MAPS FOR YOUR BOATS!!!
One huge issue I have with this company is that they don’t provide you with good maps. I consider it nearly essential to have one map per boat you rent. That way, if anyone goes exploring in a powerboat they will have a good map of the lake to navigate with.
When you rent a houseboat and a powerboat, the only map you will recieve is the one that is mounted on the wall in the houseboat. However, it’s not even that technical of a map, and it doesn’t have every channel buoy marked on it.

It blows my mind that they will rent boats to just about anyone, but yet they won’t even provide good maps for navigating the lake.
Seems like an obvious safety measure to me. Unless you’ve really studied the lake or are familiar with high desert geology, most areas will look quite similar. People get lost in Lake Powell every year, and often they have no map.
Our first year, a lost powerboat came up on our beach after dark. They had been lost for hours and arrived with no lights or warm clothes. They basically gave up trying to find their houseboat and came to us for rescue. We provided them food and warm clothes and insisted that they stay until the next day when it would be safe to reunite with the rest of their crew.
Getting lost on the lake can be a potentially life threatening situation. So I definitely recommend buying one waterproof map per boat that you rent. Okay, rant over.
If you’re leaving from Wahweap you only need the Lake Powell South Map, and if you leave from Bullfrog you only need the Lake Powell North Map.
Houseboat Walk-Through And Inspection
The other final step before leaving is a walkthrough and inspection on each of your boats. Have the few people who you trust most to drive and operate the boats present for this walkthrough.
(Meanwhile, the rest of your crew can start loading the houseboat).
The marina staff will show you how to operate the boats, from engines, to electronics, to radios, to water systems.
Depending on the staff member you get, they could be very knowledgeable or just a seasonal worker who barely knows their stuff. Don’t be afraid to ask questions, because in my experience they don’t necessarily cover everything.
Pay good attention while they explain how to operate the boats, and don’t be afraid to jot down anything that seems important.
They provide you with a little handbook that covers the basics for each houseboat.
In theory, you can radio the marina if you have questions or need assistance. But in our experience, the radio doesn’t reach them if you are several hours away.
Ask the staff member to make sure your refrigerators are running because they can take a while to reach temp.
Engine Inspections
The second part of the walkthrough involves inspecting each engine. It is in your best interest to pay very close attention to the condition of the engines and propellers. Every houseboat comes with two outboard motors and powerboats come with one.
The staff member will raise the propellers to let you inspect them.
Take out your phone and get a video of the entire propeller and take note if there is any damage to any part of the engine. If you notice anything broken, bent, or chipped, make the staff member note it on the inspection sheet. This way you cannot be accused of causing that damage at the end of your trip.
When you return, they will inspect the engines to make sure that you returned them in the condition you got them. The walkthrough is your best opportunity to verify that all the features of the boat are in working order.
Running Your Generator
They will teach you how to start the gas generator on your boat. This is essential for having electricity on your boat. Pay close attention to how to operate the generator, and also the control panel switches.
Identify Potential Problems With The Boat
Sometimes we have noticed potential problems during the inspection. For example, one year our boat was missing the 40-gallon fresh water tank of drinking water. I noticed that it wasn’t working and had the staff provide us with bottled water instead.
Or other common complaints are that parts of the boat or its accessories are damaged or missing. Just be vigilant of these things, and determine how important it is to fix them, or just notify the staff.
The goal is not necessarily to make sure the boat is in perfect condition, but rather just to make sure you are not held liable for previous damages or missing items.
Once you have finished the walkthrough and inspection, regroup with your crew to check if they have loaded everything onto the houseboat. Again, make sure you are fully stocked on ice and also had a chance to buy maps for each boat!
Leaving The Marina
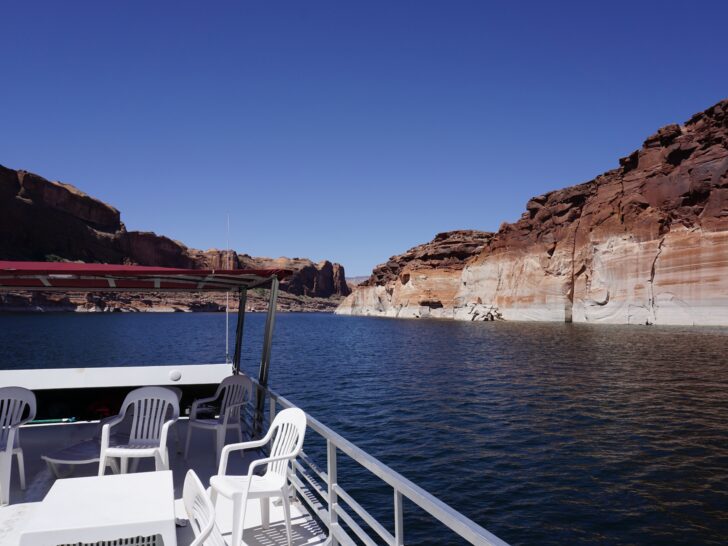
Finally, it’s time to set off on your Lake Powell Houseboat Trip Adventure!
Fire up the engines and carefully pull the houseboat out of the marina. It’s generally a good idea to have a spotter who does a quick check of the back of the boat to ensure that engines are clear of obstructions. Before moving, sound off the horn with one long blast and three short blasts.
This is honestly some of the most nerve-racking driving of the trip being so close to docks and other boats. But, if you take it slow and have your crew watch your blind spots, it’s not rocket science.
Or the marina staff can drive houseboat out of the marina for you if you are not comfortable. We have had them dock for us a couple times when it’s really windy.


If you have rented additional powerboats and/or jet-skis, you will need someone to drive those out of the marina separately. Agree on a radio channel to communicate over, so you can link up with your other boats once you are outside of the marina’s breakwater.
Don’t use radio channels 1-7 or 15-22, but everything else is fair game.
Tell them to give the powerboats and jet skis and good test drive to make sure everything is in working order. This advice would have saved us from towing a dud speedboat hours away one year.
The boat could move, but struggled to create enough torque for waterskiing and wakeboarding. If we had just given a good test drive, we could have easily swapped it out. But instead we just lived with one underperforming powerboat for the trip. They gave us a partial refund for that.
What’s Next?
So once you’ve finally made it out on Lake Powell! There’s endless possibility, so how do you know what to do first?
You and your crew might be itching to enjoy a celebratory swim, take some laps on the waterskis/wakeboard, or a champagne toast!


If you got an early start like I advised, it’s probably just after noon. You’ve got the rest of the day ahead of you, so go ahead and enjoy the lake, you’ve earned some fun in the sun!
In Part 3 of this Lake Powell Houseboat Trip Guide I cover the best places on the lake, how to navigate, and how to anchor your houseboat at night.
Or if you missed Part 1, I cover how to assemble a crew and book your houseboat reservation.
Share This ‘Lake Powell Houseboat Trip Guide’ On Pinterest!