This guide will show you how to mount solar panels on a fiberglass roof van, like those found on conversion vans, shuttles, handicap vans, ambulances, etc. The primary challenge is finding a way to mount your panels flat on the curved fiberglass surface. The second issue is that fiberglass is typically quite thin, and thus doesn’t provide good holding strength for screws. And also, fiberglass roofs come in all shapes and sizes so most roof mountings need to be custom-made.

Our process was simplified by the fact that we have just a single large residential panel. But our fiberglass roof is quite rounded, so we had to figure out a way to account for the curved roof. We decided that the best route for us was to cut custom-shaped blocks of wood to create a level mounting platform. We then used nuts and bolts to secure all the pieces together.
I will describe the process of how we mounted solar panels on our fiberglass roof as hopefully a guide to others. It’s by no means the only way, but after 1.5 years on the road, it seems to be working great.
This post may contain affiliate links. Disclosure policy.
Step-By-Step Solar Panel Mounting
Planning The Panel Placement
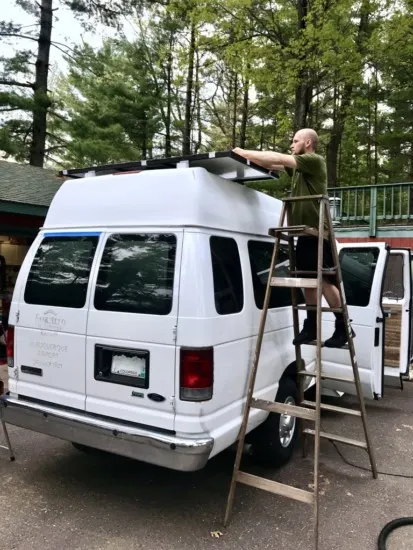
The first step was to put the panel up on the roof and mark out the location that we wanted it. We found it helpful to mark the centerline of the roof with pencil so that we could use that as our reference. Then we simply measured equal distances from the centerline to ensure straight and centered alignment.
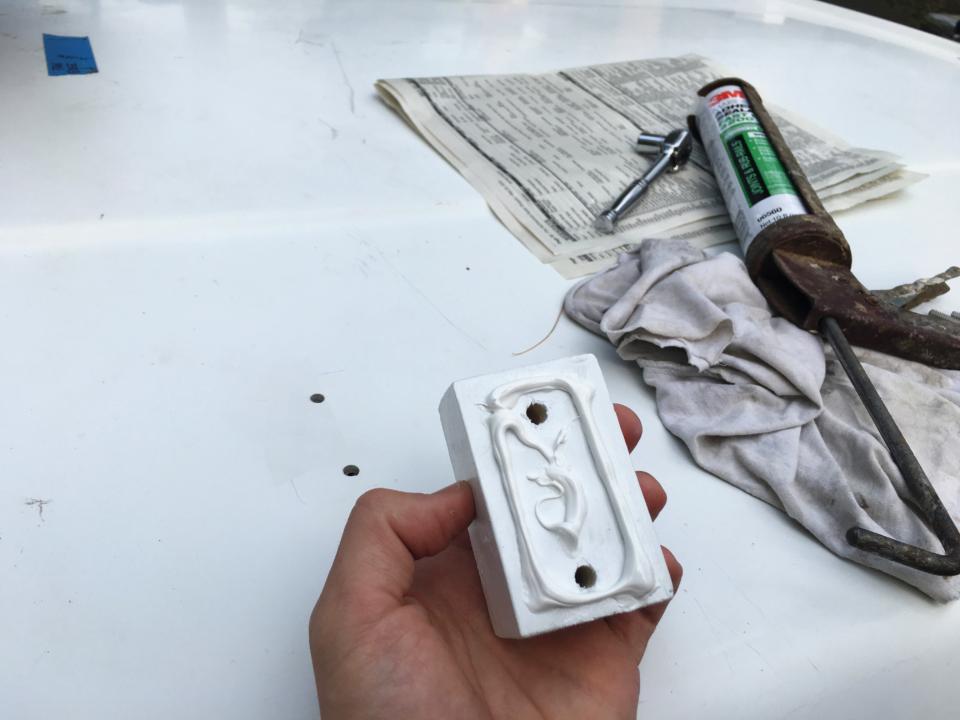
Then we marked the locations where the solar panel’s mounting holes are. The panel has a rigid aluminum frame with mounting holes. With the panel roughly in its place, we slid some scrap pieces of wood underneath the mounting holes. We had lots of different shapes and sizes of scrap wood from our van conversion, so with a little bit of trial and error, we eventually found the proper thickness of wooden blocks to “level” the solar panel. We ended up using 2×2 furring strips, which were left over from furniture construction in our van.
This is the solar panel we have = Rec N-Peak Series 320W Monocrystalline (and mounting brackets).
Shape The Blocks
The next step was to cut and sand each wooden block to account for the curvature of the roof. This will be highly specific to the shape of your fiberglass roof.
We cut the 2×2 furring strip scraps into roughly 4 inch segments. We then cut the the blocks lengthwise again at an angle using a jig-saw. Most jig-saws allow you to tilt the guide, effectively making the blade cut on an angle. So we estimated the angle to roughly match the slope of the roof.
In our case, the rear of the van is more square, so the rear blocks were required less shaping. But the front blocks accounted for more curvature of the roof. However, within each set, the blocks were mirror-image of each other.
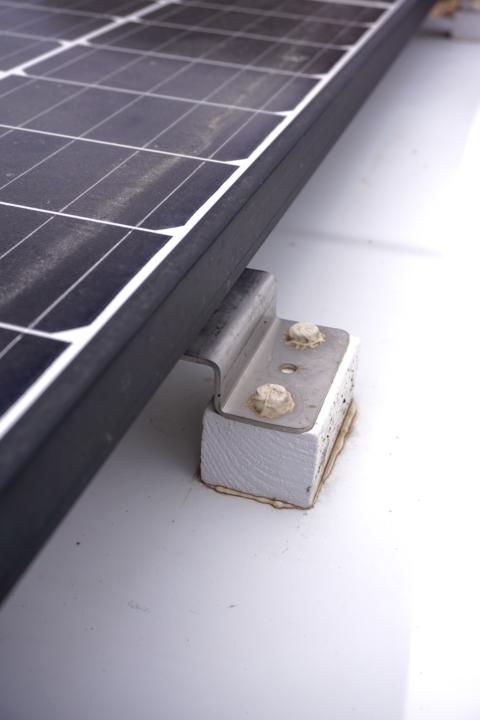
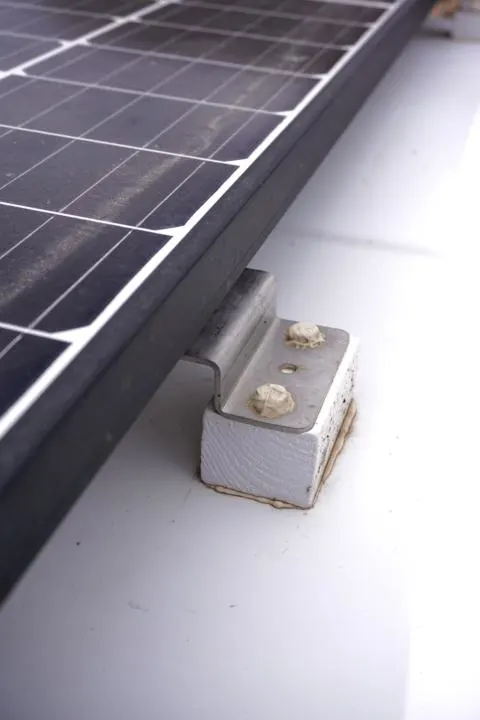
Our solar kit came with metal mounting “feet” so the blocks were cut to fit those mounting feet. And later the panel attaches to the metal mounting brackets with set of nuts, bolts, and washers.
Then we test fit the blocks in their place to see what changes need to be made to the blocks. The fine-tuning should be done with rough-grit sandpaper like 80 or 100. This will help you to quickly get the blocks to the proper shape. This can be done by hand, but electric sanders can be a big help.
It took several tries to get the shape just right.
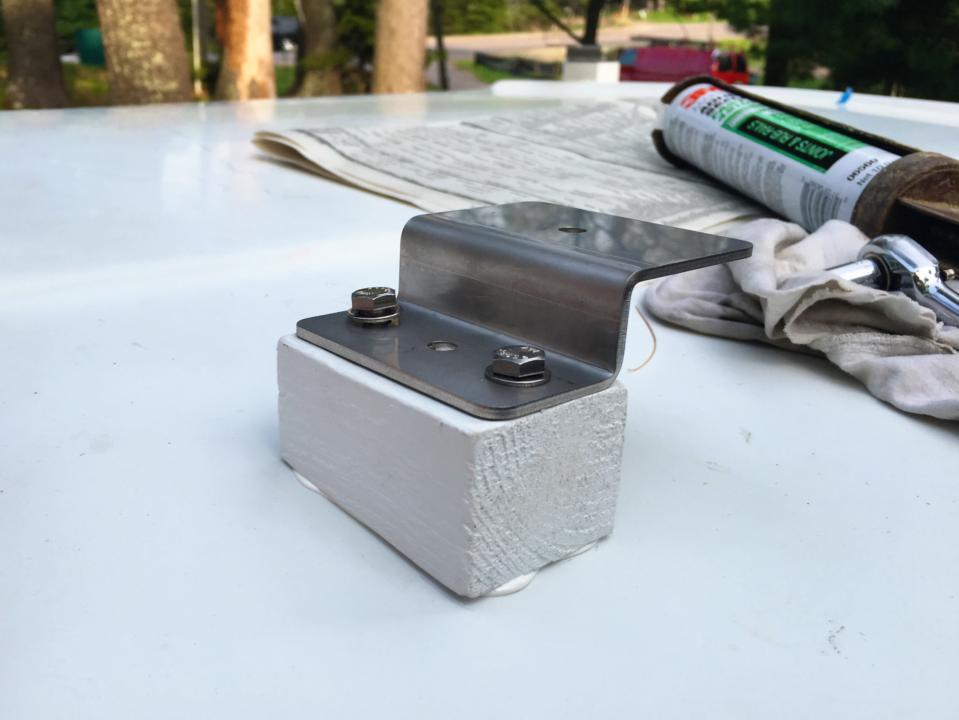
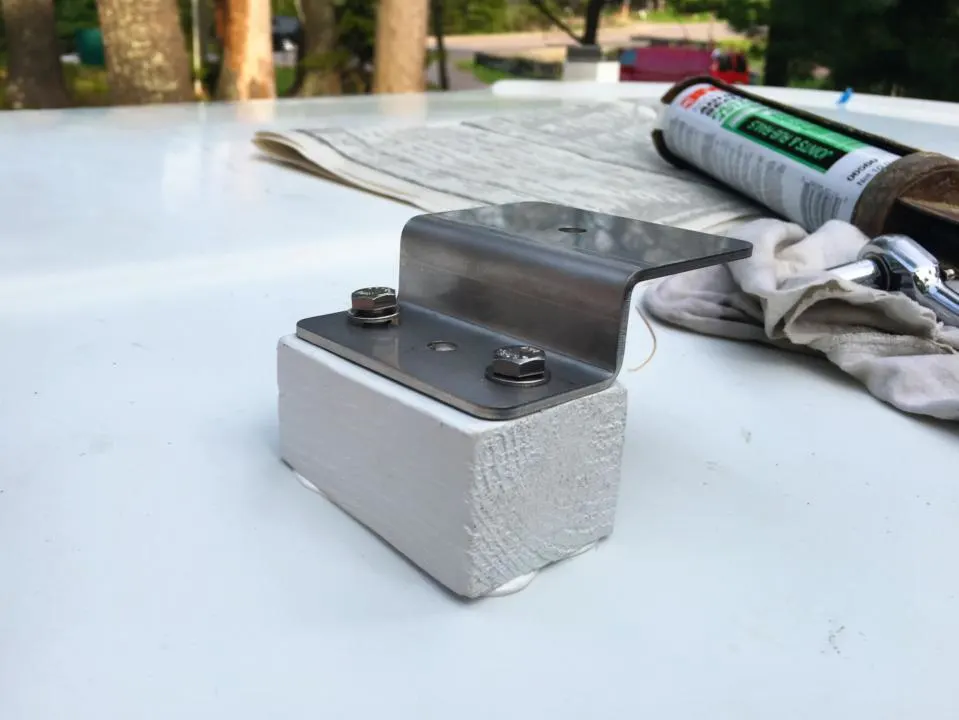
Sand And Paint The Blocks
Then to finish the blocks, we sanded them smooth with fine-grit sandpaper (first 150, then 220). To prepare the blocks for the elements we painted them with 3 coats of outdoor paint. We used white paint to match our van. This step is important for protecting the wood from rot and other environmental damage.
Mounting The Panel

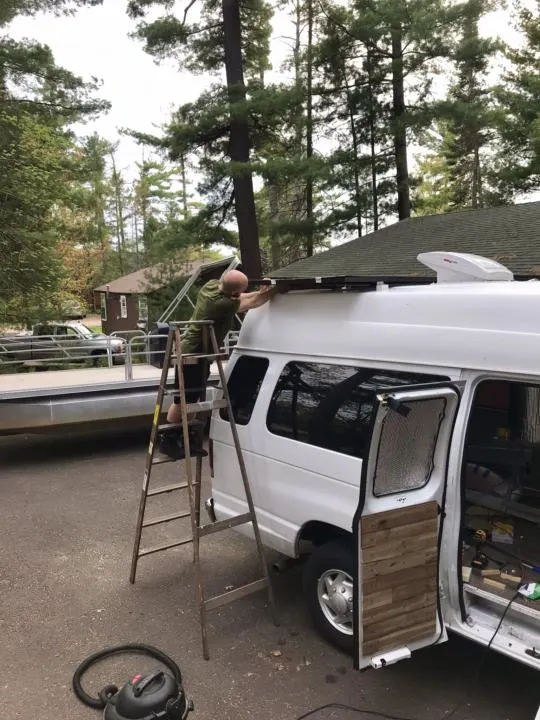
With the wooden blocks finished, we placed everything on the roof to make sure we were happy with the fit.
After testing the fit of everything, we marked the locations of the mounting holes from the metal mounting bracket onto the wooden blocks. We lifted the wooden blocks off the roof and drilled holes all the way through. Use a drill bit slightly thicker than your bolts.
Then place the blocks back in place and use them as a guide to drill through the fiberglass roof. If you want to know where the holes will come through on the inside you can use a couple magnets. Tape one magnet on the roof over the spot, and wave another magnet on the inside and it will snap to the place.
We knew roughly how thick our fiberglass roof was because we had already cut a hole for our fan.
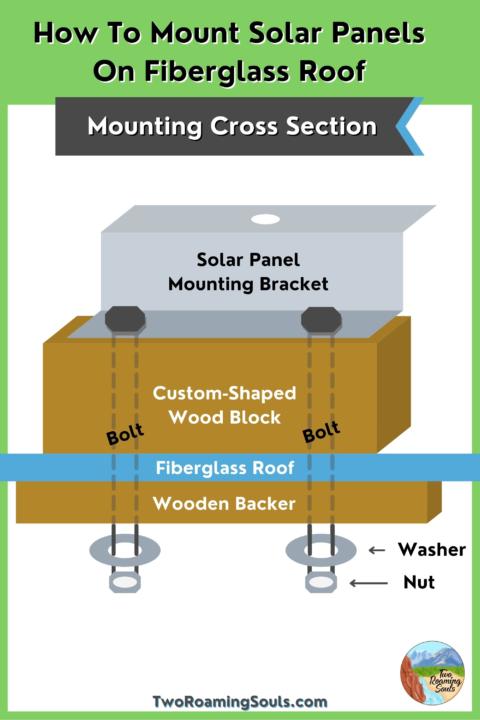
For extra security, we added another wooden backer on the inside of the roof to act as a large “washer”. It helps to spread out the stress over a larger surface area. This might be overkill, but we wanted to make sure that this solar panel wasn’t going anywhere.
Then, we drilled the holes through our “backer” pieces of wood that go on the inside of the roof. Emily was my fearless assistant who held the wood in place from the inside (with her hands safely out of the way). We also taped a plastic bag around the drill site to prevent debris from falling on Emily and inside the van.
The next step to mount solar panels on a fiberglass roof is to out all the pieces together. This means using long bolts to pass through each layer and then securing them with washers and nuts. You need bolts long enough to reach through the solar panel mounting brackets, wooden blocks, fiberglass, and wooden backer leaving enough room for a washer and nut on the end. But you don’t want too long because then they may not fit underneath your ceiling, and you would have to cut them shorter.
Here’s a diagram that I spent wayyy too much time on Canva.com making.
Preventing Leaks
To prevent leaks it is important to apply sealant around the mounting. We recommend 3M 4200, because it is a high-quality marine-grade sealant that will prevent leaks. We applied sealant on the underside of the wooden block between the wood and the fiberglass. Don’t go crazy because it will squeeze out once the bolts are tightened, so too much excess sealant will make a mess.

The final place to apply sealant is around the head of the bolts. But don’t do this until after the nuts and bolts have been tightened.
Tightening The Nuts and Bolts
When you are tightening the nuts and bolts you will need a second person. One person holds the bolt head from spinning, while the person inside tightens the nuts with a socket wrench. Once the nuts and bolts are tightened, apply the final sealant around the heads of the bolts.
Attaching The Solar Panel (Final Step)
The final step is to attach the solar panel to the metal mounting brackets. In our case, this just required using nuts and bolts to connect the holes on the brackets with the holes in the aluminum frame of the solar panel. This may be different depending on the mounting supplies with your specific solar panels.
A Couple Of Notes
Single Panel vs Array
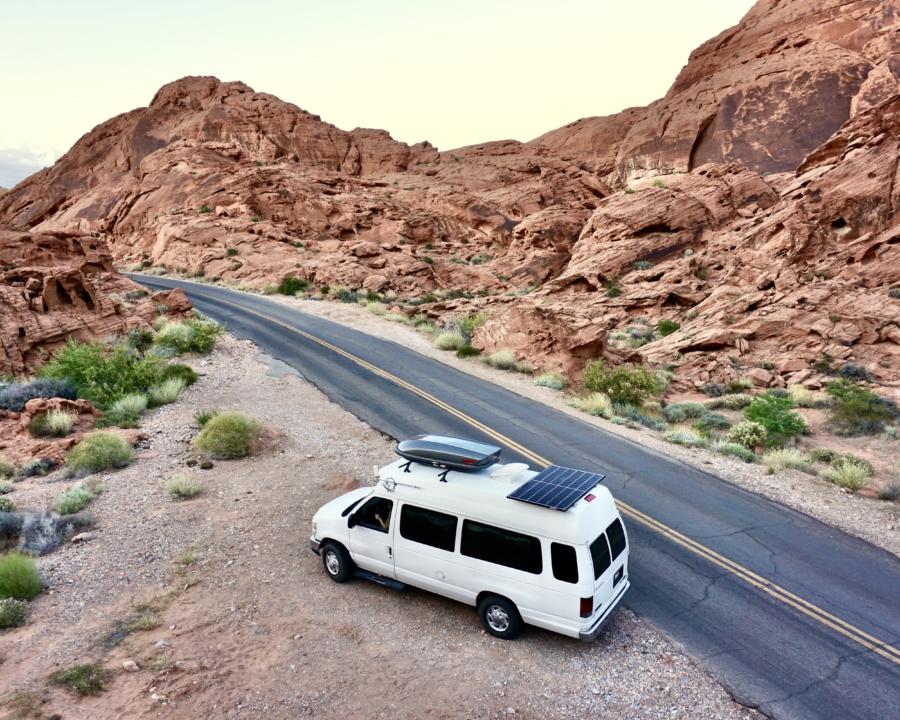
First of all, we have just a single 320-watt residential solar panel on our van’s roof. This is atypical in the vanlife community, as most people have an array of smaller panels (usually 100-watts) rather than one large panel.
We got our solar kit from Northern Arizona Wind & Sun, in Flagstaff Arizona. They commonly offer large residential panels that provide some savings per watt. However, they need to be shipped via freight (same with batteries), so picking them up in person will save a bunch on shipping.
The benefit of having a single large panel is that we only needed 4 mounting points. If you have an array of smaller panels, then you might have 8, 12, 16…..or more mounting points. This makes the job exponentially more tedious and time-consuming. More custom wood blocks, more hardware, more sealant, more holes in your roof. So we think having a single panel was a huge benefit in this instance.
Personally, if we had multiple panels, I would have prioritized building a large roof rack instead and then just attaching the panels to the roof rack. You could use the same methods described above to mount a roof rack.
Mount With Air Gap
Solar panels should be mounted with an air gap underneath. They are more efficient when they are cool, so airflow helps to keep them cooler. If your roof is curved then it should help create more air underneath. But just try to follow the panel manufacturer’s recommendation as best you can.

Takeaway | How To Mount Solar Panels On A Fiberglass Roof Campervan
Using this method, we created a very secure way to mount solar panels on a fiberglass roof. We love the peace of mind knowing that our panel is bolted securely, and not going to fly off while driving on the highway. It’s not the most modular or elegant solution, but aside from external damage, the panel has a 25 year warranty. So hopefully the extra secure mounting method lasts for decades as well.
The panel does stick out a little wider than the roof itself, but it’s not wider than the widest part of the van. This was not our preference, but we needed to leave enough space for our MaxxFan and ski box. And we’ve worried about catching the sides on the panels on low branches, but it’s plenty strong to plow through light branches. Haven’t had an issue yet.
Save ‘How To Mount Solar Panels On A Fiberglass Roof Campervan’ For Later


How To Mount Things To The Roof Of A Fiberglass Hightop Van - tworoamingsouls
Wednesday 14th of July 2021
[…] You can read our entire post about How To Mount Solar Panels On Our Fiberglass Roof […]
DIY Solar Panel Tilt Mount For A Campervan or RV - tworoamingsouls
Wednesday 17th of March 2021
[…] […]
Why Choose A Fiberglass Hightop Van For A Campervan Conversion - tworoamingsouls
Saturday 13th of March 2021
[…] could support the weight. I custom bent some “T” braces in order to mount a roof rack. And our solar panel mounts were leveled with custom wooden blocks that were tediously cut and sanded to the perfect shape. […]