
Want to add off-grid solar to your van, but you’re getting lost among all the electrical products and jargon? It can get confusing quickly, especially for a novice.
That’s why I created this Beginner’s Guide To Solar Components.
I start from the beginning and cover all aspects of vanlife solar components. By the end, you will have the knowledge and confidence to start building your very own DIY solar setup.
This post is mostly focused on the components that make up a solar setup and important terminology. Learning all the terminology is SOO IMPORTANT because then you can find answers and products more easily. People can’t help you if you don’t know how to explain your problem, or what you’re looking for.
Having off-grid electricity in our campervan is one of the luxuries that keeps us self-sufficient as we travel. We never have to worry about plugging in at overcrowded campgrounds just to keep the lights on. Which means more freedom to park our home in incredibly beautiful and remote places.
The cost of off-grid solar keeps dropping, allowing more and more people the freedom to enjoy renewable solar electricity. And the push by companies to design simpler consumer products makes it possible for relative beginners to teach themselves all the skills necessary to assemble their own solar setup.
I was once a beginner, but using online resources and help from the company that sold us our solar kit, Northern Arizona Wind and Sun I was able to build my own solar setup. And now our van can operate completely off-grid with plenty of power for the everyday comforts of a home.
This is Part 1: Vanlife Solar: Beginner’s Guide To Solar Components.
Part 2: Guide To Wiring, Connectors, and Crimping
This article aims to educate beginners on the basics of an off-grid van solar setup. And I’ll include many diagrams for those visual learners, like myself. After reading and understanding this article, you will have a firm grasp on the components of an off-grid solar setup and how they interact with each other.
Disclaimer: Working with electricity can be very dangerous and even deadly. And while I do have some electrical knowledge from school, I am not an electrician. Always practice proper safety when working with electricity. The information shared below are my opinions. This post summarizes what I believe to be the best tools, products, and techniques for accomplishing the task. I hope you find it helpful and informative.
But before we dive in, I should cover a few basic electrical terms. Feel free to jump ahead if you already know the basics.
This post may contain affiliate links. Disclosure policy.
Basic Electrical Terms
Things can start to get really deep into the science when learning about electricity. Luckily, you only need to understand the basics in order to assemble your own solar setup. So, I will keep things simple.


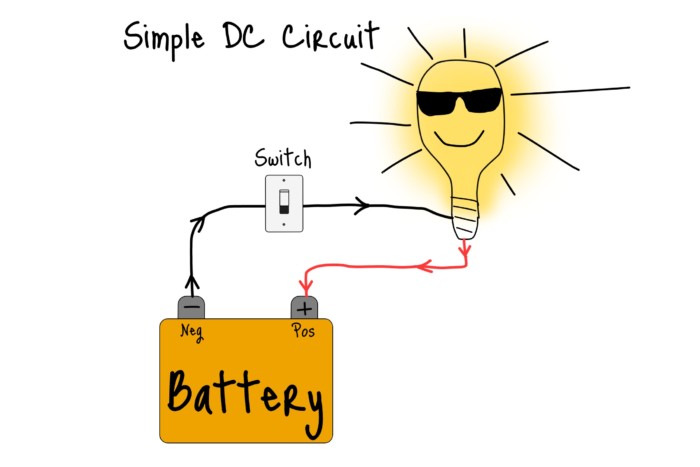
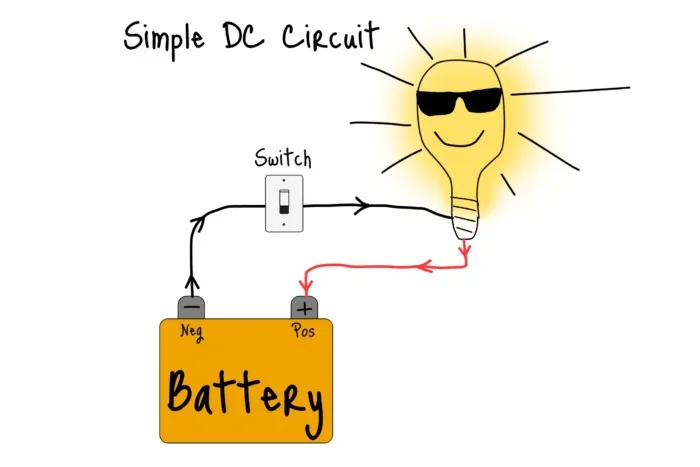
Electrons – Negatively charged particles that repel each other. This causes electrons to move from areas of high voltage to areas of low voltage. (From the negative battery terminal to the positive battery terminal.)
It’s common to think of electrons flowing along a wire like water through a pipe. But in actuality, when an electron moves from one atom to the next, it pushes a different electron out the other side, like they are trading spots. But the “water in a pipe” analogy is a fine way to visualize it.
I like to draw my diagrams to illustrate the direction that electrons “flow”, from negative to positive (Electron Flow).
Note: The long-standing convention is to illustrate electricity flowing from positive to negative (Conventional Flow). This convention dates back to before electrons were even discovered. If you care to know the history, it’s explained here. Otherwise, just be aware that you may see both methods when studying solar.
Circuit – A connection of conductors (like wires) that allow the flow of electrons.
Current – The rate of flow of electric charge.
Amps, Volts, and Watts
These three terms are best understood with an analogy to pipes carrying water. Amperes (Amps) are the volume of water flowing through the pipe, volts are the water pressure, and watts are the total amount of power that water can deliver (watts = amps x volts).
Amperes (Amps) – The unit of measurement for quantifying the rate of electric current flow.
Volts (Voltage) – The “pressure” of an electrical system, caused by electrons’ negative charge repelling each other.
Watts – The total power of electric charge which is calculated by multiplying amps x volts (watts = amps x volts)
Ampere hour (Amp hour or Ah) – The amount of energy charge in a battery that will allow one ampere of current to flow for one hour. Batteries will commonly have this to quantify their power.
Okay, now let’s jump into what makes up an off-grid solar setup.
Vanlife Solar Components
Solar Panels
At the simplest level, the suns rays hit your solar panel(s) and it converts that energy into electricity that you can use to power devices, appliances, etc.
Battery
The battery stores electricity so that you can use it on demand. Otherwise, you would only be able to use electricity when the sun is currently hitting your panel.
Charge Controller
This device is what controls the flow of electricity going from your solar panels into your batteries. You can think of it like a bouncer at a club where the batteries are the club and electricity is the people.
The bouncer organizes the surges of people arriving at the club into a line, and controls the rate at which they pass through.
The charge controller organizes the sporadic energy coming from the solar panels and changes it into an acceptable current for your batteries.
And whenever possible, it keeps your batteries at full charge, without overcharging them.
Here is a simple diagram of what this looks like.

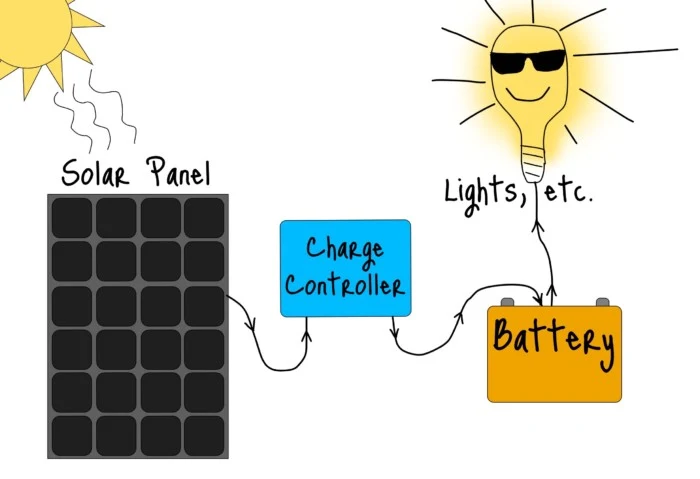
Simple enough, right?
Okay, now let’s introduce a few more vanlife solar components and explain what they do.
Fuses
A fuse is a little metal bridge in a wire that is designed to break or “blow” if the amount of electricity becomes unsafe. This way, the fuse will prevent a wire from overheating and potentially causing a fire.
It also protects appliances and devices from receiving too much electricity. The size of your fuse will depend on how much electricity needs to flow through the circuit and the maximum current that the wire can handle.
Note: For the sake of simplicity, I left the fuses out in some of the diagrams. So just be aware that they are a critical safety measure in a system when it’s finally all wired together.
Bus
A bus in electrical terms refers to a conductor (usually metal) that serves as a common area for multiple wires to connect to the same point. It is customary to refer to a bus by its polarity, like a negative bus, or positive bus. A fuse box is a perfect example of a device that uses buses.
Fuse Box
A Fuse Box is basically a combination of buses (one positive and one negative), with places to insert fuses along each circuit. This allows you to easily fuse all your connections, while also keeping them safe and organized.
You can think of it like a surge protector power strip you might use in a house. Let’s say you have 5 things that you want to plug into a single outlet, you might buy a power strip to allow you to plug all 5 things into that single outlet.
The fuse box works much the same. Say you have a fridge, lights, fans, etc. that you want to power using your battery. If you tried to connect all those things directly to your battery, it would get messy quickly. The fuse box keeps things much more organized.
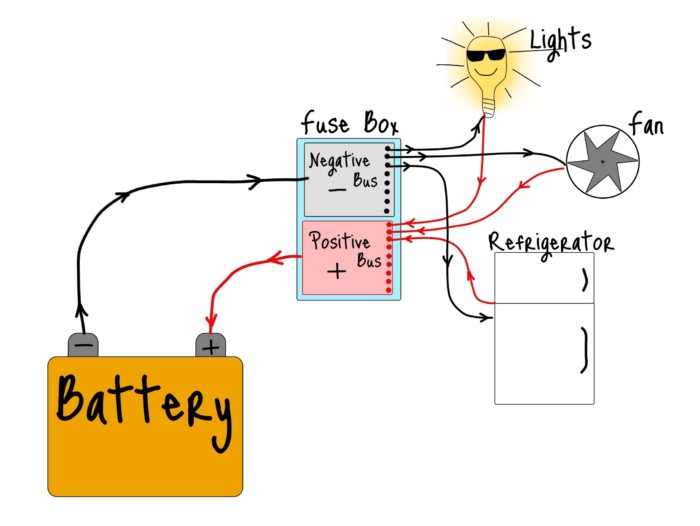

See how there are only two wires connected to the battery, instead of all the wires running coming out of the DC devices. And the extra empty connections on the buses give you the ability to easily add more devices in the future.
Ground
A ground isn’t an actual piece of hardware, but rather any place where an electrical system is connected to the “ground”. Normally in the case of a building, the ground is literally connected to the ground (hence the name).
In the case of a vehicle, like a van, your electrical system will be grounded to the metal chassis of the vehicle. It is common to connect your grounding wire to a part of the van’s interior metal framing that is near your battery.
The purpose of a ground is to provide a safe escape route for an electrical system that becomes faulty. Before a loose or damaged wire can cause a shock or fire, the dangerous electrical current will terminate at the ground.
DC Versus AC
Direct Current (DC) and Alternating Current (AC) are two terms that you should be comfortable with. Luckily, you don’t need to know more than just the basics.
For van electrical setups, you will have a battery that can provide direct current (DC), and anything that you connect to your battery will receive direct current.
Basically, you connect a red wire to the positive terminal and a black wire to the negative terminal and electricity only flows in one direction. And really, DC is the only type of current that batteries can supply just on their own.
Alternating Current (AC) is the type of electricity that your local power plant supplies to all houses, offices, etc. When you plug anything into an outlet in your house, it receives AC. And with AC, the flow of electricity actually alternates back and forth really quickly.
For our purposes, you basically just need to know that these two types of electricity are different and that we will have different methods for powering devices depending on whether they run on DC or AC.
12-volt DC System
The most common voltage used in van electrical systems is 12-volt direct current. This is most easily achieved by using a single 12-volt battery. They are widely available and provide adequate and efficient power for most vanlife power needs.
The three most common things to run using 12V DC power are lights, vent fans, and refrigerators. Using DC to power appliances/devices will almost always be more efficient than AC, and you should try to run as many things as possible off of DC.
AC Inverter
But some things cannot run on DC and need to have AC, for example, a blender or laptop charger.
For those things, we need an Inverter to convert the 12V direct current (DC) into 120V alternating current (AC). 120V AC is the normal household power that comes from any outlet in your house.
Just be aware that there is always some amount of power lost when converting DC to AC.


Fuse + Switch Vs Circuit Breaker
The combination of a fuse and switch is a common connection between two vanlife solar components in your electrical system.
For example, you should have a fuse and a switch between your battery and your inverter. The fuse protects the inverter and the wires, and the switch allows you to safely and easily cut power to the inverter (if you need to work on it).
However, a circuit breaker combines the fuse and the switch into one component. A circuit breaker is basically just a resettable fuse, meaning that when it “trips”, you can simply flip the switch and restore the circuit.
This may be familiar if you’ve ever “blown a fuse” in your house by running too much power. And then someone has to go down to that grey box in the basement and start flipping switches.
Technically, you didn’t really blow a fuse, but rather just tripped one of the circuit breakers. This is why you are able to fix the problem by just flipping a switch.
With a blown fuse, you actually need to replace the fuse to restore the circuit. I recommend using circuit breakers because they simplify the wiring in your electrical system, take up less space and are generally more user-friendly. And most times you can find a circuit breaker for cheaper than the combination of a fuse + switch.
This 100 Amp circuit breaker that we used in our van build is really simple to use and it works well. I can simply flip the switch to cut off power and safely work on or add things to our electrical setup.
However, circuit breakers do wear out over time, so it’s not recommended to flip them off and on repeatedly. But I find that once a solar setup is complete, the number of times you need to intentionally flip the circuit breaker is very small.
For comparison, this combination of fuse and switch can achieve the same purpose.
Battery Monitor
To keep track of the level of charge in your battery bank, you will need a battery monitor. While not technically required, a battery monitor is highly recommended to keep track of how much power you have so that you can keep them healthy.
These can range anywhere from $15 to over $200. The cheaper ones usually only have a display that shows the basic current battery stats.
And the more expensive models, like this top-of-the-line Victron Battery Monitor can connect to your phone via bluetooth and show you all kinds of advanced statistics.
We ended up splurging for the fancy Victron battery monitor, and it works great. I do find the additional stats helpful for troubleshooting and optimizing our solar collecting, however I don’t use more than just the basic statistics on a regular basis. So perhaps it is not really worth the extra cost.
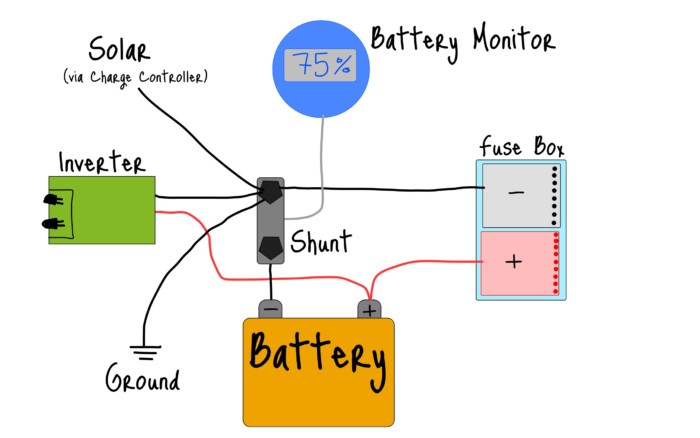
Shunt
A shunt is not only a really funky word, but it’s also the thing that allows your battery monitor to do its job.
Your battery monitor needs to measure all the power going in and out of your battery. And the shunt is where the battery monitor “sees” what’s passing through. T
hink of the shunt like a bridge with a toll booth in the middle. All of the electricity flows from one side of the bridge to the other. And the tollbooth is the battery monitor measuring all the electricity passing over the bridge.
Instead of connecting all the negative wires directly to the negative post of your battery, you detour them across the shunt. So you connect all negative wires to one side of the shunt and then just have a single wire that runs from the other side of the shunt to the negative battery terminal.
Then your battery monitor has a wire that’s connected to the middle of the shunt, so that it can read all of the currents in and out and provide accurate readings. This is the grey wire in the diagram below.

How Much Solar Power Do You Need?
Everything we just covered is the majority of what makes up an off-grid solar setup. But of course, there are hundreds of different options for panels, batteries, charge controllers, etc, and which ones you choose will depend on how much power you need and your budget.
And figuring out exactly how much power you need is challenging because of the wide variety of inputs.
How much power do the devices you use on a regular basis consume?
How often do you plan on using or charging things like phones, tablets, computers, cameras, etc.?
And what about power for the things that run 24/7 like a refrigerator?
How much sunlight will there be per day?
Are we talking summer solstice type sunshine, or weak, low-angle winter sunshine?
The best place to start is by sizing your panels and batteries. Panels are usually measured in Watts (W) and batteries in Amp Hours (Ah).
The higher the wattage rating, the more power a panel can generate. So the total wattage of your panel(s) will dictate how quickly you can recharge your batteries.
And the total Ah rating of your battery(ies) will dictate how much power you can store. Like the saying goes, you can literally store extra power for a rainy day.
Technically, total energy stored is measured in Watt-Hours or Kilowatt-Hours (Wh, kWh). Finding Watt-hours is simple, just multiply the AmpHours by the Voltage of the battery.
So for a 100Ah 12-Volt battery, 100 x 12 = 1200 Watt-Hours (or 1.2 Kilowatt-Hours).
But most consumers find it easier to work with AmpHours because it basically tells you how long a battery can last with your normal power consumption. So for beginners, I recommend just focusing on Ah.
You can use this very handy solar calculator to attempt to figure out what size solar setup your need. But first, you will need to collect the wattage of all things you plan to power (or at least the most frequent substantial items).
Their calculator does a spectacular job at trying to simplify the process and give concrete results. But the issue is that the calculator is still subject to human error.
It can be really hard to accurately estimate how many hours per day you will use each device. And so, the safe thing to do would be to round up. However, if you round up your usage for every single device, then by the end your result may be far from reality.
Even with such a great tool, the various factors make calculating your exact power needs very tricky.
So sometimes it’s nice to take your queue from vanlifers who are already living off-grid with our solar setups. We have real world results about what size systems work for different environments and power needs.
The average full-time vanlifers are happy with between 250-500 Watts of solar panels, and between 100-400Ah in usable battery storage.
Our Solar Setup
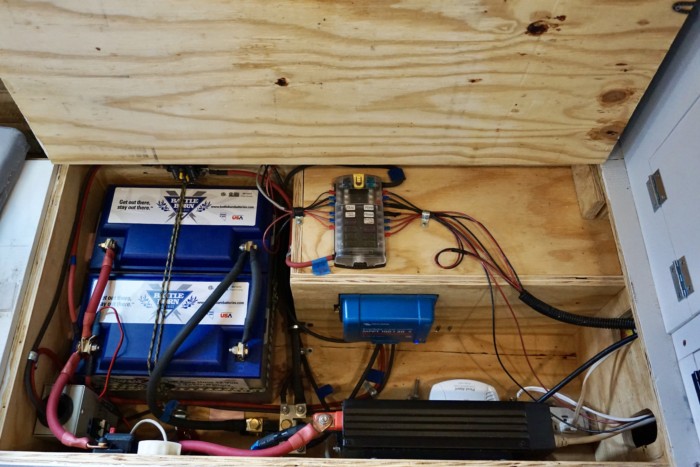

Emily and I have a 320 watt solar panel and 2x 100 Amp hour lithium batteries (200Ah total). And since completing our van build in June 2019, we have had ample electricity for all of our power needs, except for the winter months.
During the shortest days of the year, we must be in direct sunlight for nearly the entire day to keep our batteries fully charged. And therefore, cloudy days or parking in the shade can prevent us from getting up to full charge.
However, we can store much more power than we use in a day, so it would take 4 or more bad sun days in a row to fully deplete our batteries.
For reference, below are the majority of things that we use on a regular basis.
Vanlife Solar Components
Our Daily Power Needs
- Two laptops
- Two smartphones
- Sony a6000 Camera
- GoPro Hero11
- Maxxair vent fan
- Shurflo Water Pump
- Vitrifrigo 12V fridge/freezer
- 12V puck lights
- Two 12V LED light strings
- WeBoost Cell Signal Booster
Additional devices that we use occasionally
- Samsung Monitor
- Magic Bullet Blender
- Black & Decker Jigsaw
- Dewalt Power Drill
But keep in mind that we have been traveling mostly in the sunny southwestern US. These states are known for having lots of sunshine, almost year-round.
If you were planning on living/traveling in more cloudy areas like the Northeast or Pacific Northwest, then you would likely need to greatly increase the size of your solar setup.
In the winter months, the sun’s trajectory is much lower in the sky and there are fewer hours of daylight. This combination of less powerful sun for fewer hours makes it difficult to get enough power depending on where you are.
This is why so many van dwellers and RVers choose to spend the winter months in the southern states (aside from the warmer weather, of course).
What Are Your Plans?
So put some thought into where and how you plan to use your solar setup. And then size up or down based on your needs or budget.
To review, the average full-time vanlifers are happy with between 250-500 Watts of solar panels, and between 100-400Ah in battery storage.
Are you traveling solo, or do you have a partner?
Do you plan on being in relatively sunny areas and/or have generally low power needs? Then you will probably be fine with the lower end of those ranges.
Or do you know that you will spend lots of time in cloudy areas, or plan on using power-hungry appliances often? Then you should aim for the higher end of those ranges, or even higher if you can afford it.
When trying to compare prices on solar components, it’s helpful to consider the price per watt, or price per amp hour. This can provide a good baseline for determining the value of certain products.
However, just be aware that it’s not always apples to apples if you’re comparing different technologies. For example, let’s begin by comparing different types of solar panels.
Solar Panels

There are several different cell types of solar panels, and within each type, many different brands and manufacturers. But the two most practical types of panels to use for a van solar setup are monocrystalline and polycrystalline.
Vanlife Solar Components
Monocrystalline
Pros
Most efficient per square foot
Better heat tolerance
Cons
Most expensive per watt
Struggles when partially shaded
Polycrystalline
Pros
Less expensive than Monocrystalline
Cons
Less efficient than Monocrystalline
So when dealing with limited space, like the roof of a van, monocrystalline will allow you to get the most power per square foot.
Now let’s look at how different battery types compare to one another.
Batteries
The type of batteries that are useful for van setups are deep cycle batteries. This refers to batteries that can handle being slowly discharged over long periods of time.
As opposed to a car’s starter battery which is good for short bursts of huge energy to start a car’s engine, but will die pretty quickly if you try to run your car’s stereo with the engine off.
Deep cycle batteries are perfect for handling the modest electricity needs of a small home on wheels. Running lights and fans for hours at a time is no problem for deep cycle batteries.
But under the umbrella of deep cycle batteries, there are several different types.
Lead-Acid and Lithium-Ion
The two main battery chemistry types are Lead-Acid and Lithium-Ion.
Lithium-Ion is the fancy, expensive new kid on the block. But Lead-Acid batteries have been around much longer and generally cost less in the short term.
The abbreviated explanation is that Lead Acid batteries have the cheapest up-front cost, but are less energy-dense, require maintenance, and need to be vented to protect against off-gassing.
Lithium batteries are the most expensive but are the most energy-dense, require no maintenance, don’t off-gas, and are a better value in the long run.
Usable vs Nominal Battery Capacity
But the most important thing to understand when cost comparing batteries is the nominal battery capacity versus the usable battery capacity.
Nominal Battery Capacity
This is the advertised (or named) capacity of the battery. Often denoted in Ampere hours (Ah).
Usable Battery Capacity
This is the percent of the battery’s nominal capacity that can be safely used without shortening the battery’s lifespan.
The discrepancy between these two measures is because the chemistry inside a battery begins to degraded if it’s discharged too far. Batteries have something called a Depth of Discharge, or DOD. This is what percent of the battery can be discharged before damaging the battery or shortening its lifespan.
Lithium batteries can usually handle nearly 100% DOD while Lead-Acid batteries can usually only handle about 50% DOD. So a Lithium battery’s usable capacity is the same as its nominal capacity, while a Lead-Acid’s usable capacity is only about half of its nominal capacity.
“Wait! Are you saying that you basically can’t use half of a Lead-Acid battery’s total power?!?!?”
Yes, unfortunately.
If you want a battery to last until its advertised lifespan, then keeping at or above the DOD is critical.
For example, in order to have 100Ah of usable battery capacity, you would need a nominal 200Ah Lead-Acid battery vs just a nominal 100Ah Lithium battery.
I find this to be the most important thing when comparing batteries. Be sure to consider the price per usable capacity rather than nominal capacity.
Off-Grid Solar Kits
A helpful product available to consumers is solar kits that have pre-chosen components that integrate well with each other. This saves you the trouble of picking all the parts individually. They can really help beginners hit the ground running on assembling a solar setup.
Northern Arizona Wind And Sun Kits


We bought our solar kit (which has slightly different components now) from Northern Arizona Wind and Sun (NAWS) because they have really competitive pricing and amazing customer service.
Seriously, their employees were really patient for many phone calls to help talk me through all my questions during installation (especially considering I’m a small fish compared to their bigger clients).
They provide solar equipment for many large residential and commercial setups, and I believe that’s why they can offer such amazing prices, especially on panels. And they offer the most complete kit I have seen that includes nearly everything you need to have a working system with panel, charge controller, battery, inverter, and nearly all the connections in between.
They also let you make any changes to their kits if you want to add, change, or remove anything.
For example, we added a second battery to this kit to take our total storage from 100Ah to 200Ah.
Doubling our battery capacity allows us to last longer during times when we don’t get enough sun to get back up to full charge (like winter or cloudy weather).
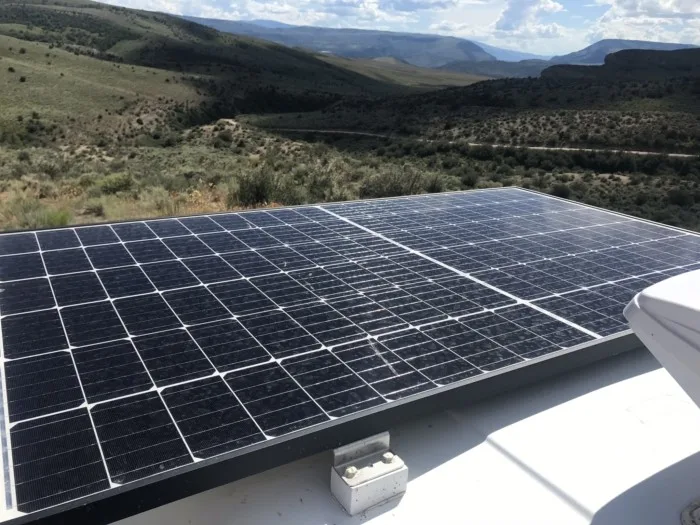
And since NAWS offers residential and commercial size panels, we were able to get a single large panel that’s rated at 320 watts! This made installation simpler because I only needed to mount and wire a single panel to our roof.
However, the one drawback to Northern Arizona Wind and Sun is that their shipping costs specifically for panels and batteries can be quite expensive. We were able to avoid those costs by picking up our kit in person at their Flagstaff, AZ headquarters.
So if you live or travel near Arizona, it could be a good option to pick it up in person. Otherwise, they do their best to work out a reasonable shipping method for you.
Renogy Solar Kits
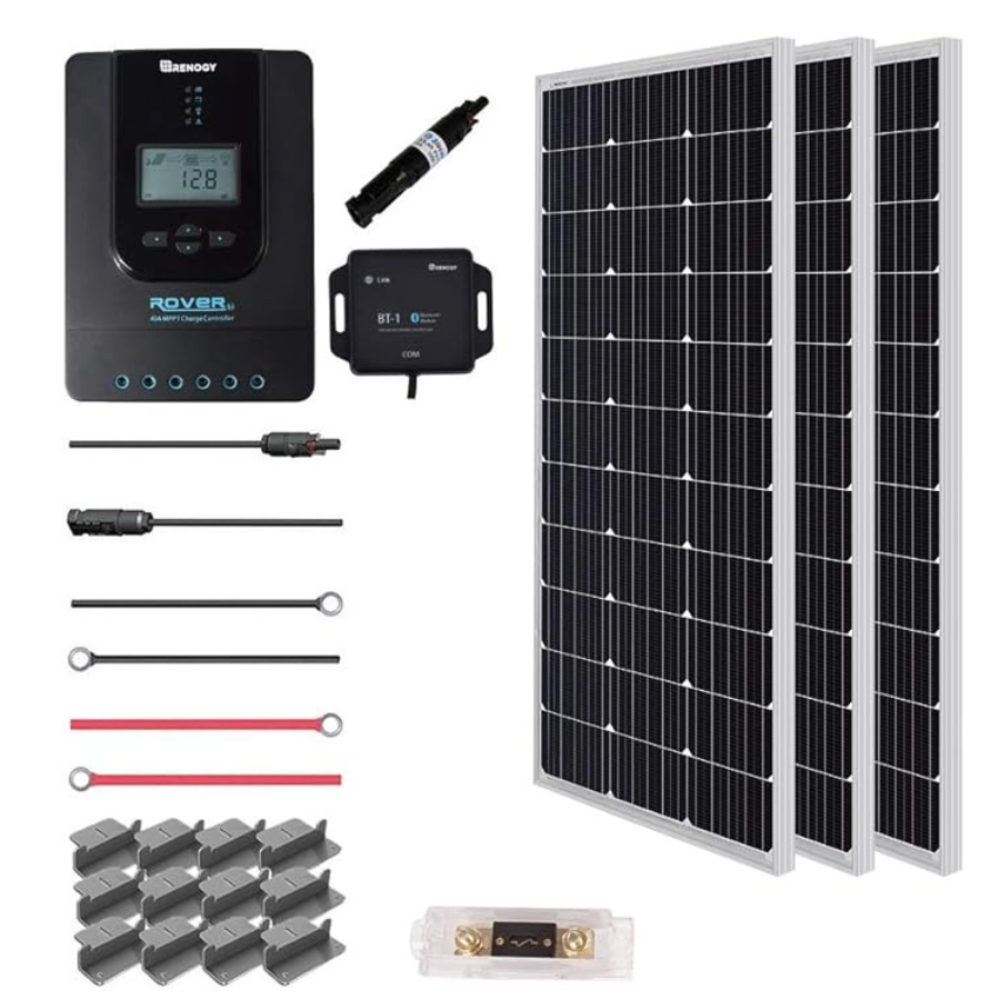
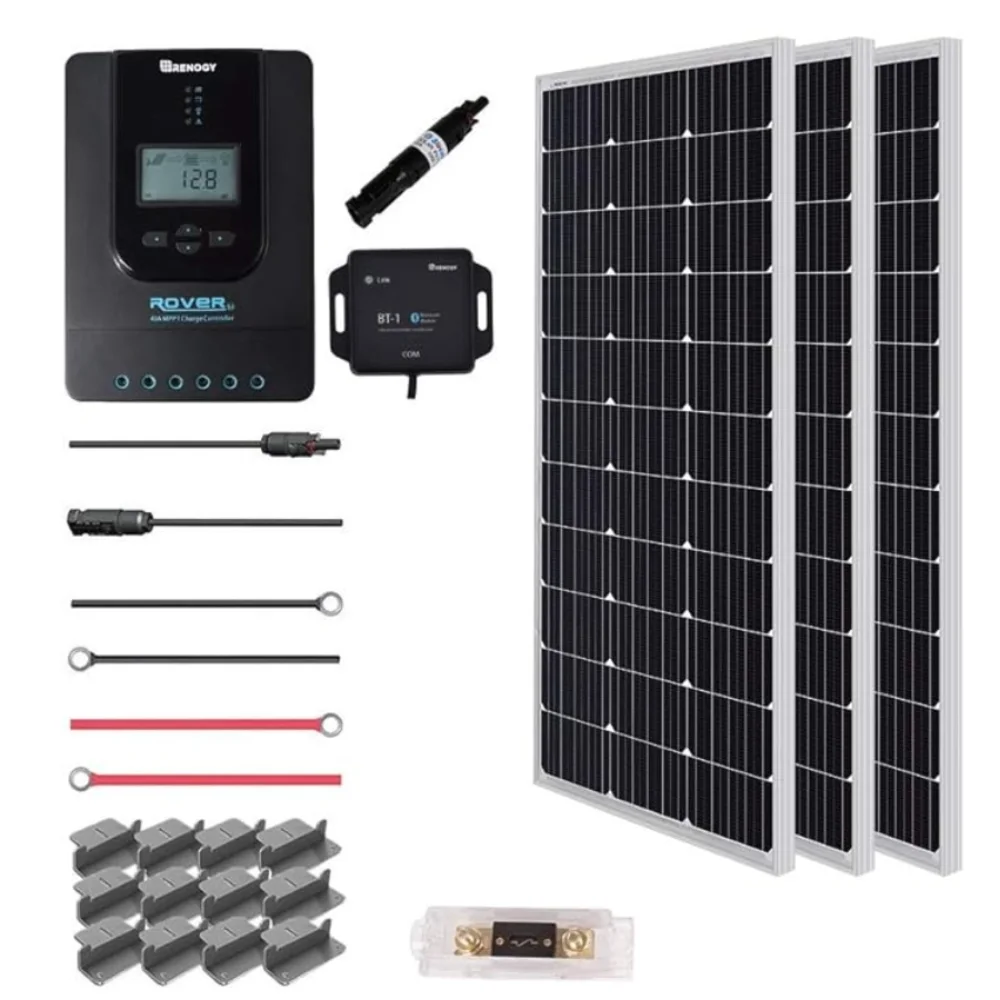
Another really popular solar kit is this 300W Solar Kit from Renogy. Renogy is a high volume supplier of RV/van/marine solar equipment.
The benefit of buying from Renogy is that their popularity has led to a huge amount of third-party resources detailing how to install their kits.
A quick google search usually turns up hundreds of videos of people installing, using, and troubleshooting their products.
They also have a wide variety of kits in different sizes (100W-1000W+), in addition to selling a variety of other components like batteries, inverters, wiring and other parts.
And another benefit of Renogy, is that they offer free shipping on a wide variety of kits and components.
However, they don’t allow any other modifications to their kits. And the one negative of a Renogy kit (like the one linked above) is that they don’t include everything you need. You still need to purchase a lot of the other components separately. Which will require a good deal of research and shopping around.
Their kits usually come with solar panels, panel mounting hardware, charge controller, wiring, Bluetooth module, and panel fuse. Which is a really great start to get your panels mounted and connected to the charge controller.
But you will then need to buy and assemble the rest of the components that take the power from the charge controller through the batteries and then out to your devices.
Comparison
Northern Arizona Wind & Sun
Pros
Best prices on Panels
1 on 1 Customer Service
Most complete kit
Cons
Expensive Shipping
Some components limited/expensive
Limited third-party resources
Renogy
Pros
Lots of third-party resources
Free Shipping*
Cons
Not complete kit
More expensive panels
Hit or miss customer service
Do you know of any other good suppliers of solar kits that I missed? Please share in the comments.
Building a Solar Setup without a Kit
You can potentially save money if you buy all the parts for your solar setup individually. But I don’t recommend this method for beginners. For starters, this puts the pressure on you to understand the specific ratings and limitations of each component you choose to ensure that they will work together.
For example, if you buy 600 watts of solar panels, you need to ensure that your charge controller is capable of handling the maximum power those panels can produce.
However, if you really take the time to understand the tech specs of each component, then it’s totally possible to choose parts individually for your solar setup. And by shopping around for the absolute lowest price on each component you could potentially save money.
Next Steps
I hope this post has helped you to understand the basic concepts and products of vanlife solar components. Don’t be intimidated if you don’t quite understand everything. Even experienced solar installers will occasionally have to research and relearn things as they work.
Now that you are comfortable with the components of a solar setup, let’s figure out how to connect everything together. Head over to Part 2 of my solar guide: Wiring, Connectors, and Crimping.
How Much Did Our DIY Camper Van Conversion Cost - tworoamingsouls
Friday 5th of May 2023
[…] Vanlife Solar: Beginner’s Guide To Solar Components. […]
What is a DC to DC Charger: Vanlife Alternator Charging - tworoamingsouls
Thursday 27th of April 2023
[…] if you are planning a vehicle solar system from scratch AND you plan to have a smaller solar array, then these dual-input DC-DC chargers are […]
How To Get Vanlife Internet? | Best Devices For Portable Wifi - tworoamingsouls
Thursday 6th of April 2023
[…] Campervan Solar […]
Van Conversion Build Order | Step By Step Guide - tworoamingsouls
Monday 23rd of January 2023
[…] This is a good time to install your solar panels so that you can run the wiring underneath your ceiling and walls. If this step is daunting, we suggest checking out this beginner’s guide to solar. […]
Solar 101 for Solo RV & Vanlife - Solo Women RV
Tuesday 3rd of May 2022
[…] A beginner’s guide to vanlife solar […]