
I got into mobile photography starting all the way back with the iPhone 4s. The camera(s) built into modern smartphones have come a long way. They allow even beginner photographers to take amazing photos.
My passion for taking great photos has helped me get the most out of my iPhone cameras. There are definitely limitations, but you can learn to navigate these to still get great shots.
This guide helps teach amateur photographers how to take stunning outdoor photos with a smartphone.
This post may contain affiliate links. Disclosure policy.
Mobile Photography Gear
I only use two things besides the stock iPhone itself, when taking stunning outdoor photos with a smartphone, but none of them are absolutely required to achieve similar results.
My portable tripod is the Xenvo Squidgrip Tripod. I love this little tripod; its weight-to-functionality ratio is superb.
And the best tripod is the one you’re actually willing to carry with you. (I only use the tripod for taking long exposure pictures, and for taking pictures of Emily & I. Read my other post about shooting long exposures.)
I clean my camera lens with a microfiber screen cleaning cloth. You can usually get these for free. Companies love to give them away as promotional merchandise, or as throw-ins with sunglasses, electronics, etc.
Setup Up For A Shot
Before you begin, inspect the lens for fingerprints, dust, or other debris. A good tip for how to take stunning outdoor photos with a smartphone is to always have a microfiber cloth with you. I usually keep a few microfiber cloths around in my car and my backpacks, so I always have one nearby. If you have smudges or fingerprints on the lens, it will set you up for failure and blurry photos.
Follow these steps to properly set up for a shot. First, choose your subject. Remember, your job is to direct someone’s gaze when they view your image. So decide exactly what it is you are trying to show.
If your subject is taller than wide, use portrait orientation. If your subject is wider than tall, use landscape orientation (turn your phone sideways). Find the best place to hold your camera and don’t be afraid to move your body!
The best way to do this, is to frame your subject as large as possible by moving yourself (or your subject if you can). Now, view your subject on your phone’s screen. Try to be as close to your subject as possible without cutting off any part of it. This ensures that you capture your entire subject in the highest resolution possible.
What To Consider To Capture Great Photos
There are four main things that I consider when structuring photos; focus, lighting, three-dimensional space, and two-dimensional space. With practice, you can learn to consider them all simultaneously. But let’s break them down one by one.
Focus
Smartphones make this pretty simple because they default to auto-focusing everything in view. Or sometimes they intelligently detect the subject and focus at that distance. So for most mobile photos, you can just point and shoot.
However, you can manually adjust the focus. By simply tapping a specific part of the screen, you can tell the camera exactly where to focus.
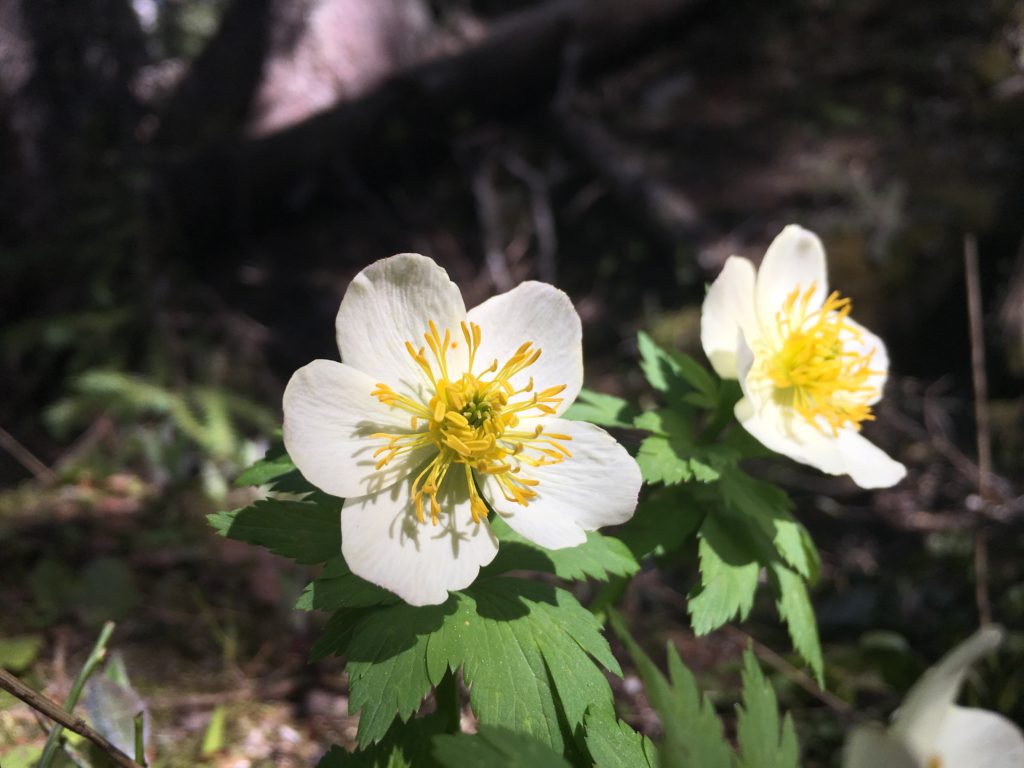
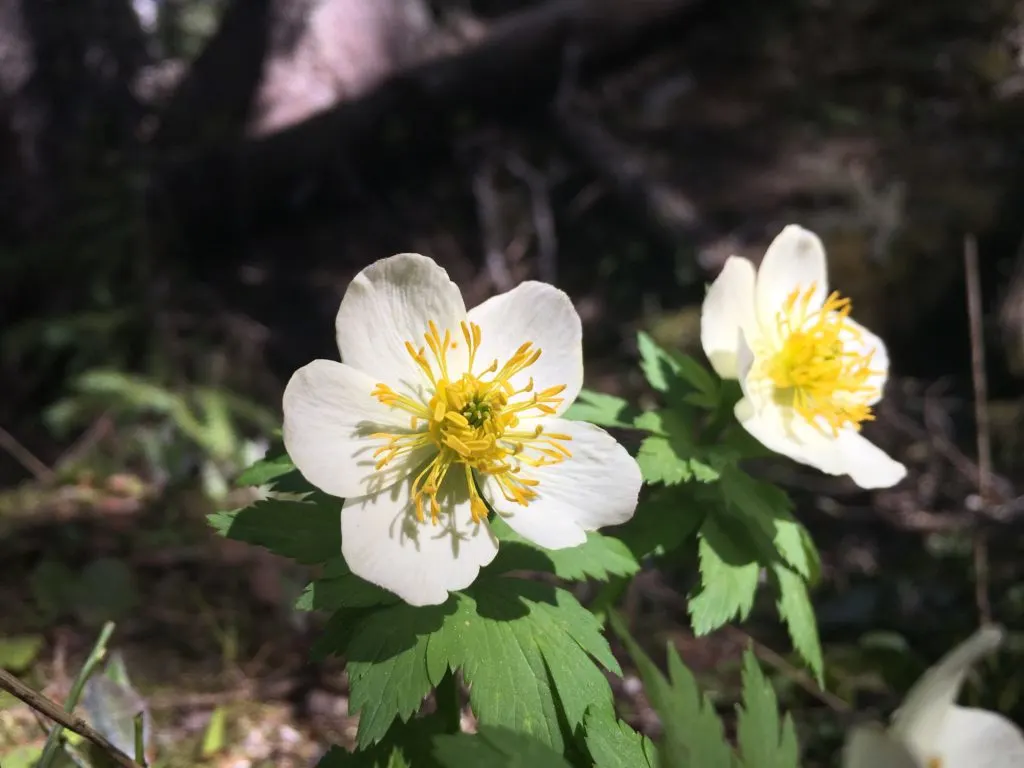
Most of the time I just want everything to be in focus, but sometimes I want my background to be blurry so the subject in focus really pops out at you (or the less common, blurry foreground and in-focus background). Here’s an example of both

Lighting
Your goal is to achieve a healthy balance of contrast between the brightest and darkest parts of your photo. Yes, you can adjust things like this in post-editing, but nothing beats just getting it right the first time.
If any parts of your image are too bright or too dark they will lack color and detail. So again, it’s a balance that we are looking for.
First, consider what your source of light is. I pretty much never use the flash on my camera phone. I find the light from a flash to be too white and abrasive.
Since I mostly photograph nature, flash has no business in most of my photos. And even for portraits, I always prefer the diverse character of natural light.
For this reason, my lighting is almost entirely dependent on the sun. When the sun is directly overhead, it is the most difficult time to get artistic lighting.
When your subjects are lit from directly overhead, they lose structure and can look really flat. Or you can also get an effect similar to when someone holds a flashlight under their chin to tell a campfire story, except the light is just coming straight down from above. Not a flattering look.
Generally, the lower the angle of the sun, the better structure is created with shadows. Lighting usually becomes most favorable around sunrise and sunset (colors often pop too).
Also, take into consideration the reflectiveness of things in your environment. The sun can reflect so profoundly off of water, snow, and glass that it can ruin any chance for a good photo. Or it can be used to your benefit.
Conversely, the sun’s light can reflect beautiful colors off of objects and onto your subject. For example, if your subject is standing next to a big red barn, a warm reddish color may be reflected onto your subject.
Mobile photography is very accessible because the phone automatically adjusts the brightness (exposure) for you.
However, I recommend that you always double-check the exposure and make adjustments as necessary. You can adjust the exposure by using the exposure slider. Or you can tap a certain area on the screen to optimize the brightness for that area.
I generally adjust my brightness to cater to the brightest part of the image. I have found that brightening a photo that is too dark yields better results than darkening a photo that is too bright.
One of the most common problems is having the sky completely overexposed. And once the sky is entirely white, no amount of darkening will bring its color or definition back.
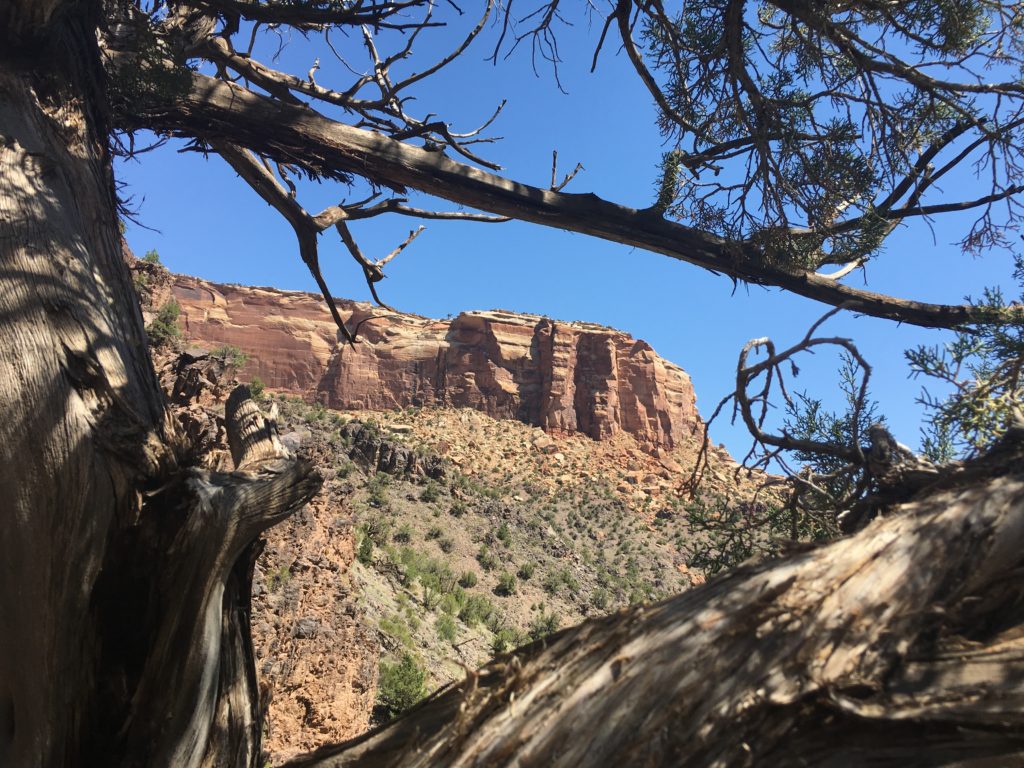
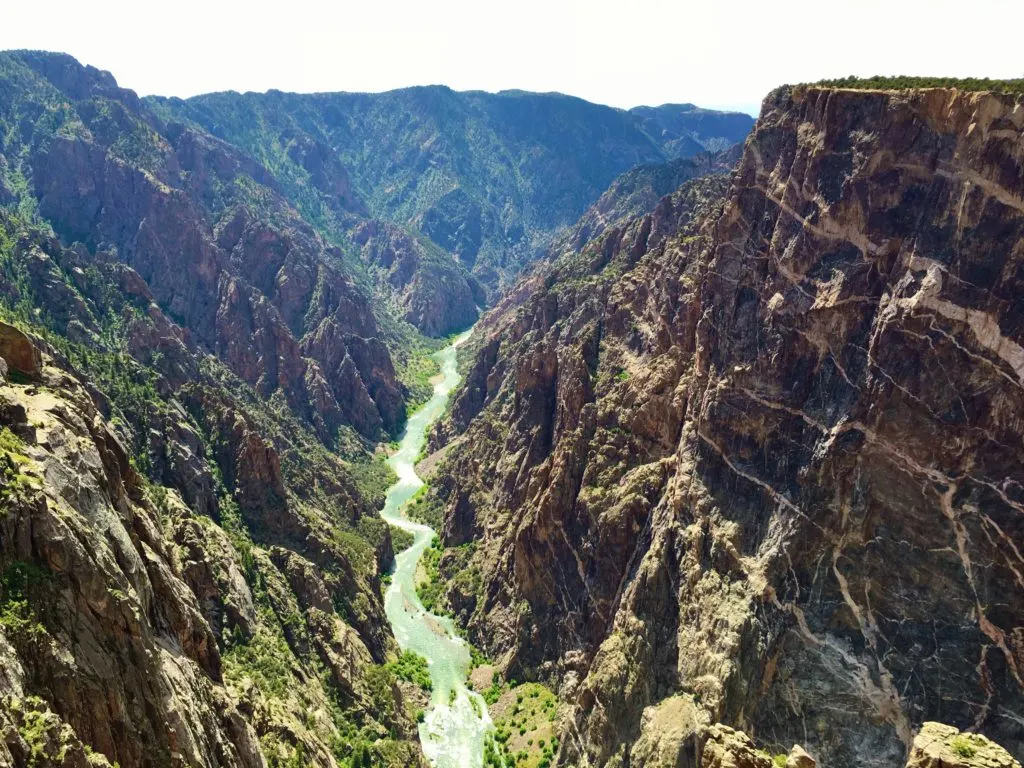
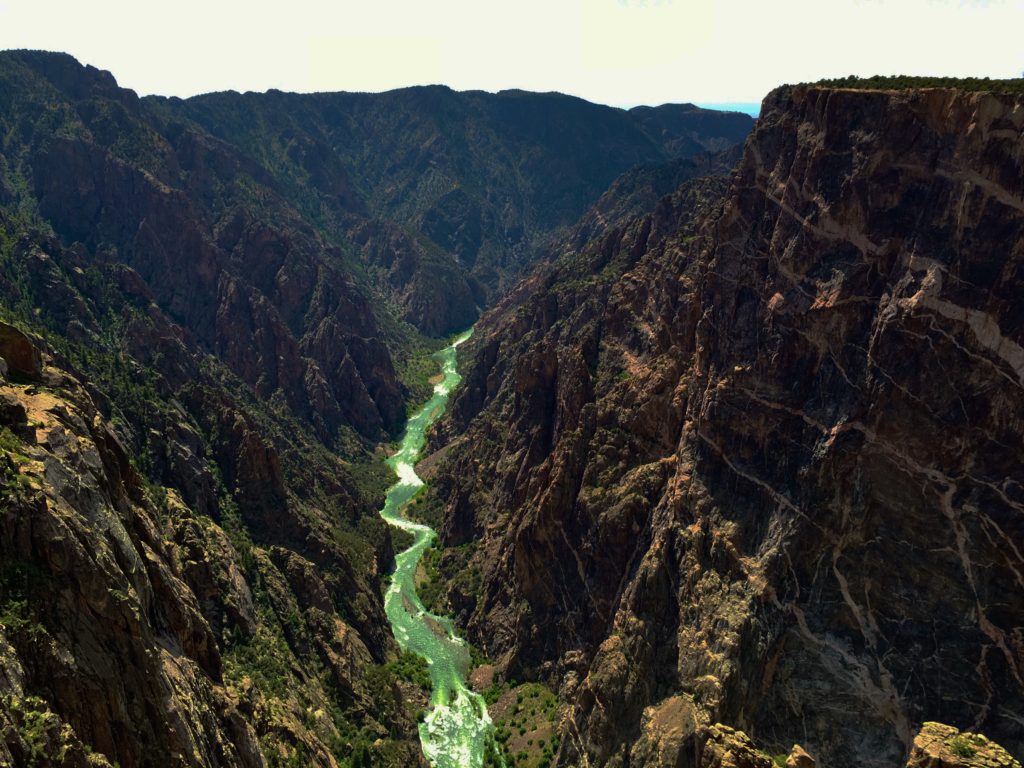
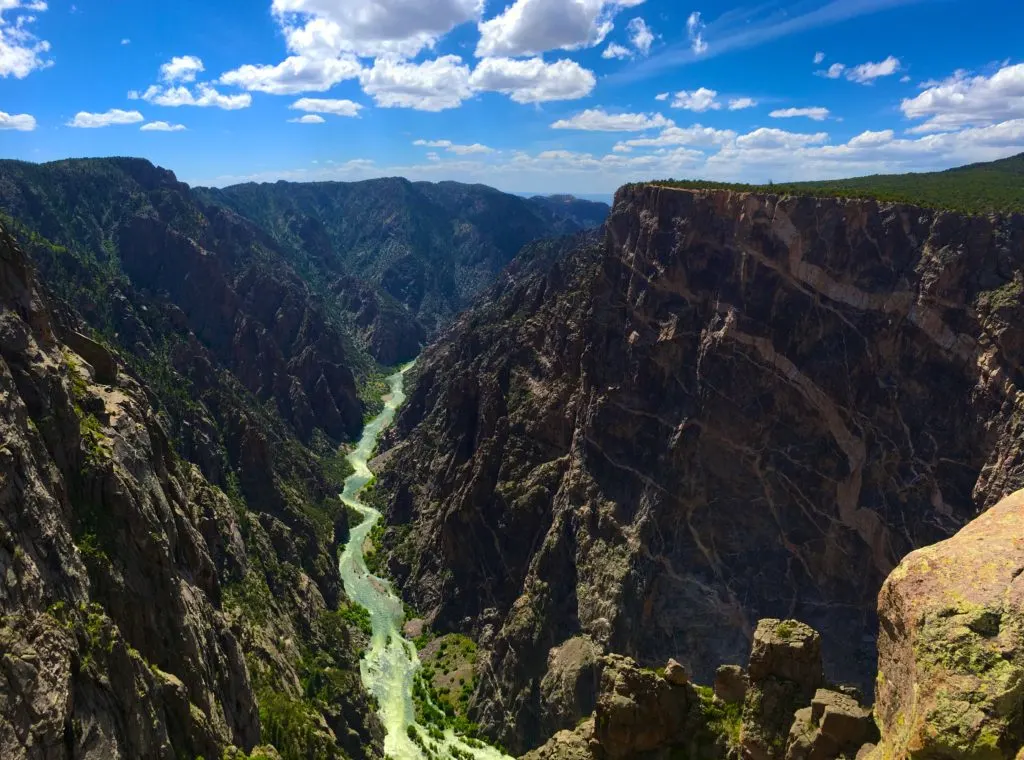
For example, before snapping this next photo, I manually adjusted the brightness for the canyon wall by tapping on it. The canyon wall looks great, but the sky got completely over-exposed. The second photo is an edited version with the brightness turned down. But as you can see, the sky never regained color, and the canyons are now far too dark.

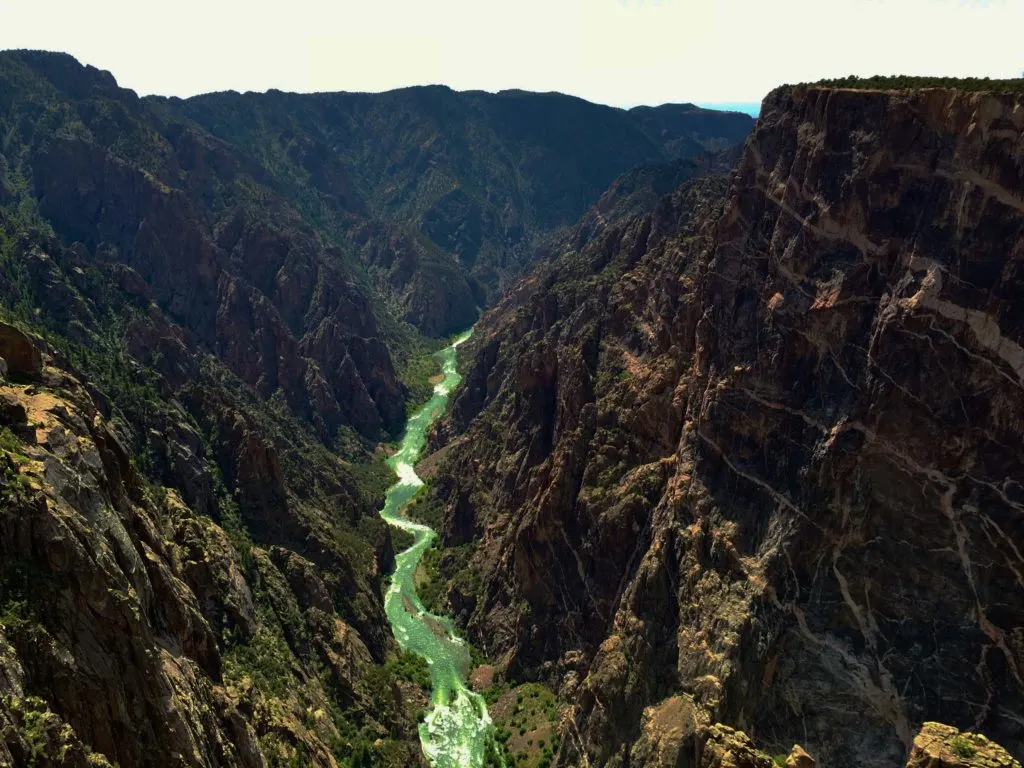
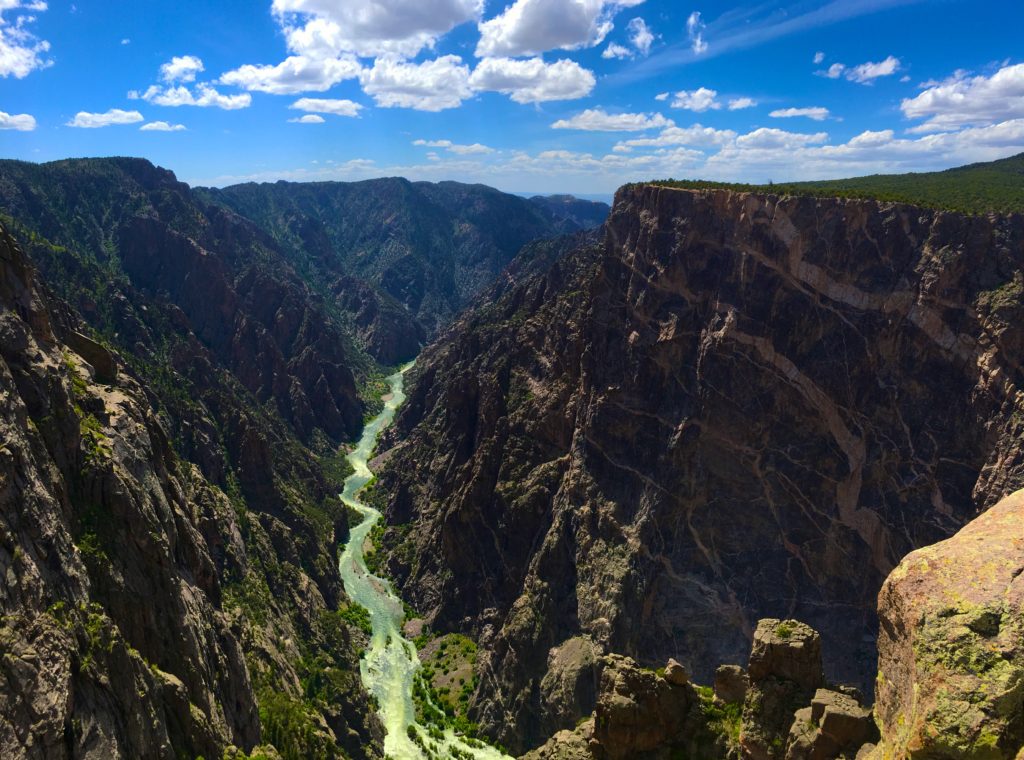
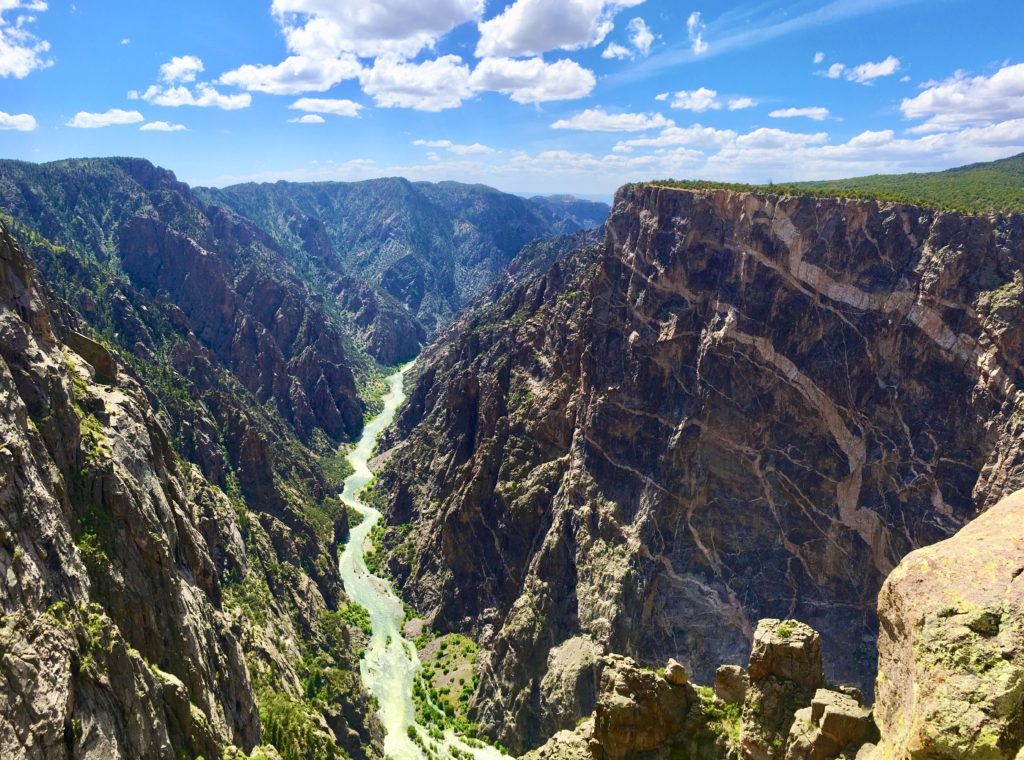
Below is another photo taken moments later, but with the brightness manually adjusted to the sky. Here, the sky looks great but instead, the canyons are a little too dark. But by boosting the brightness a little, the resulting image is a much better image than the previous example.

Three-Dimensional Space
You should pay attention to the background, middle ground, and foreground of your photos.
The interaction of objects at various distances is what determines the three-dimensional makeup of your photo. It’s good to have a layering of scenery at different distances.
Take this photo for example.
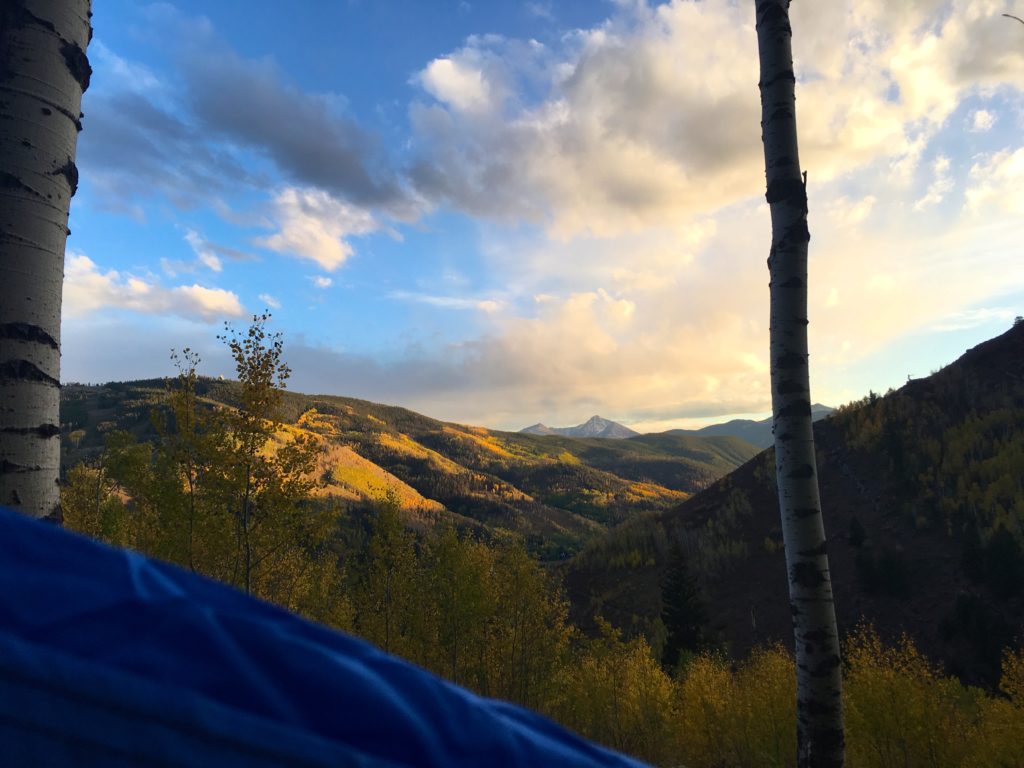

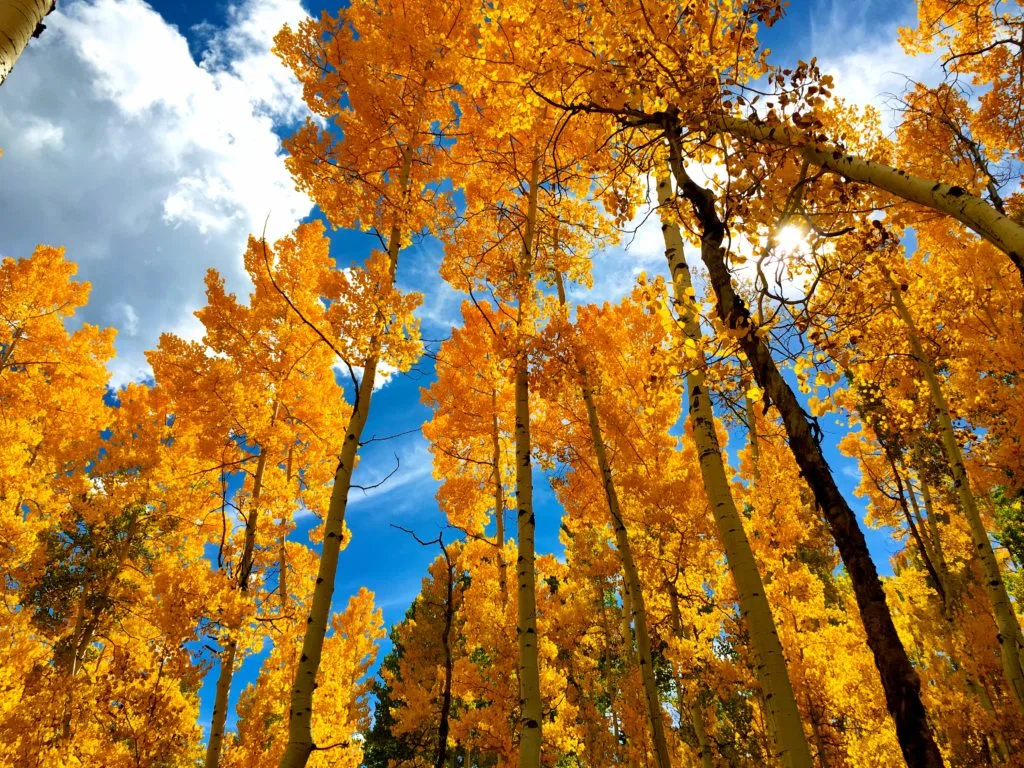
Here, I am hammocking with a nice view of Mt. Holy Cross.
Luckily, there are some other objects in the foreground to give my photo a little more to look at. These two trees in front of me provide a little action in the middle ground.
And I can even bring the camera right down into my chest so that part of my hammock is showing in the corner.
Now this photo has some character. Not only can you enjoy the fall colors and Mt. of the Holy Cross in the background, but you also get the foreground context of me relaxing in my hammock. It’s part of the fun of finding creative ways to incorporate different layers into your photos.
Having things in the foreground helps the viewer place themselves in the scene. The viewer can feel the presence of the hammock.
Two-Dimensional Space
Before you press the shutter, you want to consider how the three-dimensional world will look once it is turned into a two-dimensional photograph. What kind of visual balance will your photo have? Most photos fall into two categories: symmetrical and asymmetrical.
Symmetrical photos have the subject right in the center of the photo, and asymmetrical photos have the subject offset from the center.
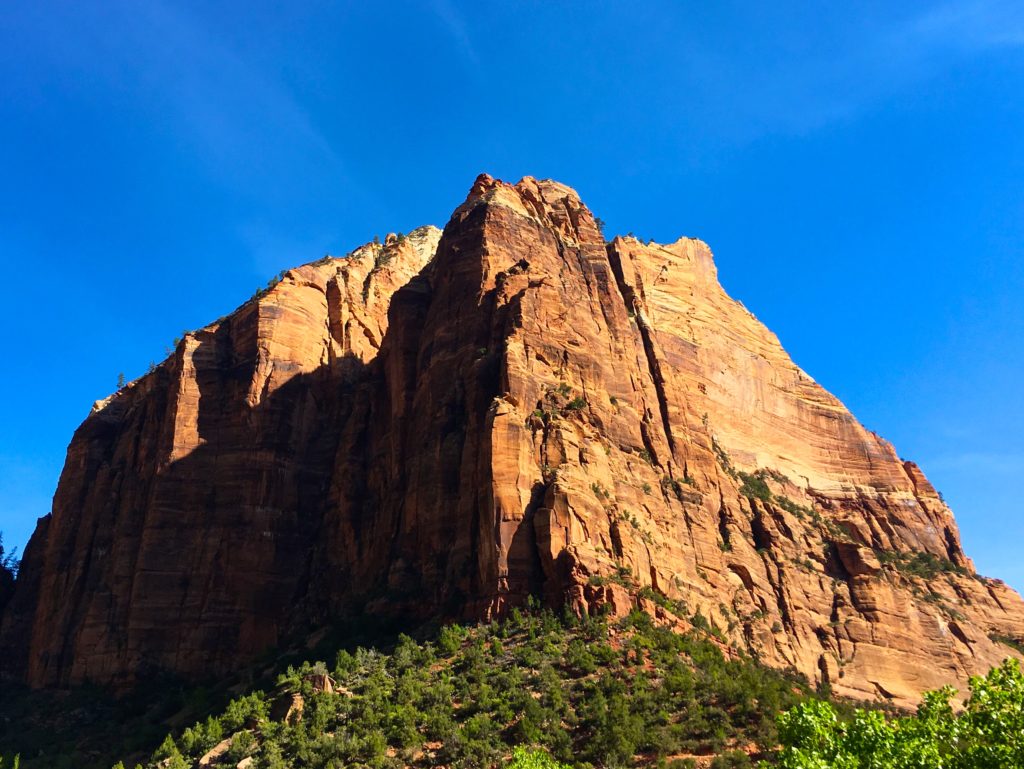
Symmetrical photos are good for highlighting a singular subject and often ignoring the background. This scene from Zion National Park was perfect for a symmetrical photo because of the natural symmetry of this rock.
And the late afternoon light casts a nice shadow providing a visual dividing line down the center.

Asymmetrical photos are inherently off balance, however, it’s still good to have some sense of visual order.
Luckily, we have the Rule-Of-Thirds. It is a universally understood concept that helps structure a visual balance in photos.
It’s really easy to follow because most smartphones have the ability to add in a Rule-Of-Thirds grid. These guidelines divide the screen into horizontal and vertical thirds (think tic-tac-toe board). They can help you create satisfying visual balance in your images.
First, adjust your camera so that your subject is aligned with one of the vertical lines. Next, try to line up any strong horizontal features (horizon, cloud layers, canyons, mountains, buildings, roads, etc.) with one of the horizontal lines. The photo below shows a pretty textbook use of the rule-of-thirds.

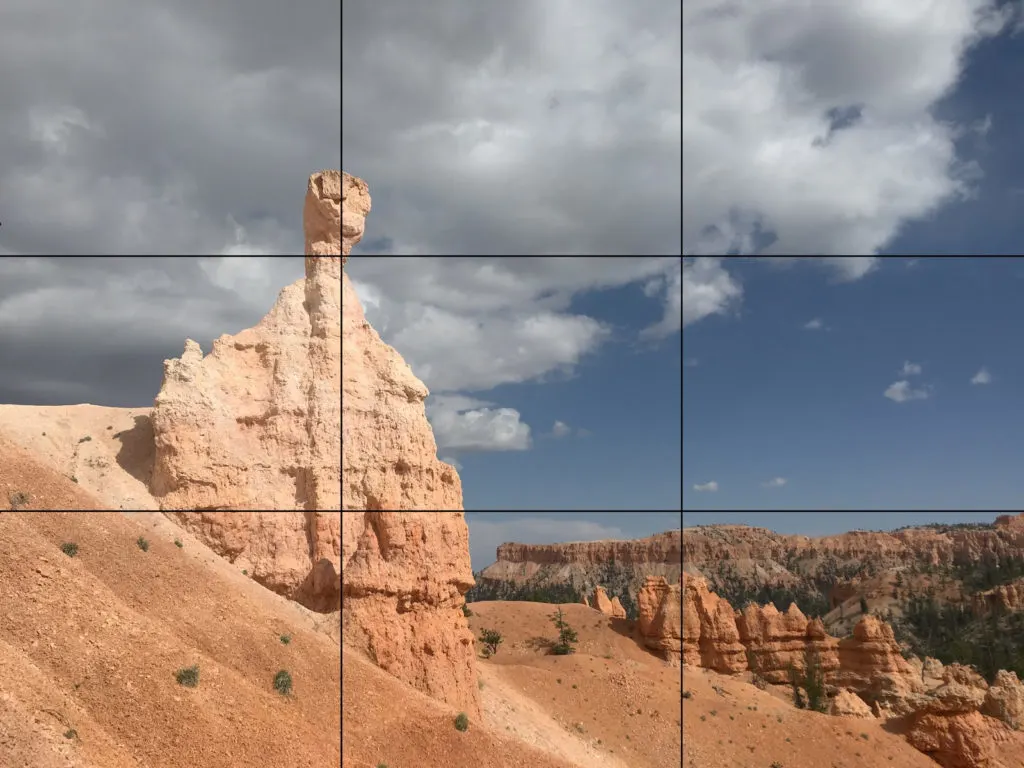
You can see the rule of thirds working on two different axes here.
The subject of the photo is the funny-shaped rock formation hoodoo in the foreground on the left. The bulb at the top of this rock is placed near the top-right intersection point. The clouds and the canyon rim in the background loosely follow the horizontal lines.
It doesn’t matter that it doesn’t line up perfectly, we still achieved our goal of creating visual balance. Plus, nature is all about freeing yourself from boxes anyway!
Shooting Technique
Once you are ready to take your picture, always hold the camera as still as possible when pressing the shutter, to ensure the best clarity.
For any kind of long-exposure photo, be sure to use a tripod and a timer.
Often when I shoot photos, I’m on the go and the sun can make it hard to see my phone screen. If I am debating between two or three different options for the same photo, I can just shoot all of them and then evaluate them later.
Editing
My biggest piece of advice for beginner photographers is to use editing tools in moderation. Unless you are intentionally editing to achieve an ‘artsy’ look, edits to things like color, brightness, and contrast should be used sparingly.
Cropping
My first edit (if needed) is minor cropping. If I failed to line up the shot exactly how I wanted, I can use cropping to make those minor adjustments (especially when trying to fit to the rule of thirds).
Brightness
Next, you may want to adjust the brightness of your photo. The brightness slider will brighten all parts of your image collectively.
Highlights & Shadows
For more advanced control, you can use the ‘highlights’ and ‘shadows’ controls. These sliders let you selectively just change the brightness of either the brightest parts or darkest parts of your image.
I find that if you increase the brightness of your image, it will often overexpose the highlights. So you can decrease the highlights to recover them.
Contrast
Contrast increases (or decreases) the difference between the light and dark of your photo. Increasing contrast makes the darker areas darker and the lighter areas lighter. And decreasing contrast brings all the brightness levels closer together.
Saturation & Vibrance
Two common color-based editing tools are saturation and vibrance. Saturation will simply increase or decrease the saturation of all colors in your image.
Vibrance, on the other hand, only increases (or decreases) the saturation of colors that are dull in the image. A common mistake that amateur photographers make is to boost saturation and vibrance too much. In most cases, an oversaturated photo just begins to look fake and inauthentic.
Temperature
Another useful editing tool is temperature. This can change the “temperature” of your entire photo. Typically this can be used to minimally alter the feeling of a photo. I typically let the setting of the photo dictate how to alter the temperature. That is, a snowy photo at a ski resort can be shifted slightly blue to sell the feeling of winter. Whereas a photo at the beach can be skewed warmer to evoke those sunkissed vibes of summer.
I hope these tips for how to help take stunning outdoor photos with a smartphone help you to improve your photography skills.
How To Shoot Long Exposure Photographs With An iPhone - tworoamingsouls
Monday 7th of March 2022
[…] it often has to be to get these shots. Once you’ve found a stable tripod location and covered your basics for setting up a photo, it’s time to change your […]
Alyssa
Tuesday 16th of April 2019
Your web site has excellent web content. I bookmarked the website