
This is a detailed review of Starlink Roam and our experience using the satellite-based internet service for full-time vanlife. We discuss the specifications of the product and the user experience.
Starlink Roam (formerly Starlink RV) is the location-independent product offered by Space-X. This means that your internet service isn’t tied to a specific address. So for nomads, like ourselves, Starlink Roam allows us to access high-speed internet while we travel.
Starlink Roam Internet is ideal for people who travel in remote areas with poor cell reception. So we are definitely the target audience for this product.
But what is the reality of using Starlink Roam? Here’s our review.
This review is NOT sponsored or in any way affiliated with Starlink. We pay full price for Starlink Roam.
Cost Of Starlink Roam
With Starlink Roam, there are two monthly pricing tiers of service and two satellite dish options.
The two monthly pricing tiers are Regional and Global. These plans dictate the geographic regions where you can use the service.
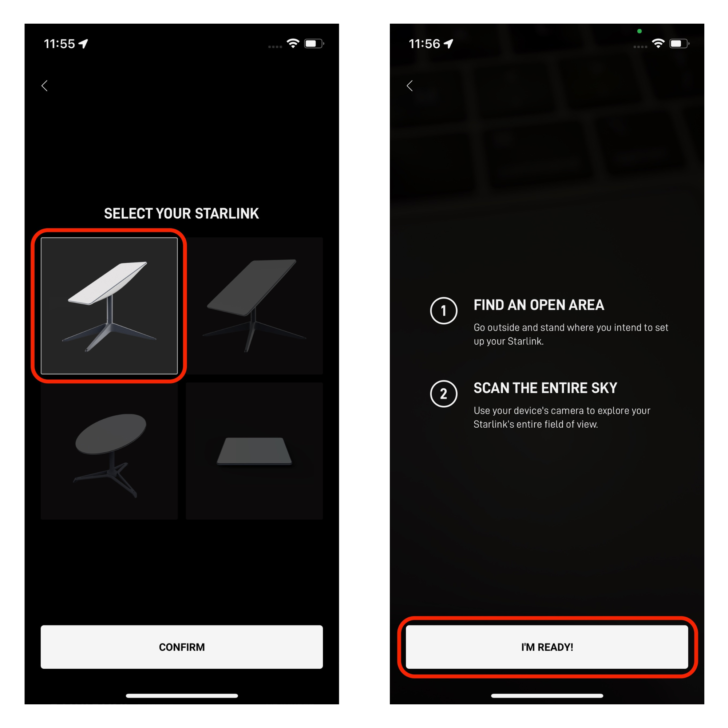
And there are three satellite dish options for Starlink Roam: the Standard Dish, Flat High-Performance Dish, and the Mini Dish.
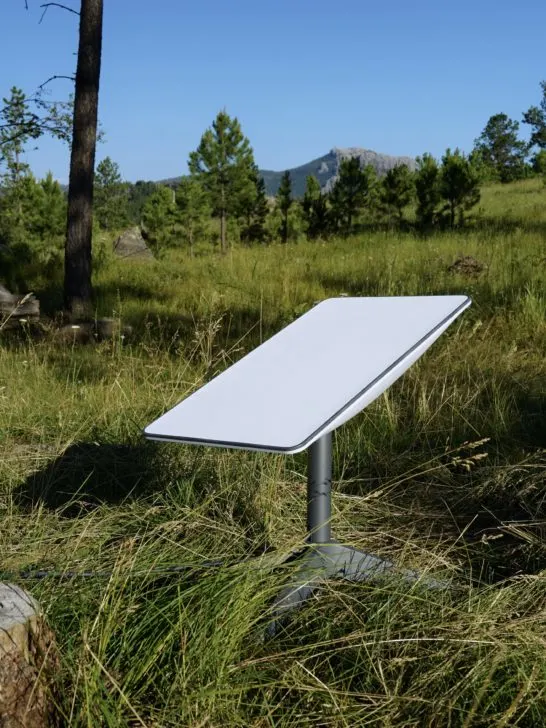
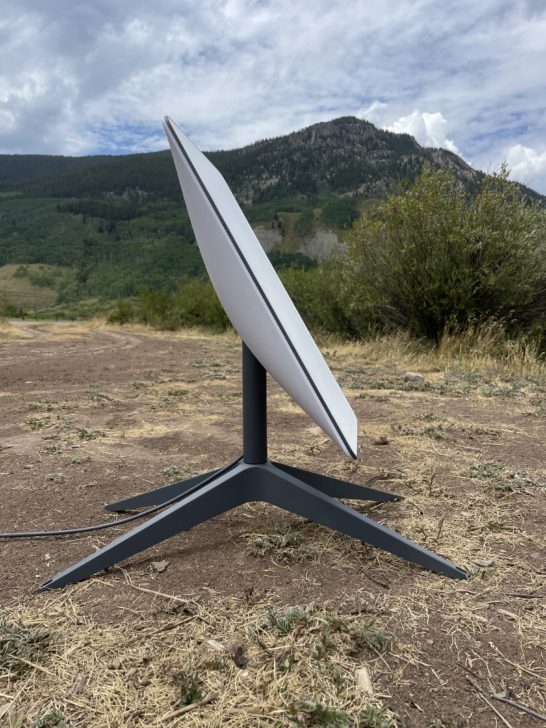
The Standard Dish ($599 one-time fee) is designed for stationary use and is not designed for permanent mounting on moving vehicles.
The Flat High-Perfomance Dish ($2,500 one-time fee) is designed for in-motion use and can be permanently mounted on moving vehicles.
The Mini Dish ($599 one-time fee) is designed for travelers and can easily fit into a backpack.
Starlink Regional ($150/mo)
Starlink Regional is restricted to the available coverage regions in your home country, plus 2 months per year in other covered countries on your continent.
For example, if you are a USA customer, you can use your Starlink Regional for 2 months of travel in Mexico or Canada (per calendar year).
Starlink Regional costs $150 per month and provides unlimited data.
Starlink Global ($200/mo)
Global Roam gives you access the all the regions of the world currently covered by Starlink.
Starlink Global costs $200 per month and provides unlimited data.
We chose the Starlink Regional with the Standard Dish because we plan to use Starlink mostly in the US and while parked.
Hardware That Comes With Starlink Roam (Standard Dish)
The necessary hardware includes the Starlink Standard Dish, Starlink router, AC power cord, and dish power/communication cord. They have since undated the Standard dish to a much thinner design and only has a small kickstand.

Starlink Hardware Dimensions & Specs

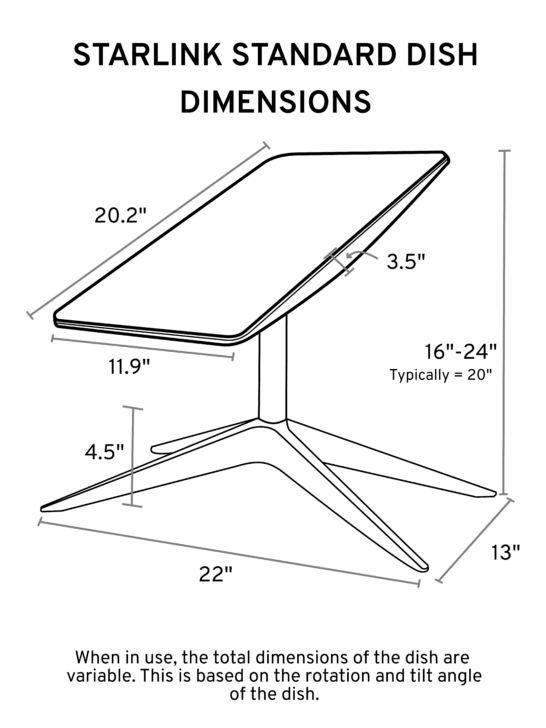
Standard Dish Specs (Dish Only):
- Length: 20.2 in (513 mm)
- Width: 11.9 in (303 mm)
- Height: 3.5 in (89 mm)
- Weight: 6.4 lbs (2.9 kg)
Starlink Stand Only:
- Length: 22” (558.8 mm)
- Width: 13” (330 mm)
- Height: 4.5” (114.3 mm)
Standard Dish Assembled (Dish & Stand):
When in use, the size of the dish/stand is variable. It changes based on the angle and rotation of the dish.
- Length: 22” (558.8 mm)
- Width: 13”-14″ (330 mm)
- Height: 16”-24” (Usually around 20”) (406-609 mm)
Starlink Router Specs:
- Length: 7” (178 mm)
- Width: 3” (76 mm)
- Height: 10” (254 mm)
Other Specs:
- Satellite Dish Cord Length: 50 feet (15m)
- AC Power Cord Length: 6 feet (1.8m)
Download The Starlink App
Before you begin, you should download the Starlink App. It provides all kinds of useful controls, settings, speed tests, obstruction tests, and more.
Note: Some functions of the Starlink App do not work with a VPN on (i.e. advanced statistics tracking, Starlink dish settings, and others). When necessary, we disconnect our VPN for a moment to utilize these features, and then turn it back on after.
How To Set Up Starlink Roam
Starlink Roam is very simple to set up. You simply place the Starlink Dish outside in a suitable location. Then plug the dish cable into the router, and finally plug the AC power cord into the router and into an AC power outlet.
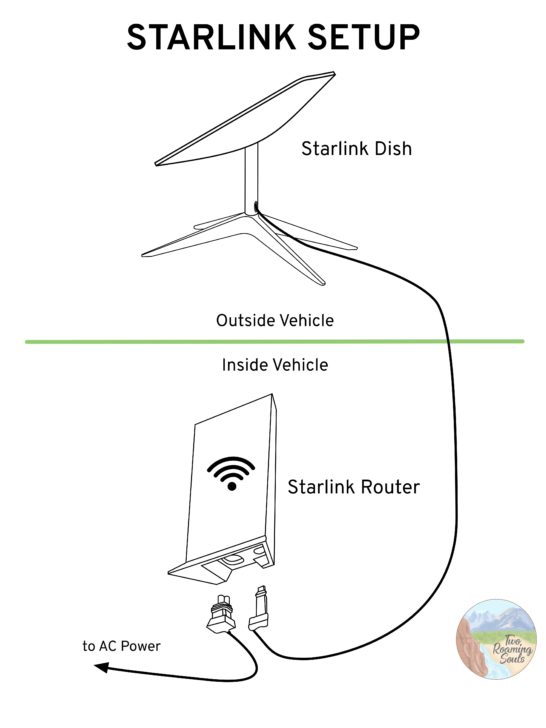

Starlink then connects to the internet within minutes and you will be prompted to name your WiFi network and set a password.
Finding A Good Place For The Starlink Dish

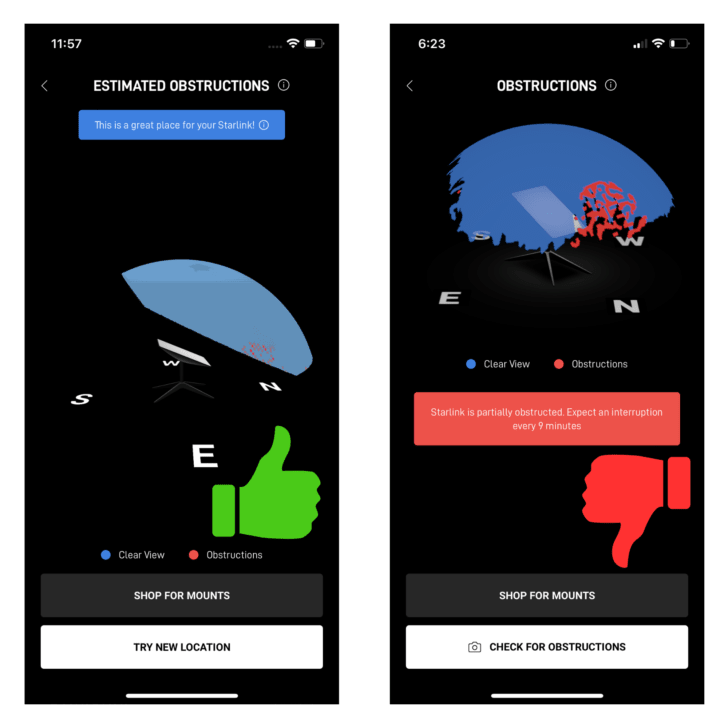
The Starlink Dish requires a ‘clear view of the sky’ in order to provide uninterrupted high-speed internet.
This is described as a 270-degree unobstructed view of the sky, which allows the dish to receive signal from the low earth orbit satellites. Things like trees, buildings, mountains, canyons, or even your own vehicle can be considered obstructions.
Dish Placement is the most important thing for using Starlink Roam.
So prospective users should consider the conditions where they are likely to use it. It may dictate which types of campsites and parking locations you stay at.
Obstructions Test With Starlink App
You can use the Starlink App to run an ‘Obstructions Test’. This uses your phone’s camera to scan the sky for possible obstructions. For the best internet service, you want to find a location with zero obstructions (within a 270-degree view of the sky).
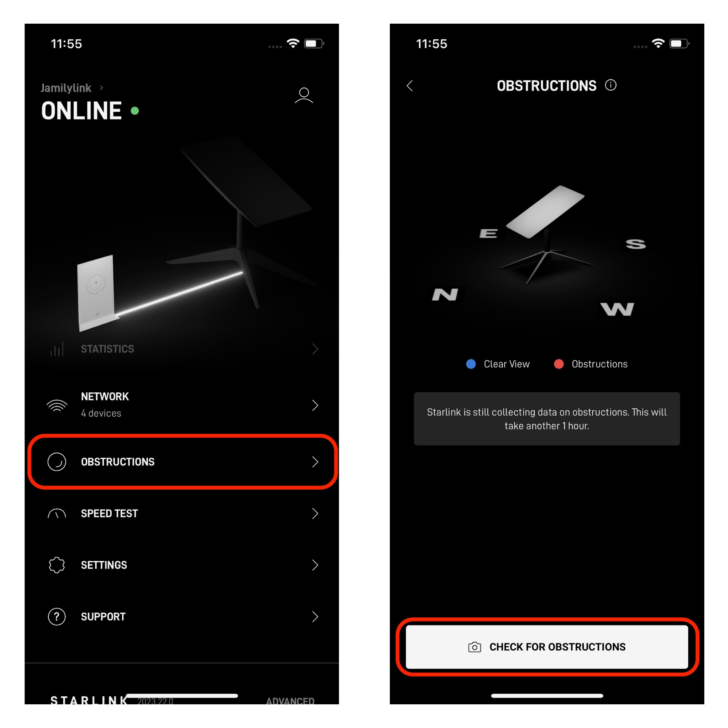

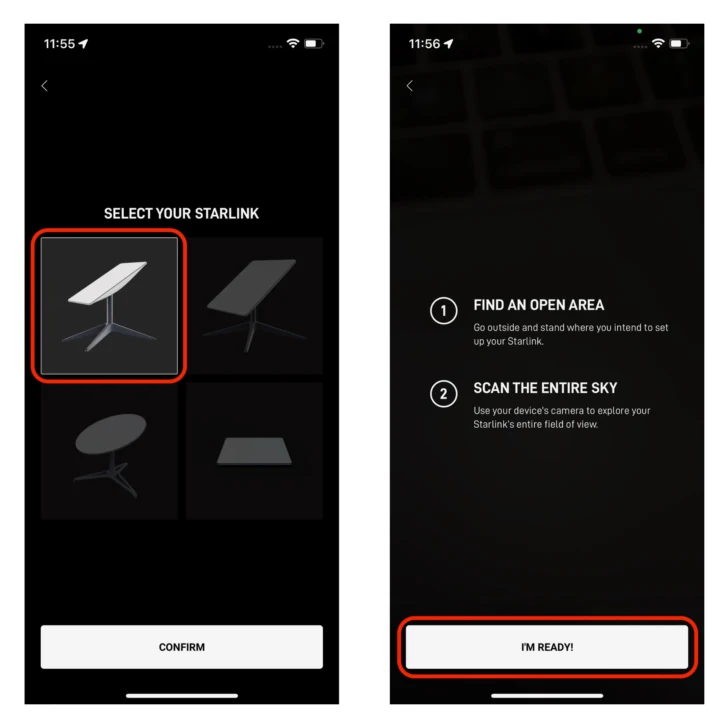

One minor thing to consider is that the Obstructions Test instructs you to stand where you intend to place the dish. But if you are placing the dish on the ground, its field of view might be slightly different than your phone held up at standing height. Just something to consider.
Standard Dish Cable Length
The Standard Dish cord is 50 feet long (15m). So when you account for running the cable inside your vehicle to the router, you can place the dish up to about 45 feet away from the router.
Otherwise, you can purchase the 150-foot or 75-foot extension cord from the Starlink website. But two cables cannot be combined. So 150 feet is still the maximum (not 200).
Our Experience Connecting To Reliable Signal
In our experience, you don’t need to have a perfect view of the sky to receive some internet. But you will probably experience intermittent interruptions. We have used it in places with some large obstructions, like trees, and still manage to get relatively uninterrupted connection.
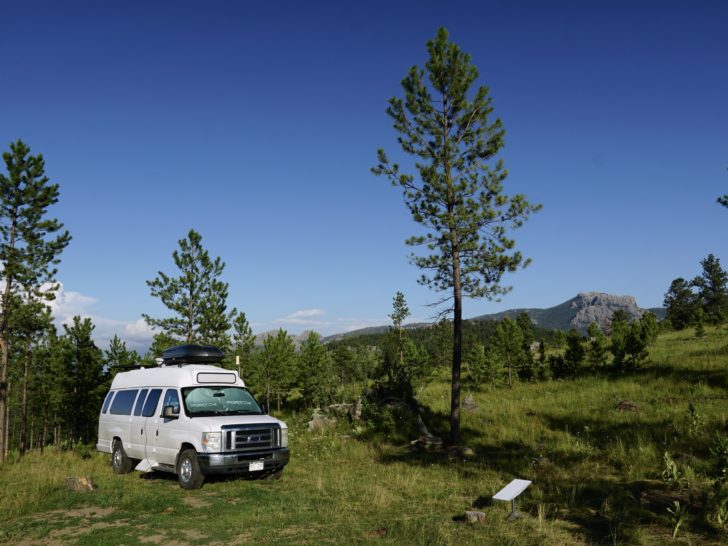
We are Colorado-based nomads who spend most of our time in the Southwestern USA.
Generally, this region of the country is pretty good for Starlink. The mountainous forests in this region are sparsely forested with relatively short trees. And the deserts of the southwest have either short trees or none at all.
As long as we just avoid the most heavily wooded campsites, we usually have success with dish placement.
But in places like the Pacific Northwest with dense forests and tall trees, it may be harder to find campsites with a clear view of the sky.
Mountains and canyons in the distance are not an issue for Starlink. But if you are parked in an especially deep valley or next to a big cliff, you may struggle to maintain an uninterrupted signal.
We also live 100% off-grid with strictly solar power. So even before getting Starlink we already prioritized campsites with few obstructions to maximize our solar collection. So at least for us, avoiding heavily wooded campsites was already common practice.
The Starlink Dish Usually Points North
In our experience, the dish always points north. So using that information, we have been able to plan our dish placement around a northern orientation.
For example, campsites with a line of trees or obstructions to the south have not been an issue.

Custom Starlink Dish Mounts
Some users place the dish up high to get a clear view of the sky. You can place the dish on top of your vehicle to get “above” some potential obstructions.
But personally, I wouldn’t put the dish on top of a vehicle without some way to secure it. There are 4 holes in the corners of the stand that you could use to secure with bolts or similar.
Or there are several Starlink mounts you can use to attach to your vehicle.
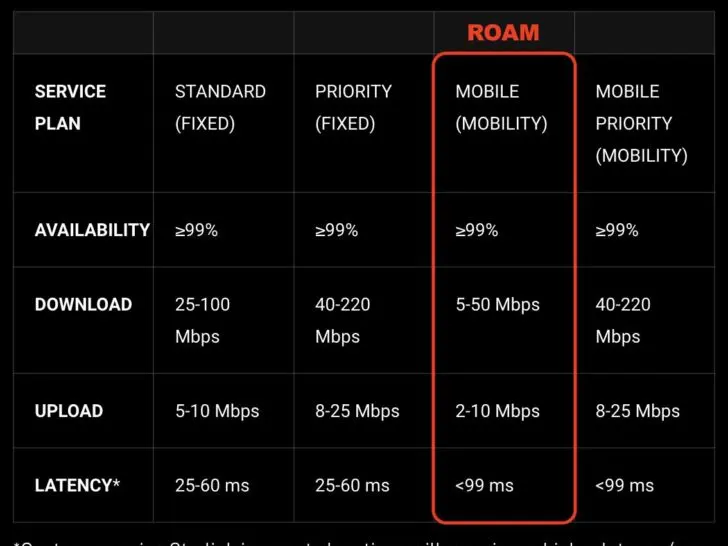
Data And Speeds
Starlink Roam includes unlimited data.
However, the Starlink Roam service is categorized as ‘Best Effort’ or ‘low priority’. Meaning that other users in the same cell with higher priority (residential, business, mobility) can limit your bandwidth at times of high congestion and peak hours.
The advertised data specs of Starlink Roam are:
- Download = 5-50Mbps
- Upload = 2-10Mbps
- Latency = >99ms
In our experience, Starlink Roam does deliver bandwidth and latency within those ranges. The download bandwidth goes above 50Mbps sometimes. But the upload bandwidth never seems to exceed 10Mbps.
And the average latency we experience is about 35 milliseconds.
Low-latency is really the key reason why Starlink is a breakthrough piece of technology. Space-X’s low earth orbit satellites allow data packets to transfer much faster than existing satellite internet services.
This low latency is what allows activities like video conferencing and online gaming without lag.
Just be aware not to confuse the bandwidth and latency that Starlink offers for other plans. Starlink Roam is the lowest tier.
For their stationary and/or priority customers, they offer better speed and bandwidth. So sometimes people may confuse their other service tiers with what Starlink Roam offers.

Opt-In Priority Data
Another option that is worth mentioning is the ability to Opt-In to Mobile Priority Data.
{We have not used or tested this option.}
For $2 per GB, you can opt-in to receive network priority data. This includes network priority, ocean access, in-motion connectivity, and global use.
To activate Mobile Priority Data:
- Log into your account on Starlink.com.
- Then, under ‘Data Usage’,
- Click the toggle switch by ‘Mobile Prioity’.
Power Consumption
Starlink (with the Standard Dish) uses between 50-75 watts of AC power during use.
In our experience, the power usage typically follows this pattern:
When the device first powers up, it usually draws up to about 80 watts for a few seconds while the dish orients itself. But then the power consumption drops to around a continuous average of around 47 watts.

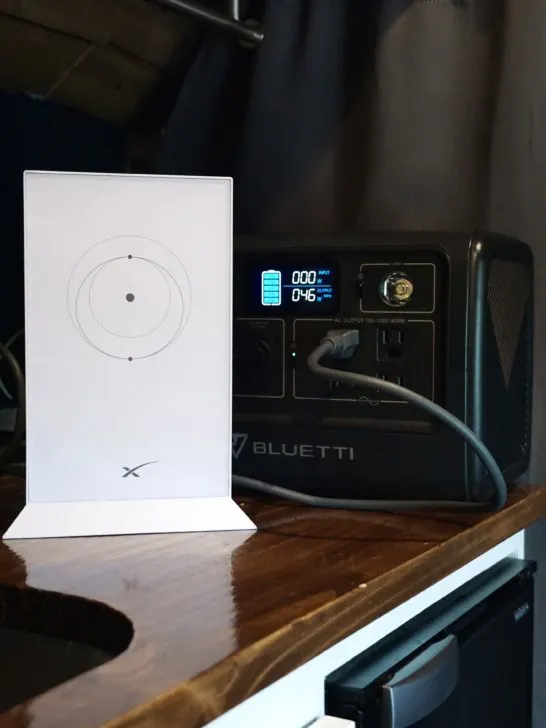
This power consumption is rather significant for smaller off-grid power systems. Especially when using the Starlink all day, and long after the sun goes down.
We have 200Ah (2400Wh) of Lithium (LiFePO4) batteries and a 320-Watt solar panel. With that system, the power consumed by Starlink is very noticeable to us.
To run the Starlink for 10 hours uses roughly 500Wh.
Even in the summer, the addition of Starlink has made it difficult to charge our batteries to 100% daily.
To be clear, we can totally power the Starlink by itself. But it’s just the combination of all the other things we use daily that pushes our batteries to the limit. (i.e. fridge, vent fan, lights, charging phones, charging laptops, water pump, and more).
In the winter months, it’s become even more important that we maximize our solar energy collection (i.e. solar panel tilt, climate selection, etc).
Coincidentally, shortly after we got Starlink the company Bluetti reached out to us for a partnership. So we now have their Bluetti EB70S Portable Power Station with 200-watt folding solar panel (Full Bluetti Review Here). This additional solar power station has greatly reduced the electrical burden of running the Starlink daily.
Can You Power Starlink Roam with DC Power Supply?
Currently, Starlink does not offer a way to power the system with DC power.
However, motivated people have been designing methods for powering Starlink with DC power. But keep in mind that these modifications are not covered by warranty.
User Experience Of Starlink Roam
So, what is it like actually using the Starlink on a daily basis?
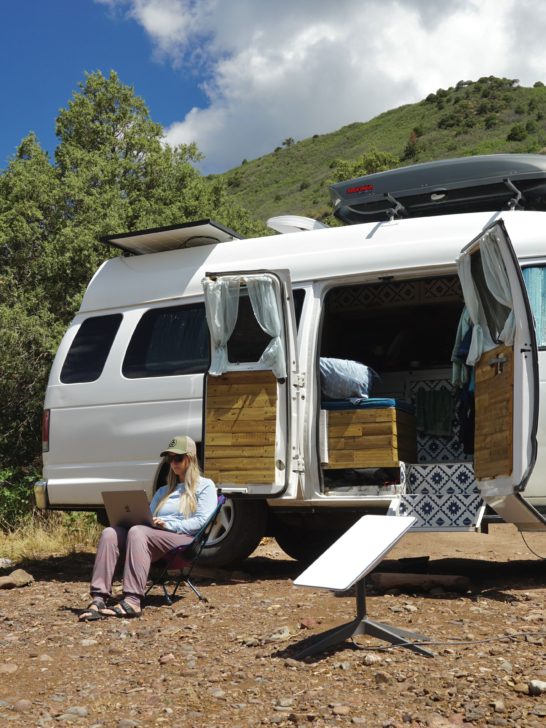
We use the Starlink Roam while living full-time out of our campervan. Which requires some special steps for use.
In my opinion, Starlink has not been designed well for mobile users.
No meaningful consideration has been given to people who need to travel with the hardware.
Most Starlink users install the dish at their home or business, and thus don’t deal with frequent dish placement, assembly, and transporting of the hardware.
The Starlink Standard Dish is not permanently mounted, so we need to place the dish outside for every use.
And admittedly it’s a little bit of a chore to deploy and store the dish each time. Especially going outside at night to bring it inside, because, ya know, sometimes the dark is scary.
And also the dish is hard to separate from the base because it’s a very snug fit. Though it seems to be getting slightly easier as the paint on the ‘leg’ wears down a bit.

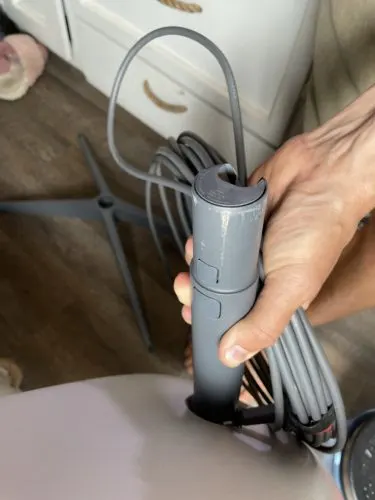
The cord itself can be a bit unruly unless you coil it each time. We added a little velcro strap to help keep the coiled cord tidy when not in use.
And when using it outside on the ground at campsites and such, the cord and dish collect a fair bit of dirt from being out in the elements. We keep a dedicated rag for periodically wiping the hardware clean.
And you need some way to run the cord inside your vehicle. This can be an open window, door, or dedicated entry port. Starlink makes some official entry glands or you can create a DIY solution.
We run the cord through a side window of your camper van. It just goes through a small hole in the screen. The stock Ford E-Series windows are nice because they can stay open even when it’s raining.
Storage & Transport
The Standard Dish is too big and awkwardly shaped to keep assembled in our van. So when we are driving, we opt to disassemble and stack the dish components so that it takes up less space.
You can store the Starlink hardware in an official Starlink rigid travel case ($250), any number of generic storage tubs, or even just keep the box it was delivered in. But personally, all of those options take up more space than we like and/or cost too much.
We are much more in favor of a cheap DIY solution, that takes up a minimal amount of space.
Here is the process we have come up with for transporting the Starlink hardware regularly.
Starlink has an option to ‘Stow’ the dish, which basically tilts the dish to its maximum vertical angle. This is how Space-X ships the Starlink to you, and how you are instructed to return the dish for service, warranty, etc.

However, we have decided to ‘Stow’ the dish every time we drive somewhere. This has to be done through the Starlink App (make sure you don’t have a VPN on).
Also, don’t try to tilt the dish manually by forcing it with your hands. This can damage the internal motors.
Personally, we wish the leg could tilt to be completely flush with the dish so that it would compress even flatter.

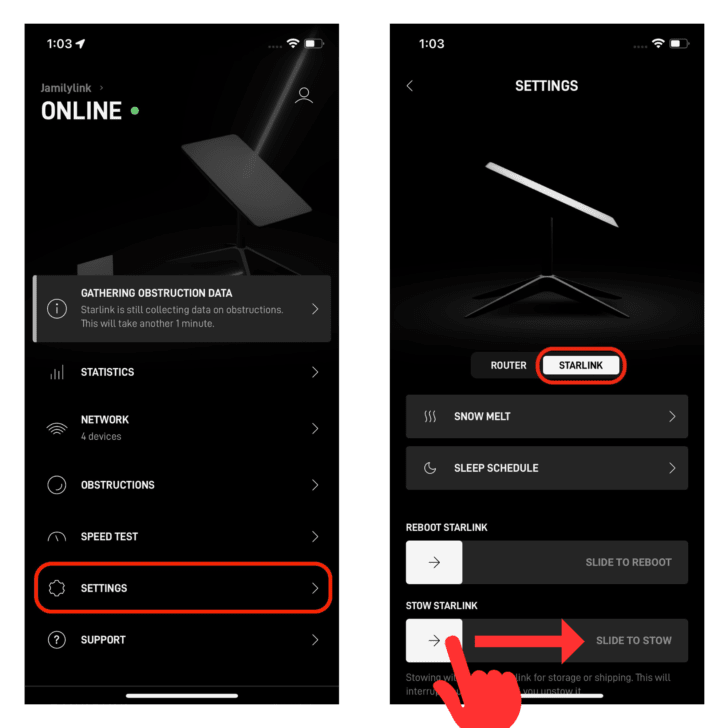
- First, we enable ‘Stow’ mode.
- Disconnect the cord and coil it up.
- Separate the dish from the stand.
- Lay the dish face down.
- Lay the stand on top of the dish.
- Coil the cord and lay on top.
- Place the router and AC power cord on top.
Then the entire kit is stored in the headliner (above the cab). It’s surrounded by enough other things (hiking packs, etc.) that it’s not going to slide around while we are driving.
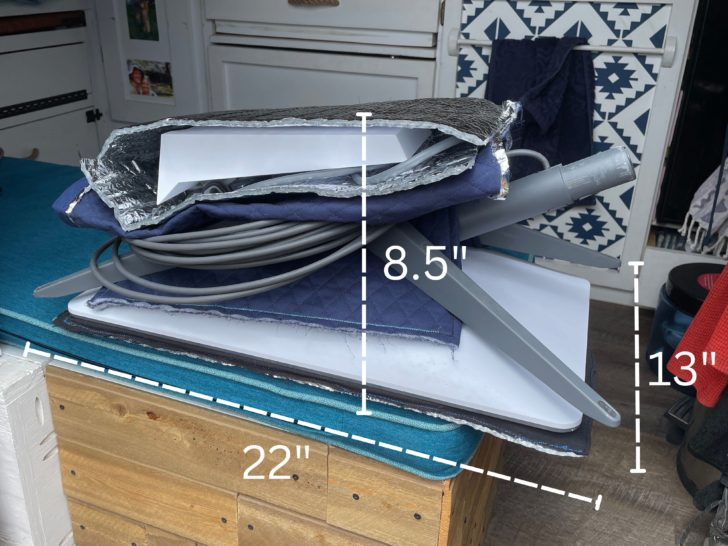
When the Starlink hardware is detached and stacked in this manner, here are the dimensions.
- Length: 22” (558.8 mm)
- Width: 13” (330m mm)
- Height: 8.5” (215 mm)
We think this is the most efficient and reasonably safe way to transport the Stalink hardware when not in use. It won’t really ever leave our campervan, so we don’t need to worry about travel cases.
Note: We created some DIY padding using some spare fabric and bubble wrap (Reflectix) to help cushion and protect the Starlink components. Life on the road can be rough and bumpy with a lot of vibration. So we take extra steps to protect the Starlink hardware.
We place a piece of Reflectix down first before laying the dish on top. We also place a piece of fabric between the dish and the stand to prevent abrasion. And lastly, we package the Starlink Router in a DIY padded sleeve.
Is it overkill? Not sure, but to protect our $600 investment, they seem like easy and worthwhile precautions.
Mounting The Starlink Router
The sleek angular shape of the Starlink router may look cool, but it makes it a pain to permanently mount in a moving vehicle.
Again, SpaceX has given no thought to people who might want to permanently mount the router. There are no mounting holes/brackets, and no side is flush to be mounted on a wall.
So users have been left up to their own DIY solutions to mount the router. A quick Google search turns up some possible solutions.
Personally, we just place the Starlink Router on the counter when in use. But it would definitely fall over when driving, so we store it each time.
Starlink Router Performance
We are pleased with the performance of the Starlink Router. But in a tiny living space, like our DIY campervan, you wouldn’t expect it to have trouble with range.
If you are using Starlink Roam in a larger RV, fifth-wheel, or camper trailer, then you should consider placing the router in a centralized location.
Outside of our van, the signal seems to reach about 50 feet maximum. I’ve had no issues connecting to our starlink Wifi network outside our van in the immediate vicinity.
Placing The Starlink Dish Outside
Placing the Starlink dish outside every day requires choosing the best location (as we discussed earlier). Generally, just look for the place near our van with the clearest view of the sky. And with an emphasis on eliminating obstructions to the north.
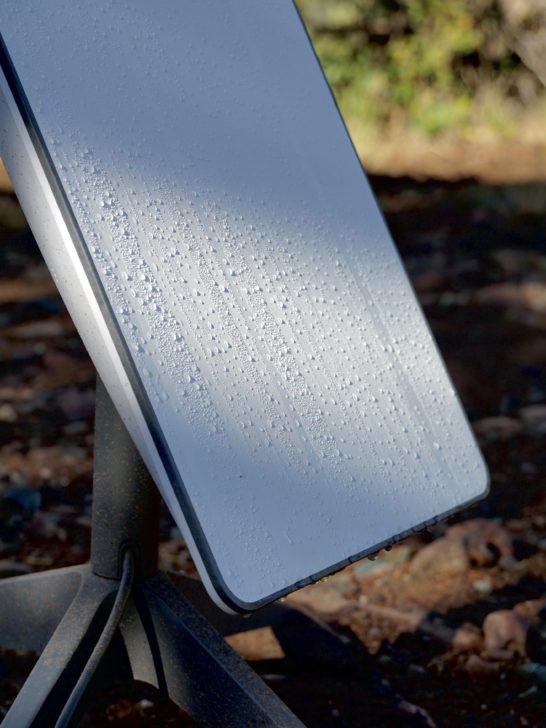
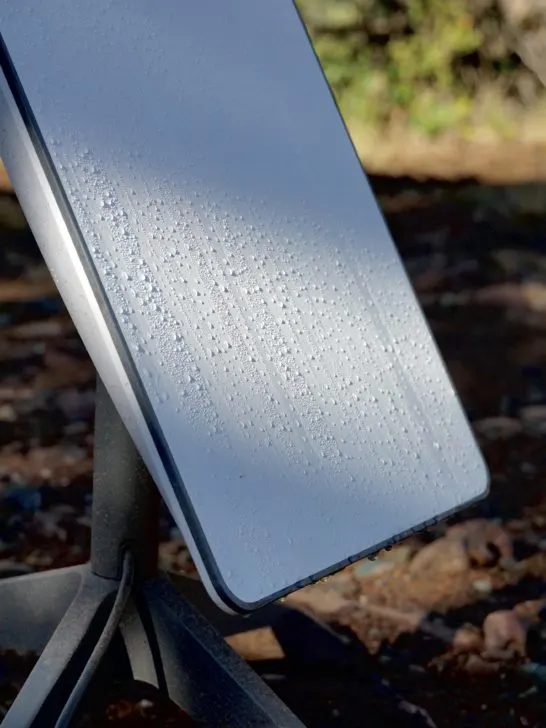
The Starlink Standard Dish is relatively weather-proof, so you can typically leave it outside during storms. The only weather that poses a unique concern is hail and lightning. During either of those we think it’s wise to bring the dish inside temporarily.
Starlink service can be affected by bad weather like heavy rain, heavy snow, or other water molecules in the air.
However, these interruptions to reliable internet connection typically only last for a few seconds. So most Starlink users likely won’t notice unless they are on a constant connection like video conferencing or gaming.
And Starlink has added a new feature that actually allows your dish to melt snow off of it. You can find this setting in the Starlink App.
Leaving The Starlink Dish Out Overnight
Aside from the aforementioned weather and potential theft, there is no reason you cannot just leave the Starlink dish outside overnight.
This is more of just a personal risk-tolerance decision.
If we are in a very remote area with little to no other people, we are comfortable leaving the dish out overnight. But in places with more people, we usually bring it inside the van overnight. And especially if we are close to urban areas.
The Starlink Dish could be an easy target for thieves. However, the dish is sort of useless for anyone who doesn’t pay for Starlink service.
And transferring ownership of a Starlink Dish is a little more complicated than a simple transaction. But thieves don’t always consider the logistical implications of the things they steal.
If we know that we are going to use the Starlink the next day, we won’t store it. We just leave the dish assembled and place it in the front passenger seat.
How To Pause Starlink Roam Service
One very important facet of Starlink Roam is the ability to pause and resume service at any time. This is different from other types of Starlink plans that don’t offer this flexibility.
Based on other travel plans, we don’t need Starlink service for every month of the year.
To pause Starlink Roam:
- Log into your account on Starlink.com.
- Then, under ‘Your Starlinks’, click ‘Manage’.
- Click ‘Pause Service’.
Unfortunately, if you pause in the middle of a billing cycle, you will not be refunded any money from that billing cycle. (And you do still have access to the service for the rest of that cycle.)
But when you un-pause your service, you will be charged a pro-rated rate based on the time remaining on your pre-determined account billing cycle.
So unless you can time your service pauses perfectly with your monthly billing cycle, you do end up paying for some service that you don’t need. Not a perfect system from the customer’s perspective.
But again, it’s nice to be able to pause in some way.
Conclusion | Starlink Roam Review: Satellite-Based Internet
Here’s our final verdict for Starlink Roam.
Reminder: we have Starlink Roam with the ‘Standard Dish’ and ‘Regional Service‘. It costs $150/mo and $599 for the hardware.
And keep in mind that we use Starlink almost exclusively in the Western United States. The network congestion in the region you use it may yield different speeds and results.
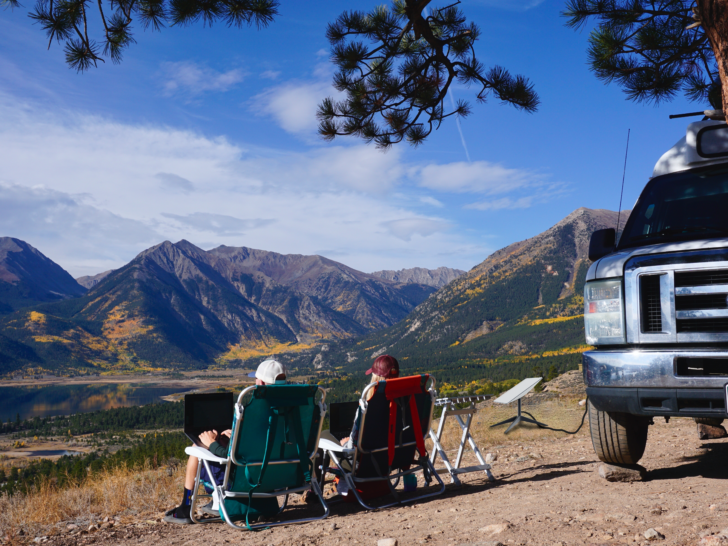

Since we work remotely on this blog, we have an extra incentive to stay connected. And we love traveling to remote locations, mountains, forests, and deserts. Experiencing adventures in nature, far off-grid is pretty much our primary motivation for living vanlife.
Starlink represents a massive change in lifestyle for us. It provides the freedom to work closer to where we play.
Starlink vs The Alternatives
But often in life, decisions are made in the context of the other available options.
So prior to Starlink Internet, we exclusively used mobile hotspot data with our Verizon cell phone plans. Additionally, we have a WeBoost Cell Signal Booster to help improve cellular signal (Full WeBoost Review Here).
And worth noting that the WeBoost only uses about 10 watts, plus some extra battery required to use our cell phones as a hotspot.
With Starlink, we can save some money by downgrading our cell phone plans to a lower tier. However, we still need some hotspot data for the few times we are not comfortable using Starlink (Walmart parking lots, street parking, etc.).
Without getting too deep into the weeds about cell phone plan terms/pricing. Here are some tables that show the basic cost breakdown of ‘what we pay’ vs. ‘what we get’.
| Service | Cost | Data |
| Two Verizon Phone Plans | $94/mo | 160GB (mobile hotspot) |
| WeBoost Cell Signal Booster (10 Watts) | $500 (one-time fee) |
| Service | Cost | Data |
| Two Verizon Phone Plans | $69/mo | 30GB (mobile hotspot) |
| Starlink Roam (50 Watts) | $150/mo | Unlimited Data |
| Total | $219/mo | Unlimited Data + 30GB hotspot |
Despite the fact that we like the WeBoost and think that it is a worthy choice to help with vanlife internet. (We lived with that system for years). Relying on cell signal coverage is still quite limiting, even if the WeBoost helps alleviate that a little bit.
In the past, we spent a fair bit of time driving to and from campsites to get cell service or wifi in town. So being able to stay in one place and work remotely does save some gas money.
And the unlimited data included with Starlink removes the stress of rationing a limited amount of mobile hotspot data. We can stream shows, play online video games, upload photos to the cloud, and more; all without worrying about hitting a data cap.
Previously, syncing our photos and videos with iCloud was not really feasible with our limited hotpot data (We take tons of photos and videos for our blog and our Youtube Channel).
However, Starlink’s upload bandwidth cap at 10Mbps makes it still a very slow process to sync data with the cloud. We wish Starlink would raise the Upload bandwidth cap for Roam, even if it was only dependent on network congestion.
Overall, despite the high cost of Starlink Roam, we think it’s worth the money for us. It gives us more freedom to work from almost anywhere.
Learn more about Starlink Roam here.
Help Share This ‘Starlink Roam Review’ On Pinterest!